Lecture
A video card is a computer component that is required to display images on a screen.
If capacitors, diodes, fuses, mosfets, shimcontrollers are swollen and pierced, a new one is replaced and installed, but if the video chip or memory chips are faulty, then it may be inappropriate to carry out repairs.
Any component of the video card, including conductive and contact elements, can be faulty.
If the following “symptoms” appear on the computer, it means that the GPU or memory chips are defective:
1) The cause of distortion or so-called artifacts can be overheating, its failure or improperly installed diver. The first thing you can do is try reinstalling the drivers, performing a gentle cleaning, replacing the thermal paste.
Graphic distortions during the loading of the operating system can cause damage to the video controller, GPU, memory chips or connector. You can check the performance of the video card on another computer.
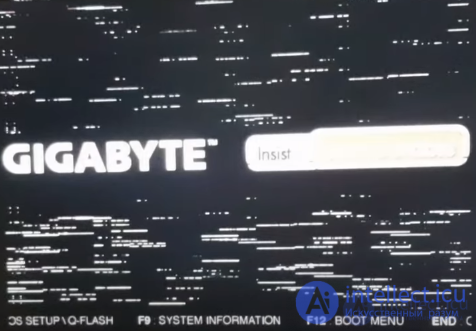
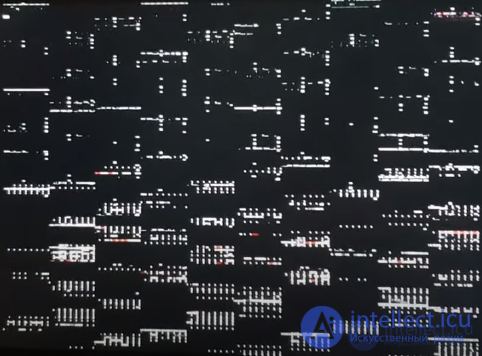
Figure 1 a, b
2) Video card, with the problem "PC does not turn on with it". Card Not heated, not soldered, but with a short circuit on the 12V line. Most likely the reason for the short circuit is a broken composite mosfet at some phase of the video processor power supply. The easiest way to find the culprit is by measuring the resistance of the gates to the ground. Or with a thermal imager.
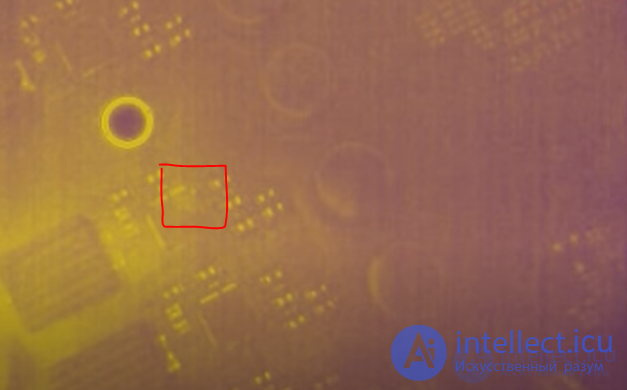
Figure 2
Slight heating of the mofet visible with a thermal imager
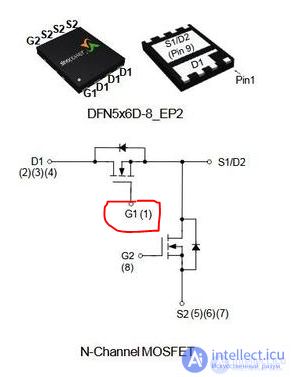
Figure 3
We assume that the upper shoulder of the composite mosfet is pierced. G1 shutter (opposite point). We measure the resistance at G1 in all phases. (The norm is in the region of 10 kOhm) In the second phase, the resistance at the gate G1 is only about 20 Ohm. This is very small. We solder the compound mosfet and make sure that the short circuit on the 12V line has disappeared.
We solder the same mosfet, the card consumption is normal. The restored phase of the video processor power supply and all other phases are working properly.
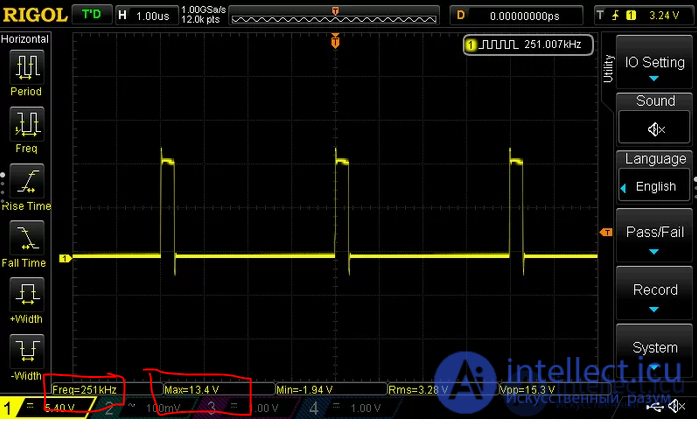
Figure 4
It is impossible to accurately determine the breakdown by the photo, by the description of the problem, or by the model of the device. One and the same external manifestation of a malfunction can be caused by a dozen completely different reasons. To say why a computer, laptop or video card "does not turn on", "does not show", "turns on and off immediately", you need to carry out diagnostics - that is, make all the necessary measurements on the board.
Competent diagnostics will save the equipment from the consequences of unskilled intervention, and the owner from unnecessary repair costs after unsuccessful picking by amateurs.

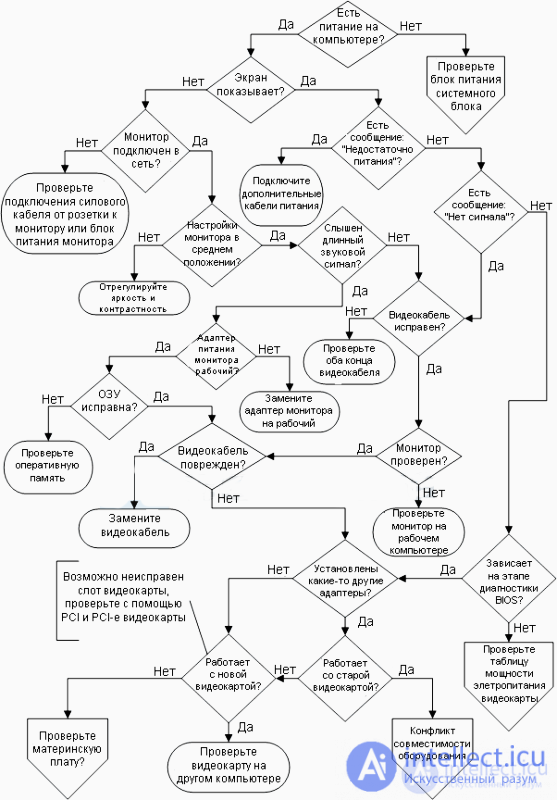
Figure 5 Algorithm for troubleshooting a video card and monitor

Is the system powered? Is there any noise from the fans, the spinning of the platters, or any squeaks? Are the lights on the front of the case on? And it's about powering the system, not the monitor. If the system is not receiving power, or you are not sure whether or not power is available, go to the Power Supply Failure flowchart.
Is there anything visible on the screen of your cathode ray (CRT) or liquid crystal (LCD) monitor? It doesn't have to be the Windows desktop. At this stage, a text or a message in a crawl line will pass for "something". In the next few steps along each route, you will determine whether the problem is due to power or a bad connection to the monitor or graphics card.
Are you sure the monitor is on and powered? Do not laugh.All modern monitors have something like a status indicator - usually on the right or inside the power button - that tells you if the device is being powered or not. Even older CRT monitors usually have a status LED that stays on when the monitor is supplied with power and may blink or change color depending on whether an active graphics card is detected in the system. Large CRT monitors, as a rule, emit a specific sound when the power is turned on - first, an "electric" click is heard, which gradually fades away, and then such a sound, as if someone pulled on a tightly stretched pharmaceutical rubber band. Both types of monitors (CRT and LCD) generally use a detachable power cord, so make sure the male connector fits snugly in the power port of the monitor. If the monitor still shows no signs of life,try plugging the power cord into a different outlet.
You may also come across an old LCD display with an external PSU similar to the one found on laptop power cords. If you have just such an LCD monitor, and it is not supplied with power, use a multimeter to measure the output current of this power supply unit - it should be approximately equal to the nominal value (it is indicated in the documentation or on the power supply unit itself). LCD displays are designed to take up a minimum of space on the table, so the power cord is usually connected to them vertically, i.e. parallel to the display. This makes it difficult to check the connection of the power connector - for this, the monitor must be placed on a table or raised above your head.
Multi-monitor systems are becoming increasingly popular among advanced users who either want to increase the screen size in this way, or look at different things in different monitors. In such systems, there is always one main video output, and for systems where you have several video outputs from one video card, and for systems where there are several video cards. When solving a dead screen problem, concentrate on getting the picture on the main monitor - ie. on what is active at boot time. Try connecting the main video output to multiple monitors in turn, as the probability that two monitors have broken at once is negligible.
If you are using an HDTV monitor as the main monitor, and especially if this is a new build or you have just upgraded the system, first try returning the video using a standard monitor (if available). HDTV monitors do not always do a good job of emulating computer monitors, they were not created for this purpose. In order for the HDTV monitor connected to the new video card to work properly, sometimes it is necessary to install updates from NVIDIA, AMD or Intel, set the settings on the HDTV monitor using the remote control, or connect a new HDMI cable. If your PC is unable to automatically detect the screen resolution and refresh rate that your HDTV monitor supports, you will first need to connect a regular monitor to configure more appropriate settings in Windows. Before we continuefind out the maximum refresh rate supported by your HDTV monitor, because setting this value too high may damage the TV. A couple of times I've heard stories of HDTV display breakdown after upgrading Windows. This solution requires the most recent drivers and sometimes the most recent BIOS.
If the only message shown on the screen is something with the word "power", then it most likely wants to tell you that the PC video card needs additional power to work. The video card is fine (it generates a message), but the motherboard slot is not receiving enough power to perform its function normally. Both modern PCI Express graphics cards and high-performance AGP graphics cards (predecessors of PCI Express) usually require one or more wires connected to the PSU. If you have just assembled your PC, then the absence of a video signal may indicate that you forgot to connect the wire to the power supply unit or simply did not connect it well enough. If this is a PC whose case you just opened, then it may be that you accidentally loosened the power cable connection. But if at the time of the last successful boot the case was closed, then the case may bein damage to the power supply circuit or hardware malfunction of the video card.
These auxiliary power wires can be of different shapes - from old Molex 4x1 connectors, which have been used in PCs since the 80s, to special power connectors for PCI Express video cards, which are equipped with new ATX-type PSUs. Some video cards support different types of power wires (and the connectors for them do not take up too much space on the card), while some, on the contrary, require an adapter to convert the power from the existing connector into a format that the video card understands. If your PSU has an 8-pin PCI Express connector, and your video card requires a 6-pin connector, you can buy an inexpensive adapter with 8 pins on one side and 6 (or 6 + 2) pins on the other. Or you can modify the cable connector according to the instructions on the video card manufacturer's website.
Many newer monitors, when healthy and receiving enough power, will display a message like “No signal source” or “Attach video signal”. These messages will appear even if your PC or video card breaks down. This, in my opinion, is one of the most useful innovations in monitor technology. is clear evidence that the monitor / display is in order and could show a picture if there was a video signal. Unfortunately, older monitors and cheap models often do not show any message at all, and in some cases this message is not visible due to a black screen resulting from a malfunctioning video card or a boot failure.
At the moment, there are several types of video cables that differ from each other depending on the generation of technology. The older ones support up to 15 pins (3 rows of 5 pins in each connector) for analog video transmission and have been in use since the early 90s. Modern DVI cables (from the English "digital video interface", ie "digital video interface") are of different types - they can have up to 24 pins for digital data transmission and 5 optional pins for old analog signals. An HDMI cable (from the English "high definition multimedia interface", ie "interface for high definition multimedia") is equipped with a connector (it can be of 5 types) with 19 or 29 pins; it supports miniature video devices, cameras and displays. HDMI is backward compatible with DVI,therefore, you can buy HDMI / DVI and DVI / HDMI adapters if necessary.
But whichever technology you use, the connector must be placed exactly in (or on) the video jack on the back of the PC. There are pressure screws on either side of the connector that must be tightened all the way, but not too tight. The same should be done for the connector on the other end of the cable - the one that is connected to the monitor or HDTV-TV. If you recently moved your PC or changed a component that required you to disconnect one of the connections, remove that connector and check it (and the port) for any damage.
Are there any squeaks heard? If the PC is "healthy", then it should beep only once - when turning on and passing the POST test (that is, "testing when turning on"). Although different BIOS designers use different beeps for reporting faults, a repeating beep sequence (3 or 9 in a row) is a common indicator of a graphics card failure. But do not be fooled by the endless series of squeaks that may appear due to the fact that when you boot your PC, you accidentally lean your elbows on the keyboard and hold down a key.
Check if the video card is installed correctly, but before these manipulations, be sure to disconnect the power supply. If you have more than one video card installed, remove the second video card, and if the screen is still "dead", replace the main video card with the second one. Likewise, if you have a discrete video card in addition to an integrated video card, which is used to improve video performance, remove it and "resurrect" the monitor using the integrated GPU - even if you need to change the position of a special jumper or switch to enable it on the motherboard. When disconnecting a graphics card, be sure to unhook the retaining clip (if equipped) and always remove the card completely from the slot. When putting the video card in place, insert it evenly - applying the same force on both the front and rear ends. Also notethat if you place a screw or a rail in the back of the case for pressing the video card, then as a result its front part (that is, the part that is closer to the front of the case) can crawl out of the slot a few millimeters and turn off because of this. But with a pressure latch, this will not be a problem. After installing the video card, be sure to replace the latch.
If, after reinstalling the video card, the squeaks did not disappear, then the matter is either a faulty video card or faulty RAM memory. Therefore, at this stage, you can try to turn off the power and reinstall the RAM memory, without proceeding yet to the full diagnostics of the "motherboard" The BIOS has beeps to indicate failures in completely different components, but over time, most of these components have been built into the motherboard chipset, so they cannot be replaced (unless you have to change the entire motherboard).
If reinstalling the RAM memory on the motherboard did not eliminate the squeaks, then you can additionally check the RAM memory by installing it in another PC or by starting the system with a minimum number of memory modules. Depending on the motherboard and the type of DIMMs connected to it (single-sided, double-sided), several DIMMs can be installed in the PC, and you may need to connect only one DIMM to bank 0 to boot. DIMM sockets are marked on the motherboard with text or color codes - they represent banks.
If you want to install the maximum number of DIMM modules in a motherboard with several banks operating in 2- or 3-channel mode, then they will need to be selected correctly. In "ganged" mode, having two 64-bit memory modules on the same bus means that one processor has access to the 128-bit memory bus. But modern motherboards often use the “unganged” mode, in which multicore (and multithreaded) processors can simultaneously access 64-bit memory, thus freeing up an additional data bus for the system.
Check the entire length of the video cable for damage in the outer protective jacket - and if there is any, this could indicate that the cable was pinched and possibly damaged. Pin connectors often become unusable due to damaged contacts, but HDMI connectors are made in such a way that they are quite difficult to damage (for this you just need to take a screwdriver, stick it inside the connector and turn it several times). The pins of the DVI connector are stronger than the old analog VGA connectors, and there is a dedicated section with analog pins on one side of the DVI connector, so there is virtually no chance of you plugging in the connector incorrectly. As a rule, contacts become unusable when you try to plug in the VGA connector blindly, while looking in some other direction.
Inspect the pins carefully to see if they are bent, touching other pins, or pressed into the bottom of the connector. If the connector lacks contacts, then this is normal - often the monitor that came with this cable simply does not use the contacts for the monitor ID and other signals. It's good if you have an extra video cable or a monitor with a removable video cable. sometimes you come across old CRT monitors that use a cable that cannot be disconnected from the monitor side. Therefore, such a cable can only be inspected along its entire length for possible damage.
If you notice a bent contact in the connector, you can straighten it using forceps or pliers, but this should be done very slowly. If the contact breaks, you can buy a new connector and attach it to the cable using a soldering iron (and endless patience). To get it right, you'll also need a heat gun and heat shrink tubing. The last time I did such a job, I spent almost three hours on it, but my soldering iron had a tip that was inconvenient to work with three rows of contacts. I do not recommend making your own DVI connector.
Check the monitor on another PC or laptop. If you decide to use your laptop and it cannot automatically detect an external monitor when it boots up, use the function keys {{| Fn]] (located at the top of the keyboard) to tell the laptop to switch to the external monitor. The site https://intellect.icu says about it. Remember that this test is only needed to understand if the monitor is working, so it doesn't matter if the image is crooked and out of tune. If you've connected your monitor to a working PC, but it still doesn't work, then it's the monitor, not the PC. You can also try to shine a bright light on the LCD monitor at an angle - if you see a faint image, then the problem is in the backlight or the inverter that powers the backlight. If you hear a loud buzzing noise from the LCD monitor,this is usually a fault in the inverter circuit, but it may take a few more years before the inverter is completely covered, during which the buzzing becomes louder.
Does the integrated GPU keep reporting itself when the PC boots up even when an external video card is connected, be it PCI Express, old AGP or regular PCI? Then it needs to be disabled - either by changing the video settings in the CMOS settings, or using a switch / jumper on the motherboard. Sometimes the built-in GPU is switched to CMOS settings "On" or "Enabled" and you need to change it to "Off" or "Disabled" . If it is set to “Auto” instead (for automatic detection), then this setting obviously does not work, so it must also be changed to “Off” or “Disabled” .
Does the system open the BIOS screen and then freeze? By "BIOS screen" I mean text information or graphics from the manufacturer (video card or "motherboard") that appears on the monitor at the beginning of the PC boot. In this case, the cause of the freeze is rarely related to video, but a conflict between the video card and another expansion card connected to the motherboard is possible.
Does the fan of the heat sink of the video card or integrated GPU become too loud or, even worse, stop working at all? If the fan is OK, the problem is rather video performance, so skip to the appropriate block diagram, which is called “Video Performance”.
A modern video card that is not equipped with a cooling system breaks down very quickly, and one of the symptoms of this problem is just low performance, since the GPU heats up and starts to skip some of the machine cycles (and therefore reduce performance) in order to reduce heat generation. Some fans can be changed (you just need to find a replacement of a suitable size), and in order to determine the distance between the screws, you usually need a tape measure with millimeter marks. In some cases, it is necessary to remove the entire active cooling system, which creates two difficulties. First, you need to find a replacement that is the same size, and second, you need to remove the old cooling system from the GPU, which is often held in place with heat-transmitting glue.
If the cooling system is not attached with either a spring clip or screws, you just have to wait until the video card cools down and the glue becomes less sticky (some people at this stage just put the video card in a bag, and then briefly in the refrigerator), and then slowly wedge in with a piece of thin, hard plastic on the edge. If the glue has not collapsed, then you may need to pry off the edge of the cooling system with a screwdriver, simultaneously squeezing a piece of plastic inside (you can use, for example, a discount card for this), while cutting through the glue and slightly tearing off the cooling system. But be careful as if you press too hard, the GPU can break.
Does your motherboard support two video cards (talking about technology like NVIDIA SLI or AMD Crossfire)? Unplug the PSU, remove one of the video cards, and then turn on the PSU again. Note that older motherboards that support SLI or Crossfire may have a module like the "SLI / XFIRE Switch Card" that plugs into the second x16 slot when using one video card, allowing this single video card to use all 16 bus lanes. If the screen still freezes or remains black when booting, try using a different graphics card.
Both AMD and NVIDIA have online databases to resolve issues with their high-performance graphics cards.
Did you install expansion cards right before the problem appeared? Turn off the power and start removing all cards one by one, turning the power back on after each disconnection. A freeze on the BIOS screen usually indicates a conflict of expansion cards, but if disconnecting other cards does not solve the problem, go to the flowchart "Malfunctioning motherboard, processor and RAM."
When all expansion cards are disconnected, do you just light up the screen, or does the boot reach at least the BIOS screen? If yes, then the problem is either that the faulty expansion card does not allow the bus to work normally, or that the expansion card conflicts with the video card. In any case, you can again try plugging back the expansion cards one by one, turning on the power after each installation, i.e. solving the problem by eliminating the culprit. Don't forget to unplug your PC from the power supply before going inside the case again.
Another reason why a video card may not work is its incompatibility with the "motherboard". If your motherboard is old enough, it may happen that a x16 PCIe 3.0 or PCIe 2.1 video card cannot be inserted into it. PCI Express graphics cards are generally backward compatible (although data transfer will be slower), but unfortunately not all. Some PCIe 2.1 video cards are not compatible with PCIe 1.0 at all, unless the motherboard manufacturer has released a BIOS update that changes the chipset settings.
If the new component of your PC is just a "motherboard", then first (before throwing it out) try the "faulty" video card in another PC, because it may simply be a lack of compatibility between devices. If installing a new video card did not solve the problem of the "dead" screen, then the problem is probably a faulty "motherboard", even if no warning squeaks are heard. Therefore, go to the flowchart "Motherboard, Processor, and RAM Malfunction".
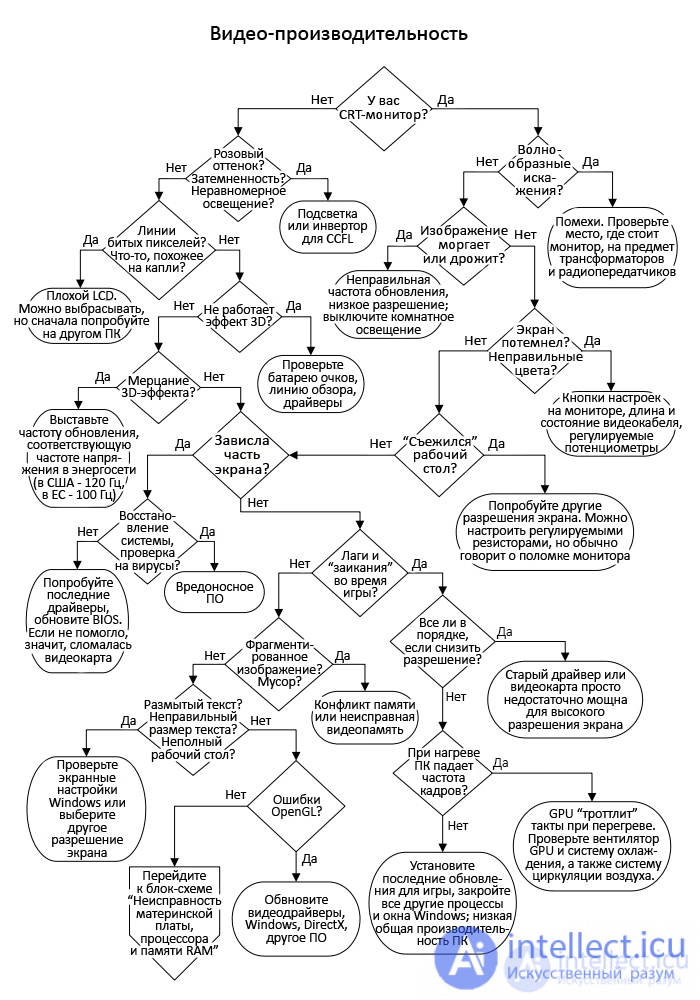
Figure Diagnosing video performance problems
Is your monitor a CRT monitor (i.e. a cathode ray tube monitor)? Some CRT monitors are still in vogue, especially large, high-performance models that cost their owners a lot of money and offer some advantages over various flat monitors. CRT technology uses high frequency waves (for an analog signal) and high voltage to selectively paint dots of phosphor onto the glass surface of a display tube using an electron beam. Accordingly, the problems of a monitor created using this technology will be completely different from those of an LCD monitor.
Is it just wavy distortion? Or does the image also have something like a "scan bar"? The most common cause of this problem is magnetic interference, which typically occurs from a transformer located above or below the monitor (such as an inkjet power supply or other peripheral device). In addition, distortion and scanning stripes can be caused by an active source of RF signals (such as a radio transmitter) or high current flowing through electrical wiring hidden in the wall.
If eliminating possible sources of interference or temporarily moving the monitor to another room does not correct the problem, then it is likely that some part of the control electronics is faulty, and it is best to contact a qualified CRT monitor technician to identify and replace it. But, of course, before taking the monitor to repair, it is better to try it on another PC. Another (less likely) cause of the problem is poor power regulation. If electricity to your home comes from old generation wind turbines that are not connected to the main power grid (this can happen, for example, if you live on an island), then check if this power source provides the required AC frequency: in the USA it is 60 Hz , and in the EU - 50 Hz.
When you look at your monitor, do you feel like they want to sell you something with the help of "subconscious" advertising? Try looking at a monitor from the opposite end of the room or out of the corner of your eye, because peripheral vision is more susceptible to rapid movement against a static background. The most common cause of a flickering image is a horizontal frequency lag or a lagging pattern of fluorescent lighting in a room.
Therefore, first, try to extinguish all light sources in the room. Is the flicker gone? If not, and if you do not want to change the screen resolution, then you can try changing the lighting or the location of the monitor relative to the room lighting. Second, try lowering your Windows screen resolution. The higher the screen resolution, the more difficult it is for the video card and monitor to maintain a given horizontal frequency. Therefore, if the resolution is at the maximum, then old video cards often do not stand it, and the refresh rate drops below 60 Hz.
Since the input signal for CRT monitors is an analog RGB signal (R is red, G is green, B is blue), the image may be affected by the length and physical condition of the video cable. If everything is simple with digital technology (the signal either passes or does not), then with analog technology things are different (the signal may deteriorate, and with it the quality of the picture). Thus, if you need a good video cable for an analog signal, then it should be no longer than 1.8 m. However, many sellers will gladly suck in longer cables for you, but the result is unlikely to please you. If you want to increase the brightness on your CRT monitor to compensate for blackout caused by a long cable, then don't be surprised if you hear a whistle from a capacitor or transformer - this means the monitor is overloading.If the video cable was clamped by a box or somewhere at the table, etc., then you can improve the picture quality by decreasing the value of one of the main colors.
All CRT monitors are factory set for brightness, contrast, hue, color balance, and all other color-related parameters. If you are dealing with a more modern monitor, then it can be fully adjusted through the user settings, but debugging an analog signal usually requires dealing with adjustable potentiometers. This adjustment should be done with a plastic (i.e. non-conductive) screwdriver and only by experienced technicians. in the process, you will need to deal with a line transformer under voltage above 10 thousand volts. If you have completely lost one of the primary colors, then this means, as a rule, that the matter is in a malfunction of one of the color "guns" in the cathode-ray tube, and such a monitor is no longer worth repairing. However,before that, you can try the monitor on another PC - in case the matter is in the video card, which has one of the channels on the digital-to-analog converter broken.
If the Windows desktop does not reach the edges of the screen, this can be adjusted using the buttons on the front of the monitor. It's no secret that when you change the resolution in Windows using older video cards and CRT monitors, the desktop may change in size or shift to the side. And if you cannot return the desktop to the center or align to the edges of the screen using the control buttons, you can try setting a different resolution in Windows. If you come across an old monitor with a "shriveled", usually asymmetrical image, then you can hardly return it to normal using the on-screen settings. This is a clear sign that the monitor is damaged, but as mentioned above, an experienced technician can restore symmetry by adjusting the adjustable resistors with a plastic screwdriver.
Is the image okay except the colors are pinkish or unevenly lit? If you have an OLED monitor (organic light-emitting diode), skip this decision point. Think of an LCD monitor as an electronic color film. If you remember 35mm slides that were very popular, then you will also remember how difficult it was to see such an image without an overhead projector or a backlit table. So the light source that turns "LCD-film" into a bright display is called "backlight". It can be either CCFL-backlight (from the English "cold cathode fluorescent lamp", ie "cold cathode lamp"), or a strip of LEDs. Both LEDs and CCFL backlights can last a long time,but to turn on the CCFL backlight, a special power source is required - an inverter, which generates a high frequency high voltage electrical signal.
If the LCD display shows only a barely noticeable image, which is visible only if a source of bright light is directed at an angle at the display, then this means that the backlight does not work. If all the elements of the image have turned pink, then the problem is probably a faulty CCFL tube. If one of the edges of the screen darkens, then it is a faulty tube, inverter or LED (if you have an LED backlight). If the dimming is in the center of the screen, then it is most likely a faulty LED backlight. The LED backlight power supply is rarely the culprit for this problem. to ensure full brightness, it supplies a constant current in a continuous mode, and when dimmed, in an intermittent one.
Many LCD monitor problems are caused by matrix malfunction. LCD monitor manufacturers usually have a standard for the number of "dead" or "stuck" pixels, after which the monitor can be considered defective and claim a return under warranty. There are millions of individual pixels on the screen, but even one faulty pixel right in the center of the screen can be enough to infuriate a person. But always, just in case, make sure it's not a speck of dust.
If a whole line of pixels (horizontal or vertical) on the monitor has become unusable, or if a whole area "dies" on the screen (from edge to edge), then this means that either there is no connection between the electrical contacts and the LCD panel, or one from the multiplexer chips that were accessing the LCD lattice, or one of the output lines of this chip has become unusable. It is impossible to fix this at home, and it makes no sense, so just carry such a monitor for a return. fixing this problem usually requires replacing the entire LCD panel or circuit board. If a random size lump or a growing drop appears on the LCD screen, and this is definitely not adhered dirt, then this means that the connection between the layers of the LCD panel has become unusable, as a result of which liquid began to flow out of it. This usually happensif the screen is cracked or damaged by a sharp object, so if you return such an LCD monitor, the manufacturer will most likely try to blame you for causing the damage.
3D games and programs are not displayed in 3D? Many games have 3D images in one way or another - in the sense of using perspective to create the illusion of depth, but very few games and programs use true stereoscopic 3D. The principle of operation of stereo-3D is that different images are shown to the right and left eyes, which the brain then connects together and creates a picture, as it were, crawling out of the screen.
Monitors and HDTVs that support stereoscopic 3D are usually advertised with the phrase “3D ready”. The main quality indicator of these models is support for 120Hz refresh rate, which allows them to display different images for the left and right eyes at 60Hz. So the first step is to make sure that your monitor is a 3D ready monitor, that your game is a 3D game, and that Windows has all the necessary drivers for a stereo 3D video card. In addition, all necessary additional software (such as the latest version of DirectX) must be installed and updated to play. Also make sure to use the dual DVI cable (if needed) that came with your monitor for HD 3D, and make sure your game is on the list of games for which your graphics card supports stereo 3D.
If you have a modern display used with passive 3D glasses (no battery), skip this step. If you still can't see the 3D image, then the problem is probably with the 3D glasses or the IR emitter that "communicates" with the glasses. If you have glasses with wires (plugged into a USB port), you don't need an IR emitter or a battery, so just skip this paragraph. The most common cause of this problem is an obstruction in the line of sight between the IR emitter and the glasses. It can be anything: from a cup of coffee to an object lying on the computer desk. Another option is when the battery of the 3D glasses has run out (read the instructions for your glasses for how to charge the battery). Also make sure that the IR emitter is connected and working - this can be judged by the lit status LED (if any).
Does 3D feel like flickering? If you are using a "3D ready" monitor, video card and cable, then the problem is not too low refresh rate. You see, most likely, the effect that occurs due to the fact that the frequency of the room lighting does not match the refresh rate of the monitor. This effect can be explained by the following analogy. Imagine an old Western that looks like the stagecoach wheel is spinning backwards because the camera captures the spokes moving slower than they actually spin. Thus, in the USA and other countries where the mains voltage is 60 Hz, the monitor refresh rate must be set to 120 Hz, and in the EU and other countries where the voltage is 50 Hz, the monitor refresh rate must be 100 Hz. In natural light, use 110Hz.
If changing the refresh rate doesn't work, try turning off your room lighting. Also, make sure to set Windows to a resolution supported by your monitor. Some newer HDTV monitors show 3D effect with passive glasses (they only have colored lenses; no battery or IR emitter), and if you have just such a monitor, then the only option left is to try to adjust the software settings to understand if the problem is a video card malfunction. The depth of 3D is adjusted, as a rule, in the program for controlling the video card, and people who have recently started to get involved in 3D games are advised to start at 15% - to get used to the 3D effect. Drivers for 3D displays and video cards are generally designed for 1080i (1920x1080) resolution, so if you run the game in a window instead of full screen,the 3D effect will most likely not be present, or the image will flicker a lot. Note also that some LCD monitors need a “warm up” time (15-30 minutes) of the CCFL backlight to achieve full brightness, which is important for the 3D effect.
Part of the display freezes, but can you still work normally in other windows and parts of the screen? Here we are talking about hovering entire windows, not dead pixels, cursor traces or lines. In some cases, frozen fragments can disappear if you close the problematic application using the "Task Manager" in Windows.
My all-time favorite solution to potential software problems in recent years is to roll back the system using Windows System Restore. Just select a recovery date prior to when the problem appeared, and if the problem is related to broken software settings or a simple virus, then this should solve it. I suppose many people have a program to protect against viruses and other malware, but even then it will not be superfluous to download a free program to search for malware on the Internet (do not trust a Google search; it is better to look at reviews in your favorite computer magazine to accidentally do not install any malicious program) so that no other "saboteur" bypasses your computer protection. If that doesn't solve the problem, try installing and updating the drivers for your video card,and also update the BIOS. Further, the culprit may be the video memory, but there should be no problems with it, as long as it is, in fact, working properly, and inside the case it is not too hot. Therefore, check if the fans are working well: they should suck cold air inside the case and push out hot air from behind. If your system has both an integrated GPU and a more powerful discrete graphics card, then try removing it and activating the integrated GPU. Has the image stopped freezing? Also check if the fans are working well on a discrete graphics card, a separate motherboard chip, and a new high-performance CPU.they must suck cold air inside the case and push out hot air from behind. If your system has both an integrated GPU and a more powerful discrete graphics card, then try removing it and activating the integrated GPU. Has the image stopped freezing? Also check if the fans are working well on a discrete graphics card, a separate motherboard chip, and a new high-performance CPU.they must suck cold air inside the case and push out hot air from behind. If your system has both an integrated GPU and a more powerful discrete graphics card, then try removing it and activating the integrated GPU. Has the image stopped freezing? Also check if the fans are working well on a discrete graphics card, a separate motherboard chip, and a new high-performance CPU.
Do you think that the image in the game began to freeze, and then quickly return to normal mode? Or has the frame rate dropped so much that you feel like you're looking at the screen through a spinning ceiling fan? Games require a lot more computing power from the PC than most other programs, as they must take place in real time. Thus, PC games are a real test of the performance of the graphics system. The most time-consuming graphics processing tasks in modern games fall on the GPU, which performs the rendering. But keep in mind that many PC components, including the motherboard, processor, memory, and hard drive, also run at their maximum capacity while playing.
If you see small fragments of emails, small colored pieces of the screen, or a few pixels here and there, painted in the wrong color, and all this is only corrected by restarting the PC, then it is either the GPU or the video memory. If you are using a GPU built into the "motherboard" (this can be determined if the video connector is located closer to the edge of the case next to USB ports, network port, etc., and not in one of those video card slots that are in special cut-out sections), the video memory is usually borrowed from the main memory of the PC. In addition, you may have a more modern processor that has both a CPU and a GPU built in at the same time.
So, if you are using a "mother" GPU, then the only way to determine if memory is the cause of the problem is to disable it. And if an external video card is used, then you need to try another. If some kind of "garbage" appears on the screen in a random order and immediately disappears, then the matter may be in switching the video card between different modes, especially when you run games or regular programs. If you are watching TV, make sure that closed captioning is not turned on. Also, if these subtitles are in a foreign language, the TV may not support them.
Blurry text? Wrong text size? Having to scroll to see the full Windows desktop? The very first step is to try to change the basic Windows settings for the screen. In different versions of Windows, these settings have different names, but you can access them, as a rule, by right-clicking anywhere on the desktop and choosing an item like "Properties" in the drop-down menu that opens. Please note that you need the properties of Windows, not the video card, which may also be present in this drop-down list.
If setting a different font size or other visual settings did not help, then it is possible that the monitor does not support the video card parameters set for the current resolution in Windows. These settings can be both Windows properties and graphics properties for a video card. It is not necessary to select the lowest screen resolution. Blurry text is usually the result of too low a resolution on the LCD screen.
Is the system showing errors related to OpenGL? The Open Graphics Library (OpenGL) is a widely used standard software interface for hardware acceleration of graphics rendering tasks. OpenGL errors are more common on older versions of Windows (Windows XP and older), and solutions range from installing the latest video drivers to selecting "High Color" (16-bit color) in the display options and closing all other windows. And make sure that you do not have the "hardware acceleration" enabled in the properties of the video card. Also try to ask a question about your error on the technical support forum of the video card manufacturer, attaching the most detailed information about the OS version, video card, running game or program, processor, etc., and it is quite possible that they will answer you.
If you installed paired video cards such as Crossfire or SLI into the system, but video performance has not increased, then check if this motherboard is approved by the manufacturer (AMD or Intel), as well as whether these two video cards are identical and work at the same frequency. The fact is that if one of the video cards has a lower clock frequency, then the other will adjust to it. Also, your problem might be due to a performance issue in your PC, in which case it makes sense to skip to the Motherboard, Processor, and RAM Defective flowchart.
Does the performance and stuttering rate change when the screen resolution is changed (ie, the image detail on the screen changes)? If so, make sure to download the latest drivers and updates from the GPU manufacturer's website. If the game uses DirectX, make sure to download the latest DirectX from Microsoft. If the video game developer recommends certain resolutions and screen settings for optimal performance, set them.
Reducing the resolution (i.e. the detail of the image on the screen) means fewer computational steps. That is, we sort of reduce the load on the system, because of which it ceases to be a "bottleneck". Try to close all windows; if necessary, manually - through the "Task Manager". Is the video normalized? If so, the GPU appears to be fine, so the problem is either the performance of other PC components or that you are asking the PC to do too many tasks at once. Advanced users can try disabling your antivirus software, but if you are connected to the internet and play multiplayer games then disabling your antivirus is not a good idea unless you know how to set up a firewall.
If you have closed all unnecessary applications in the "Task Manager" (except those necessary for the OS to work), but the game still works well only at low resolutions, then the problem is probably that your GPU is simply not able to work better. This is likely if you have an inexpensive motherboard with an integrated GPU, and less likely if you recently bought a powerful discrete graphics card or a new multi-core CPU that has a high-performance GPU built into it.
Does the game frame rate drop when the PC heats up? In order to simultaneously protect itself from overheating and prevent self-shutdown, the GPU may deliberately "throttle" (ie, skip some clock cycles) when it detects an excessive temperature. But it could also be that the GPU is not getting enough cooling, for various reasons. First, check to see if the video card fan is broken. Secondly, check if the PC itself is overheating - it may happen that the fans that draw air into the case were blocked (due to which cold air stopped flowing inside), or holes that let air out of the case (they are usually , behind). Also, pay attention to the temperature in the room. PC cooling depends on the ambient temperature, so the warmer the room, the less cold air circulates through the PC.
If the issue is not a heat related issue, check that you have installed all the latest updates and drivers, close background applications (to make sure it’s not a general performance issue), and ask for advice on the game developer forum to see if anyone has encountered a similar issue. something else. If your PC has a PCIe SSD connected to a high speed PCI Express slot, then it is possible that your PCIe x16 graphics card dropped to x8 due to sharing the same bandwidth with the SSD.
Double check that the version of the PCIe slots on the motherboard (1.1, 2.1, 3.0) is higher or equal to the PCIe version of your graphics card. Otherwise, the "motherboard" can become a "bottleneck". Also make sure your x16 graphics cards are plugged into real x16 slots and not slots that support x16 compatibility (these can also be labeled x16, x8). If multiple people report similar performance issues with similar hardware and software installed, then the problem may be a common incompatibility.
If you are convinced that there are no faulty components, problems with contacts, drivers, then perhaps the reason may be the so-called. blade of a BGA chip of a video card ..
The reason for this may be the work in the harsh temperature conditions of the video card, which led to its overheating.
Under the blade of the BGA chip of a video card, they call the resulting electrical contact of the BGA array of balls with the printed circuit board of the card as a result of prolonged overheating. Usually, this phenomenon occurs as a result of the presence of a small section of cold soldering, which is subjected to prolonged and strong heating.
It cannot be said that this is a 100% marriage of the manufacturer: there can be quite a lot of tin balls in the array, and the violation (or oxidation) of the contact of even one of them can lead to a complete (or partial) loss of the card's performance.
1. you need to remove from the card all plastic plugs on it, stickers (stickers) located on the back side.
Figure 6 Removal of heat sensitive elements
If some elements cannot be removed, then you need to protect them with a sticker of metal foil (but this is not very reliable)
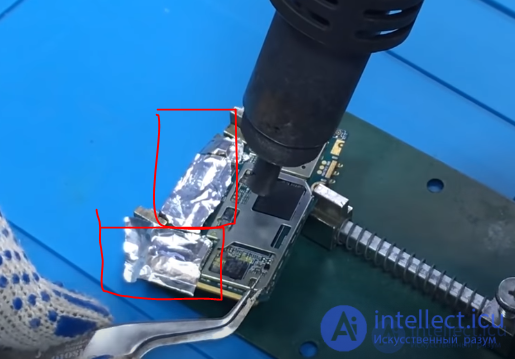
Figure 6a protection of heat sensitive elements
We remove the cooling system and clean it.
The next step is to carefully remove the GPU cooling heatsink without damaging the GPU crystal (thermal paste and GPU adhesion can be strong).
You can do this with preliminary heating. After a while (5-10 seconds), we begin to slightly shake the radiator from side to side. Thermal paste, softening under the influence of temperature, will allow us to do this.
Figure 7 unbundling of the heatsink and the chip
Then you need to clean both the base of the radiator and the crystal itself from the remnants of the old dried thermal paste. At the same time, try not to scratch the metal surface of the radiator (this will reduce its heat transfer coefficient) and the more so the crystal surface.
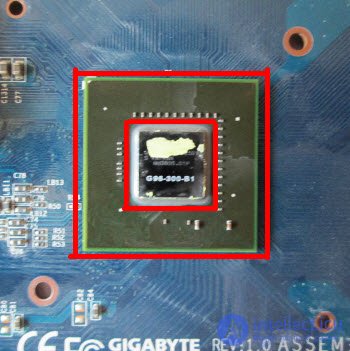
Figure 8 appearance of the GPU chip
The larger area is the graphics card chip itself, and the smaller area is the graphics processing unit (GPU ) crystal . Along the perimeter of the crystal, we see a white sealant substance (compound) that performs several functions: protects the crystal from dust getting under it and fixes it to the substrate.
What is the peculiarity here and why the repair of the video card can fail?
The area (array) of BGA solder balls is not only between the chip itself and the PCB textolite, but also between the crystal and the graphics card substrate !
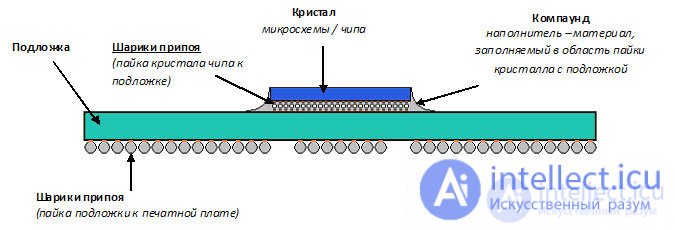
Figure 9 elements of soldering the chip to the board in section
We can repair the video card ourselves (if we are still lucky) only if there is a violation of the balls contacts directly between the printed circuit board and the substrate. If the "dump" occurred under the crystal, then we can hardly do anything about it. Even an operation such as reballing (a complete replacement of an array of balls using a stencil) will not help in this case, since this procedure is performed only for the "sole" of the entire chip, but not for the crystal!
To repair a video card, you will need a SKF flux (alcohol-canin), which is called “SKF-flux” and a disposable syringe.
Note : you can use any other inactive (ideally neutral) flux. For example, "F1" or "F3". The original LTI-120 is also suitable. Although, with LTI, not everything is so simple: leave it as a last resort :)
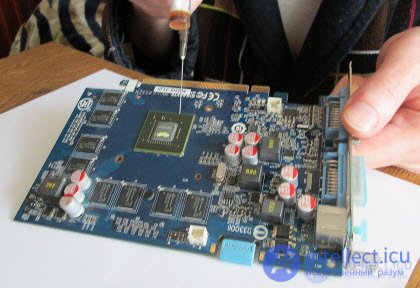
Figure 10 Chip fluxing
We gently apply the tip of the needle to the edge of the substrate, tilting it so that the flux we squeeze out of the syringe is under the chip. After pumping it, if necessary, tilt the card slightly so that it spreads well between the balls. Ideally, we want to achieve an effect where the liquid appears a little from all sides.
Tip : after use, rinse the syringe (just take water from the tap several times and squeeze out through the needle). If this is not done, the rosin in the needle will dry out and clog it. It will take a long time to clean or throw away.
Now we can be sure that when heated, the flux will fulfill its function.
We place its video card in such a way that we have free access to the GPU from above and below, and using a soldering station, we begin to heat the substrate around the perimeter.
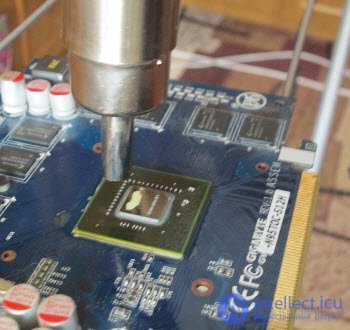
Figure 11 chip heating
Note : under no circumstances heat the crystal itself! It can fail!
How I do it, I’d better show you in video format, since you cannot clearly illustrate with photographs alone.
Now let's comment on this video a little. When you warm up the video card from below (under the chip), try to keep the hair dryer perpendicular to the plane of the PCB, otherwise I didn't manage to shoot and warm it at the same time. Also, be careful not to flare the small card components located on the back side (they can be easily displaced, given the heated solder under them).
In the video above, I did not show the whole procedure, as you understand. The bottom should be heated long enough (3-5 minutes) so that the smoke from the flux, which you may have noticed, began to rise rather intensively above the board (this is evidence that the board has warmed up well). The first stage will be "boiling" and bubbling of the flux - this is normal.
Also, do not hesitate to warm up the place under the crystal itself (you can do this through the board). The main thing: do not hold the hair dryer in one place - smoothly move it over the area (to exclude places of local overheating of the surface). Keep the funnel of the hair dryer at a distance of 2-3 centimeters from the surface to be treated. I personally set the air flow to an average value, the temperature shown by the soldering station is 410-440 degrees Celsius.
The temperature spread here is due to the fact that its sensor itself is located directly in the handle of the hot air gun, and the air temperature at the outlet of the hair dryer is already different (lower). Plus, here you can add the inevitable heat loss due to the ability to absorb and dissipate heat by the treated surface itself, the temperature in the room, the proximity of the hair dryer to the heated area, the power of the air flow, etc. That is why only empirically it will be possible to choose the exact value of the operating temperature (thermal profile) for a particular soldering station.
To what state should you warm up? Here, again, there are indirect signs by which we can navigate. The whole procedure takes approximately 5-8 minutes. The spread of time is due to the factors listed above. It also depends on the quality of the flux used, the type of solder from which the BGA array is made on a substrate (lead or lead-free). In the process of strong heating, the flux should evaporate (smoke) decently enough.
Another important marker can be the visual detection of solder melting on the elements located on the chip around the die (usually a series of small SMD capacitors). When the solder "shines" on them, it is a sure sign that the balls of the substrate have reached their melting point, which is exactly what we need! For greater confidence, you can take tweezers in your free hand and try to slightly move the chip itself: gently push it (literally by a millimeter - half a mi a place. After that, the heating can be safely stopped!
Note : some craftsmen, instead of a station, use a regular building hair dryer or, in general, "bake" it in a household oven, after wrapping it in foil! Frankly, I am not a fan of such radical methods of "repair", you can perform such actions at your own peril and risk, but there are chances.
During the heating procedure, you can monitor the surface temperature with a thermocouple or pyrometer (infrared thermometer). This will help in the future to better navigate in the selection of the correct thermal profile.
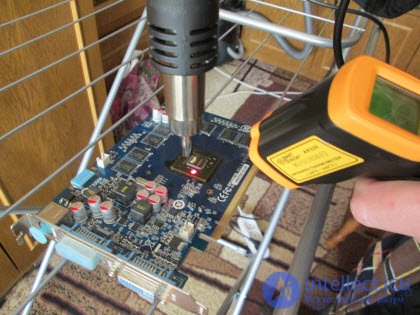
Figure 12 Chip warm-up temperature control
Note : when cooling the video card (and any other element), do not use forced airflow - a fan, etc. Let the part cool naturally, no need to "fit" it. We don't need the microcircuit to receive a thermal shock (shock)?
After repair, it is necessary to check the functionality.
Naturally, you need to clean the board from the flux residues. if there is rosin left, it is neutral (does not interact with the components of the board) and, in theory, it can not be washed off, but, for the sake of order, we will thoroughly walk over it with a brush with a cleaner, possibly moistened with a special solvent.
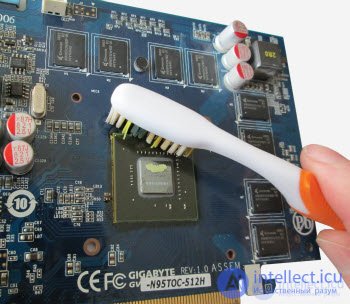
Figure 13 Chip Cleaning
We washed more or less (the rosin dissolved), let it dry and apply fresh thermal paste on the crystal ("KPT", "AlSil" or "Zalman"):
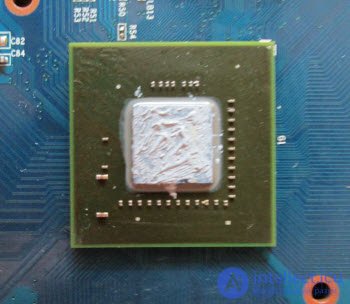
Figure 14 Thermal Grease Coating Chip
Now we put all the components back together (fix the radiator, screw on the cooler, connect it to the connector on the board).
Before installing the card into the system unit, let's go (just in case) with an elastic band over the contacts of the Pci Express connector and that's it - you can install the component on the motherboard to check what we've got.
Of course, for complete confidence, we need to have a working operating system, a native video card driver and run some stress test, such as FurMark, for the stability of image synthesis (for several hours or days with interruptions), which will show us, in the end , how high quality was the repair.
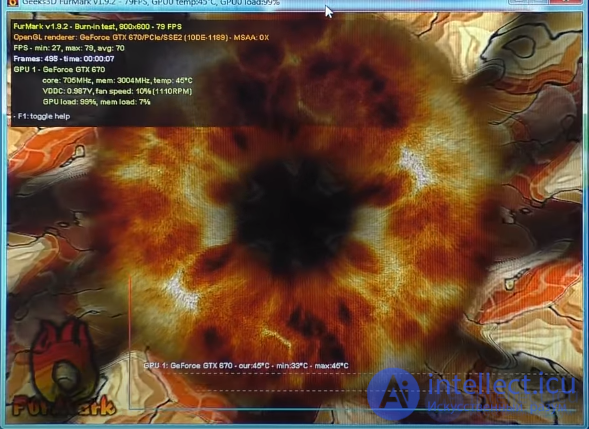
Figure 15 GPU stress test using FurMark software
Источник: https://krzjctcqcwwsz457pdyzpqcqeu-intellect-icu.translate.goog/diagnostika-neispravnostej-videokarty-i-remont-rebolling-blok-skhema-9075

глубокая теория и практика по диагностике элементов
https://intellect.icu/diagnostika-aktivnykh-i-passivnykh-elementov-rezistorov-diodov-tranzistorov-kondensatorov-i-mikroskhem-osmotrom-testerom-ostsillografom-i-teplovizorom-3304
Comments
To leave a comment
Diagnostics, maintenance and repair of electronic and radio equipment
Terms: Diagnostics, maintenance and repair of electronic and radio equipment