Lecture
Inkjet printers belong to the class of consecutive matrix unaccented printing devices that implement the inkjet method of image registration
The jet method of registration is based on the selective coloring of a symbol on paper using a jet of liquid dye, which is ejected as a jet from a nozzle or several nozzles under the influence of a pulsed or static overpressure.
In inkjet printers implement two ways to get micro drops:
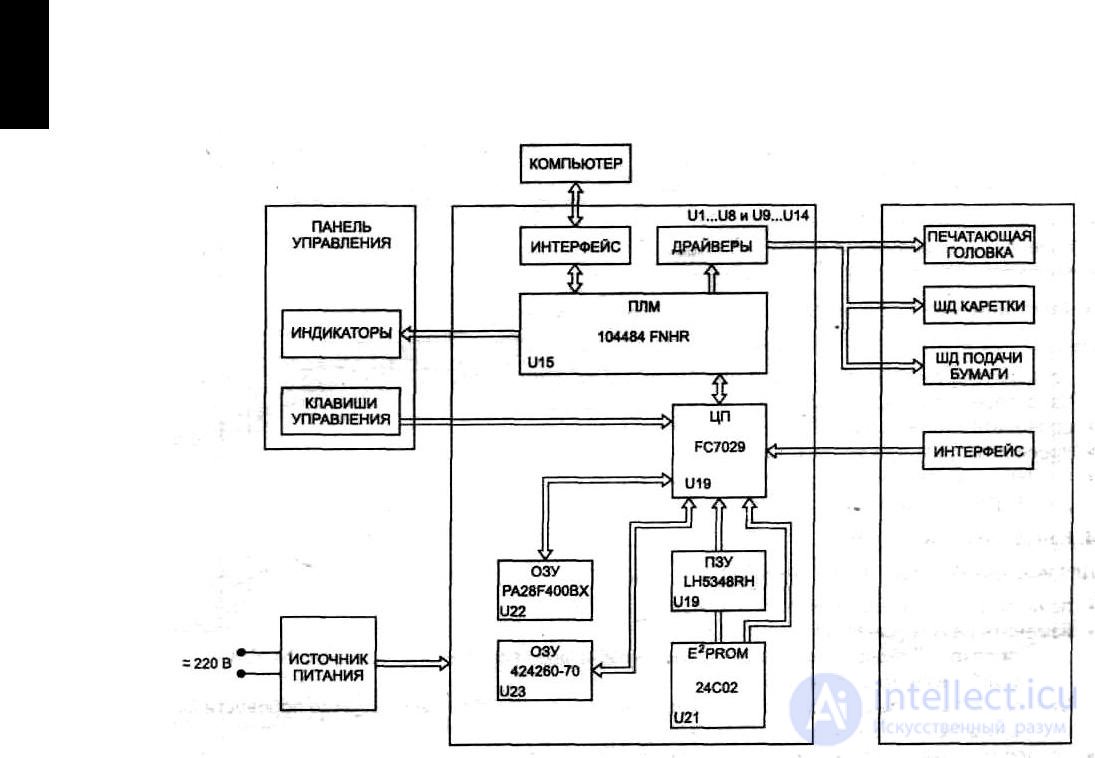
Figure 75 - Inkjet Printer Block Diagram
The main types of faults inkjet printers.
Failures of the electronic part of the printer, fully correspond to the same faults matrix printers
Printer is dirty. The surface of the nozzle and the cartridge eventually becomes dirty with ink droplets and paper villi, after which the print quality leaves much to be desired. Dust collects on the carriage’s moving mechanism, making it difficult to move.
Ink drying inside the PG nozzle. The printer must be turned off with the power button if you simply pull the plug out of service during operation, or if the power is removed from the print head that remains in an intermediate position, the ink is intensively drying. Many models of inkjet printers have a parking mode in which the print head returns to its original position inside the printer, which prevents
ink drying. Some inkjet printers have special nozzle cleaning devices.
Inkjet printers do not tolerate undervoltage at all. It may cause damage to the printer or damage to the print cartridges. The usual situation when trying to print at reduced voltage - the printer prints the first few lines, then stops and gives an error message.
Methods for refilling and restoring inkjet printer cartridges
Lexmark
All cartridges are made according to the same scheme - the ink inside the tank is held by an absorbing sponge, and the tank itself is combined with the printing head in one piece.
From this immediately follows several conclusions.
Black cartridge refills through a small hole (a little smaller diameter of the filling needle) located on top of the cartridge. A needle is inserted into the hole, and slowly (this is important!) The right amount of ink is injected. They, as a rule, slightly show through from the nozzles, and it is recommended to pump out 0.5-1 ml of ink from the bottom using a syringe and suction cup from the filling kit. This will allow to infuse the inlet capillaries, clean the nozzles, and, in fact, make sure that the filling is correct.
The color cartridge refills in the same way, only it is necessary remove the top cover. It is not glued strongly, and is easily picked off with a drill or a thin screwdriver. Under the lid are six holes. Refueling is carried out in three (Yellow, Magenta, Cyan, respectively). We enter the necessary colors into our holes, glue the lid. Again, it does not hurt to drain 1 ml of ink through the nozzles. After refilling, the cartridges are inserted into the printer, and a test page is printed containing color images and text.
Epson
In the printers of this company, the print head is installed permanently, and the cartridges are ink tanks attached to the head. According to some data, in more than 50% of cases Epson printers fail due to clogging of the head, and most often print heads are clogged due to the use of non-original consumables. The cost of replacing the print head comes up to 85% of the price of the printer.
Removing the tank from the head for more than 30-50 seconds is not recommended to avoid drying the head.
Refueling technology :
remove one cartridge, and put another in its place at the time of refilling. The holes on the bottom are sealed, and this must be done soundly. Then, the ink is slowly introduced into the hole, which is located at the top of the cartridge under the sticker. If there is no hole, then it should be made auger. Then you need to wait 5-10 minutes until ink dissolves in capacity. The tape is then removed, leaked ink is removed, and cartridges can be inserted into the printer. This technique is suitable for black and color cartridges, only in the case of refilling color - ink is in turn introduced into
your holes.
Epson is the most brutal struggle for the use of original supplies. All new printers have cartridges with chips that will not allow the cartridge to work after refueling. The chip is mounted on the side of the tank.
The printer will not accept the refilled cartridge until the chips are reset. There are a number of electronic circuits for resetting, but it is easier to use a special program. Not all chips can be reset, new model chips are not reset.
Epson printers are very good and high-quality devices, but they require proper attitude.
Hewlett packard
Several types of cartridges are supplied to printers of this company, and methods of refilling for each of them differ. The total for all cartridges one
- the print head is always aligned with the ink tank.
Refill HP DeskJet 800 and 900 Series Cartridges
Color refuel easier. It is divided into three separate tanks, each one plugged with cork. They can be found if you look at the cartridge above. Corks can be pushed inside or pick out. All HP cartridges need to be sealed with ventilation holes before refueling, they are usually located on the bottom or side. Tightness is not required here. ink is held by a sponge. Ink needs to be injected slowly, wait 5 minutes after clogging, and drain 1 ml of ink from the cartridge using the suction cup from the kit.
The black cartridge refills harder: ink is held in it due to the difference in pressure inside and outside, therefore, full tightness is mandatory! The filling hole of the black cartridge is at the bottom. First close the ventilation hole. Of course, that after refilling the tape with the air vents need to be removed. Turn the cartridge over, take out the iron ball. If there is no other ball in stock, I do not recommend pushing it inwards. As always, inject ink slowly. Then squeeze the cartridge from the sides, insert the ball, and stick it well with adhesive tape. Using a suction cup should be pumped out 2-3 ml of ink from the cartridge. If there is no suction cup, then the cartridge should be put on the table, and wait approximately 1 hour until extra ink flows out to normalize the internal pressure. If the ink flows abundantly or for a long time, then the sealing is done incorrectly, all the ink will flow out. Refill printer cartridges
HP DeskJet 400, 500, and 600 Series
Color cartridge . Cover the ventilation hole from below, remove the cover from above. She sits on the glue, so it will take some effort. Download all three colors with a syringe, try not to pour, otherwise the colors may mix, but there is nothing good about it. Put the cover back in place - it can be glued with tape or glue. Remove the tape. We are waiting for 2 minutes, sucking 1 ml of ink with a sucker.
Refill Cartridges for New HP Printers
Refilling these cartridges is much easier than older models. Under the stickers are holes in which, in fact, pumped ink. The sticker can be torn off, or pierced in the right place. Slowly introduce ink, and glue everything as it was originally. The ink should be slightly out of the nozzles. If for some reason there are no holes, then they can be made with a drill. As you can see, elementary refueling. However, the disadvantages of such cartridges are - a very small resource (about 300 prints), and a limited number of refills - the sponge tends to dry out and lose its properties.
Canon
The design of cartridges competent: tanks with ink are combined with a removable printhead. This is very convenient, because you can change the tanks and the head. This is especially true after repeated refueling.
Refill such cartridges very easily. Remove the cartridge from the printer. It is advisable not to keep the head empty for a long time. Seal the bottom holes. Then remove the cover. It is firmly glued. Enter the right amount of ink, wait a couple of minutes, remove adhesive tape. We return the cartridge to its place by removing leaked ink.
Color refuels in the same way, only three colors are entered. It is very important not to mix colors, otherwise everything printed with such a cartridge will be, to put it mildly, poor quality.
Canon has others similar to HP. In the upper corner is a cork made of plastic, it must be pulled out. This is done with a drill or screw. Ink we enter with a syringe Put the cork in place, wait 2 minutes, and the cartridge is ready to print. Cork can not pull, and just pierce. Color cartridges of this type (BC-05) are also refilled, only there are three plugs, so we do everything three times. As a rule, there are no problems with Canon cartridges.
Recovery
Under the restoration should be understood the process of cleaning the nodes after drying ink or clogged channels. Cartridges that have obviously worked their life cannot be restored.
Remanufactured cartridges can be divided into three groups:
When the cartridge with the sponge dries inside, try to soak the sponge. To do this, put the cartridge nozzles in the distillate for a day. It is important to pour a little water so that only the nozzles are immersed in it. Then ink is poured into the cartridge and the ink is pumped through the suction cup with a syringe. Pull out the syringe slowly, without sudden jerks, and when the ink starts to come out evenly and in large quantities (no more than 10 ml), it is better to stop the procedure. Do 2-3 head cleaning, print a test page.
This type of cartridges is very poorly recoverable.
Air-filled cartridges Fill ten ml distilled water inside, shake the cartridge, pour out the water. Repeat three times. Put the cartridge nozzles in the distillate for a day, so that there are only nozzles in the water. Then pour ink, seal the cartridge, and suck the ink through the nozzles. If there is no device for suction in the set, then do not improvise, it is better to find the device, since it is very easy to damage the nozzles and electronics. Do 2-3 head cleaning and print a test page.
Separate printheads . In case of problems with the reserve, it is simply thrown away because nothing can be done with it. To restore the heads, you must first perform the head cleaning program several times, implemented by the printer drivers. If this does not help, remove the head and put the head soaking in water for 1-2 days. Then assemble the printer, and clean the heads. If after 5-10 times there is no result, the heads should be replaced.
Cartridges can not be restored:

Comments
To leave a comment
Diagnostics, maintenance and repair of electronic and radio equipment
Terms: Diagnostics, maintenance and repair of electronic and radio equipment