Lecture
In this lesson we:
- we write application - calculator
Let's try to write a simple calculator that takes two numbers and performs addition, subtraction, multiplication, or division operations with them. The result displays as a complete expression.
Create a project:
Project name : P0191_SimpleCalculator
Build Target : Android 2.3.3
Application name : SimpleCalculator
Package name : ru.startandroid.develop.simplecalculator
Create Activity : MainActivity
Open main.xml and draw a screen:
<? xml version = "1.0" encoding = "utf-8"?>
<LinearLayout
xmlns: android = "http://schemas.android.com/apk/res/android"
android: orientation = "vertical"
android: layout_width = "fill_parent"
android: layout_height = "fill_parent">
<LinearLayout
android: layout_width = "match_parent"
android: layout_height = "wrap_content"
android: id = "@ + id / linearLayout1"
android: layout_marginLeft = "10pt"
android: layout_marginRight = "10pt"
android: layout_marginTop = "3pt">
<Edittext
android: layout_weight = "1"
android: layout_height = "wrap_content"
android: layout_marginRight = "5pt"
android: id = "@ + id / etNum1"
android: layout_width = "match_parent"
android: inputType = "numberDecimal">
</ Edittext>
<Edittext
android: layout_height = "wrap_content"
android: layout_weight = "1"
android: layout_marginLeft = "5pt"
android: id = "@ + id / etNum2"
android: layout_width = "match_parent"
android: inputType = "numberDecimal">
</ Edittext>
</ LinearLayout>
<LinearLayout
android: layout_width = "match_parent"
android: layout_height = "wrap_content"
android: id = "@ + id / linearLayout2"
android: layout_marginTop = "3pt"
android: layout_marginLeft = "5pt"
android: layout_marginRight = "5pt">
<Button
android: layout_height = "wrap_content"
android: layout_width = "match_parent"
android: layout_weight = "1"
android: text = "+"
android: textSize = "8pt"
android: id = "@ + id / btnAdd">
</ Button>
<Button
android: layout_height = "wrap_content"
android: layout_width = "match_parent"
android: layout_weight = "1"
android: text = "-"
android: textSize = "8pt"
android: id = "@ + id / btnSub">
</ Button>
<Button
android: layout_height = "wrap_content"
android: layout_width = "match_parent"
android: layout_weight = "1"
android: text = "*"
android: textSize = "8pt"
android: id = "@ + id / btnMult">
</ Button>
<Button
android: layout_height = "wrap_content"
android: layout_width = "match_parent"
android: layout_weight = "1"
android: text = "/"
android: textSize = "8pt"
android: id = "@ + id / btnDiv">
</ Button>
</ LinearLayout>
<Textview
android: layout_height = "wrap_content"
android: layout_width = "match_parent"
android: layout_marginLeft = "5pt"
android: layout_marginRight = "5pt"
android: textSize = "12pt"
android: layout_marginTop = "3pt"
android: id = "@ + id / tvResult"
android: gravity = "center_horizontal">
</ TextView>
</ LinearLayout>
There are two input fields , 4 buttons and a text field for output . Notice the inputType attribute for EditText . It sets the content type . I specified numberDecimal - i.e. In the field you will be able to enter only numbers and a comma , he will not miss the letters. It is convenient, it is not necessary to code various checks.
The gravity attribute is specified for TextView . It indicates how the text will be located in TextView. Do not confuse with layout_gravity, which is responsible for placing a TextView in a ViewGroup.
Now we need to read the contents of the fields, determine which button was pressed and display the desired result. Open MainActivity.java and write the code.
public class MainActivity extends Activity implements OnClickListener {

 EditText etNum1;
 EditText etNum2;

 Button btnAdd;
 Button btnSub;
 Button btnMult;
 Button btnDiv;

 TextView tvResult;

 String oper = "";

 /** Called when the activity is first created. */
 @Override
 public void onCreate(Bundle savedInstanceState) {
 super.onCreate(savedInstanceState);
 setContentView(R.layout.main);

 // находим элементы
 etNum1 = (EditText) findViewById(R.id.etNum1);
 etNum2 = (EditText) findViewById(R.id.etNum2);

 btnAdd = (Button) findViewById(R.id.btnAdd);
 btnSub = (Button) findViewById(R.id.btnSub);
 btnMult = (Button) findViewById(R.id.btnMult);
 btnDiv = (Button) findViewById(R.id.btnDiv);

 tvResult = (TextView) findViewById(R.id.tvResult);

 // прописываем обработчик
 btnAdd.setOnClickListener(this);
 btnSub.setOnClickListener(this);
 btnMult.setOnClickListener(this);
 btnDiv.setOnClickListener(this);

 }

 @Override
 public void onClick(View v) {
 // TODO Auto-generated method stub
 float num1 = 0;
 float num2 = 0;
 float result = 0;

 // Проверяем поля на пустоту
 if (TextUtils.isEmpty(etNum1.getText().toString())
 || TextUtils.isEmpty(etNum2.getText().toString())) {
 return;
 }

 // читаем EditText и заполняем переменные числами
 num1 = Float.parseFloat(etNum1.getText().toString());
 num2 = Float.parseFloat(etNum2.getText().toString());

 // определяем нажатую кнопку и выполняем соответствующую операцию
 // в oper пишем операцию, потом будем использовать в выводе
 switch (v.getId()) {
 case R.id.btnAdd:
 oper = "+";
 result = num1 + num2;
 break;
 case R.id.btnSub:
 oper = "-";
 result = num1 - num2;
 break;
 case R.id.btnMult:
 oper = "*";
 result = num1 * num2;
 break;
 case R.id.btnDiv:
 oper = "/";
 result = num1 / num2;
 break;
 default:
 break;
 }

 // формируем строку вывода
 tvResult.setText(num1 + " " + oper + " " + num2 + " = " + result);
 }
 }
I think everything is clear by kamentam. We read the values, define the button, perform the operation and print it in the text field. The button handler is the Activity .
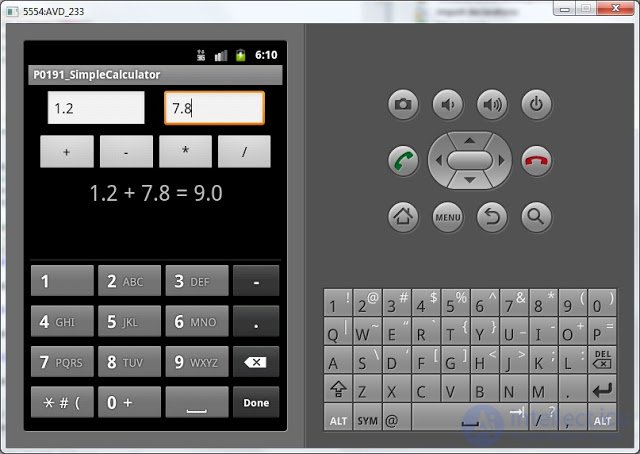
All save and run.
Let's make a menu with more items for clearing fields and exiting the application for more functionality. Items will be called Reset and Quit .
Add two constants - these will be the ID of the menu items.
public class MainActivity extends Activity implements OnClickListener {

 final int MENU_RESET_ID = 1;
 final int MENU_QUIT_ID = 2;

 EditText etNum1;
(add only underlined code)
And we will write the code for creating and processing the menu:
// создание меню
 @Override
 public boolean onCreateOptionsMenu(Menu menu) {
 // TODO Auto-generated method stub
 menu.add(0, MENU_RESET_ID, 0, "Reset");
 menu.add(0, MENU_QUIT_ID, 0, "Quit");
 return super.onCreateOptionsMenu(menu);
 }

 // обработка нажатий на пункты меню
 @Override
 public boolean onOptionsItemSelected(MenuItem item) {
 // TODO Auto-generated method stub
 switch (item.getItemId()) {
 case MENU_RESET_ID:
 // очищаем поля
 etNum1.setText("");
 etNum2.setText("");
 tvResult.setText("");
 break;
 case MENU_QUIT_ID:
 // выход из приложения
 finish();
 break;
 }
 return super.onOptionsItemSelected(item);
 }
Let's save everything, run. There are two menu items:
Reset - clears all fields
Quit - closes the application
As an independent work, you can implement a check division by zero . And display a thread message using Toast or directly in the result field.
In the next lesson:
- consider the animation of view components

Comments
To leave a comment
Mobile Programming (Android IOs)
Terms: Mobile Programming (Android IOs)