Lecture
In this lesson we:
- we draw the screen programmatically, and not through the layout file
Before that, we created the screen using layout files . But we can do the same thing programmatically .
Create a project:
Project name : P0161_DynamicLayout
Build Target : Android 2.3.3
Application name : DynamicLayout
Package name : ru.startandroid.develop.dinamiclayout
Create Activity : MainActivity
Open MainActivity.java and pay attention to the line:
setContentView(R.layout.main);
Let me remind you that in this line we indicate that the Activity will use the layout file main.xml as the screen. There is another implementation of this method, which accepts not a layout file as input, but a View element and makes it the root. In layout files, the root element is usually LinearLayout , we also use it.
@Override
public void onCreate(Bundle savedInstanceState) {
super.onCreate(savedInstanceState);
// создание LinearLayout
LinearLayout linLayout = new LinearLayout(this);
// установим вертикальную ориентацию
linLayout.setOrientation(LinearLayout.VERTICAL);
// создаем LayoutParams
LayoutParams linLayoutParam = new LayoutParams(LayoutParams.MATCH_PARENT, LayoutParams.MATCH_PARENT);
// устанавливаем linLayout как корневой элемент экрана
setContentView(linLayout, linLayoutParam);
}
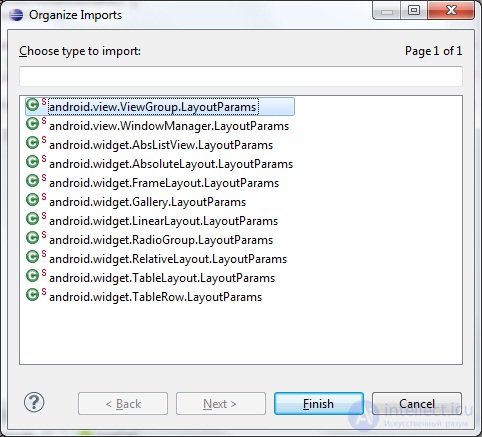
Update import - CTRL + SHIFT + O. Eclipse will ask us to choose which LayoutParams we will use. Here it is necessary to stop in more detail. Recall the theory about the screens. The screen consists of ViewGroup and View enclosed in them.
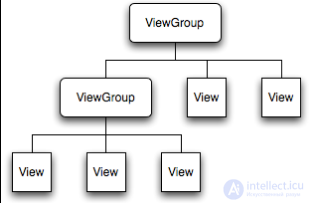
Examples of ViewGroup known to us are LinearLayout , TableLayout , RelativeLayout , etc. Each of these ViewGroups has a nested class LayoutParams. The base for these LayoutParams is ViewGroup.LayoutParams.
ViewGroup . LayoutParams has only two attributes: height and width . Its subclass ViewGroup.MarginLayoutParams inherits these two attributes and has its four: bottomMargin , leftMargin , rightMargin , topMargin . The LinearLayout.LayoutParams class in turn is a subclass of ViewGroup.MarginLayoutParams, inherits from it already 6 attributes and adds its two: gravity and weight .
Those. The LinearLayout object has a nested LinearLayout.LayoutParams class with layout attributes. And these attributes apply to all child View and ViewGroup.
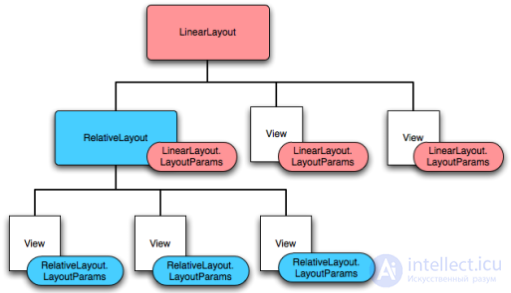
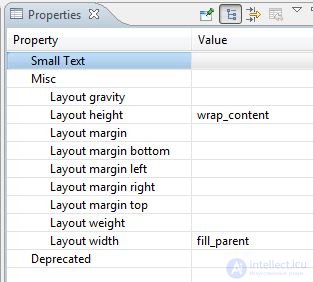
Those. A View located in LinearLayout has one set of layout parameters:
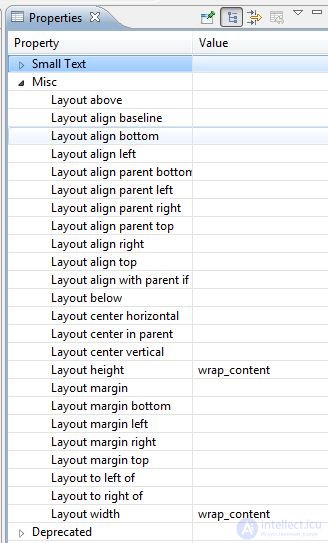
and the View from RelativeLayout is different:
There are common elements as well. The parents of these ViewGroup are alone.
Back in Eclipse, he is waiting for our choice. Use the base class ViewGroup.LayoutParams
Let's break the code down. We create LinearLayout and set the vertical orientation. Next, create a LayoutParams . The input constructor takes two parameters: width and height . We both put MATCH_PARENT . Next, the setContentView method is called. LinearLayout and LayoutParams are given as input . This means that the root element of the Activity will be LinearLayout with layout-properties from LayoutParams .
If we start the application now, we will not see anything, because LinearLayout is transparent. Let's add in LinearLayout View-components.
LayoutParams lpView = new LayoutParams(LayoutParams.WRAP_CONTENT, LayoutParams.WRAP_CONTENT);
TextView tv = new TextView(this);
tv.setText("TextView");
tv.setLayoutParams(lpView);
linLayout.addView(tv);
Button btn = new Button(this);
btn.setText("Button");
linLayout.addView(btn, lpView);
We again create a LayoutParams object with the attributes width = wrap_content and height = wrap_content . Now if we assign this object to any View, then this View will have a width and height in content .
Next, we create a TextView , customize its text, assign it the above-created LayoutParams and add it to LinearLayout using the addView (View child) method.
With Button it is similar - create, edit text, and then use another implementation of the addView method (View child, ViewGroup.LayoutParams params), which simultaneously adds a Button to LinearLayout and assigns the specified LayoutParams to Button. The result will be the same as with TextView, but instead of two lines of code, you get one.
Notice that for two View objects I used the same LayoutParams object , lpView. Both View objects take parameters from LayoutParams and use them.
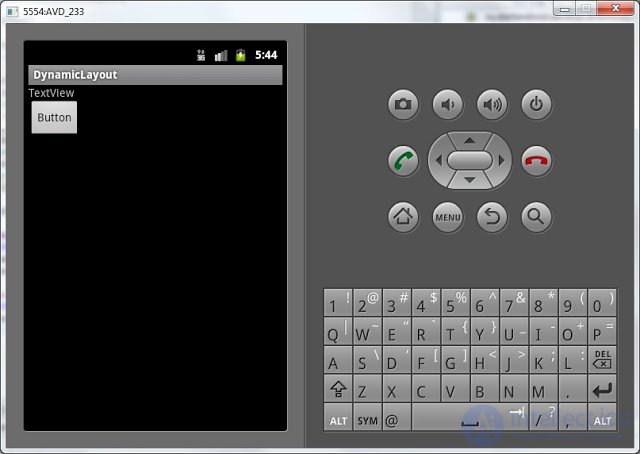
Save and run the application. We see that the components on the screen appeared. And you can see that their height and width are determined by the content (wrap_content).
The lpView object is of the base type android.view.ViewGroup.LayoutParams . So it will allow you to adjust only the width and height. But for View in LinearLayout , for example, left indent or right alignment are available. And if we want to use them, then we need to use LinearLayout.LayoutParams :
LinearLayout.LayoutParams leftMarginParams = new LinearLayout.LayoutParams(
LayoutParams.WRAP_CONTENT, LayoutParams.WRAP_CONTENT);
leftMarginParams.leftMargin = 50;
Button btn1 = new Button(this);
btn1.setText("Button1");
linLayout.addView(btn1, leftMarginParams);
We look code. We create an object of type LinearLayout.LayoutParams using the same constructor as for regular LayoutParams, specifying the width and height . Then we specify the left margin = 50. The indentation here is indicated in pixels . Next, the scheme is the same: create an object, customize the text and add it to LinearLayout with assignment of LayoutParams.
Similarly, add a component with alignment:
LinearLayout.LayoutParams rightGravityParams = new LinearLayout.LayoutParams(
LayoutParams.WRAP_CONTENT, LayoutParams.WRAP_CONTENT);
rightGravityParams.gravity = Gravity.RIGHT;
Button btn2 = new Button(this);
btn2.setText("Button2");
linLayout.addView(btn2, rightGravityParams);
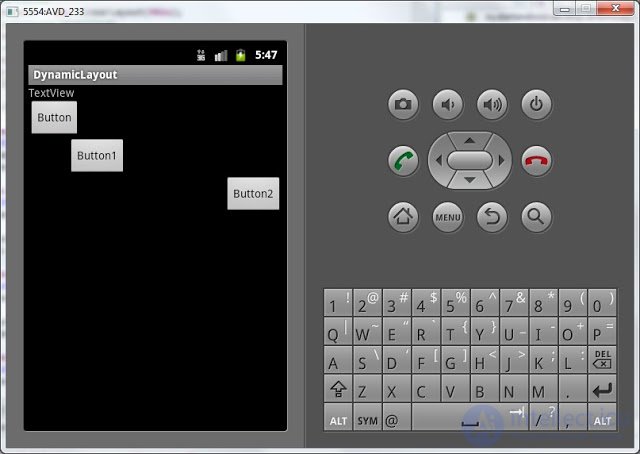
Save and run. Button1 has an indent of 50px. And Button2 is aligned to the right:
Probably, this topic will not be very clear from the first time. Therefore, in the next two lessons we will consolidate this knowledge and practice in adding elements to the screen and setting them up.
Full lesson code:
public class MainActivity extends Activity {
/** Called when the activity is first created. */
@Override
public void onCreate(Bundle savedInstanceState) {
super.onCreate(savedInstanceState);
// создание LinearLayout
LinearLayout linLayout = new LinearLayout(this);
// установим вертикальную ориентацию
linLayout.setOrientation(LinearLayout.VERTICAL);
// создаем LayoutParams
LayoutParams linLayoutParam = new LayoutParams(LayoutParams.MATCH_PARENT, LayoutParams.MATCH_PARENT);
// устанавливаем linLayout как корневой элемент экрана
setContentView(linLayout, linLayoutParam);
LayoutParams lpView = new LayoutParams(LayoutParams.WRAP_CONTENT, LayoutParams.WRAP_CONTENT);
TextView tv = new TextView(this);
tv.setText("TextView");
tv.setLayoutParams(lpView);
linLayout.addView(tv);
Button btn = new Button(this);
btn.setText("Button");
linLayout.addView(btn, lpView);
LinearLayout.LayoutParams leftMarginParams = new LinearLayout.LayoutParams(
LayoutParams.WRAP_CONTENT, LayoutParams.WRAP_CONTENT);
leftMarginParams.leftMargin = 50;
Button btn1 = new Button(this);
btn1.setText("Button1");
linLayout.addView(btn1, leftMarginParams);
LinearLayout.LayoutParams rightGravityParams = new LinearLayout.LayoutParams(
LayoutParams.WRAP_CONTENT, LayoutParams.WRAP_CONTENT);
rightGravityParams.gravity = Gravity.RIGHT;
Button btn2 = new Button(this);
btn2.setText("Button2");
linLayout.addView(btn2, rightGravityParams);
}
}
In the next lesson:
- add components to the screen while the application is running

Comments
To leave a comment
Mobile Programming (Android IOs)
Terms: Mobile Programming (Android IOs)