Lecture
In this lesson we:
- find out why we need the res / values folder, what can be stored in it and how to use
The res subfolders store various application resources . We already know very well about layout files in the res / layout folder. I mentioned the res / drawable folder with density suffixes - it stores pictures . Now pay attention to the res / values folder. It is intended for storing resources (constants) of various types. We will consider the String and Color types.
Create a project:
Project name : P0111_ResValues
Build Target : Android 2.3.3
Application name : ResValues
Package name : ru.startandroid.develop.resvalues
Create Activity : MainActivity
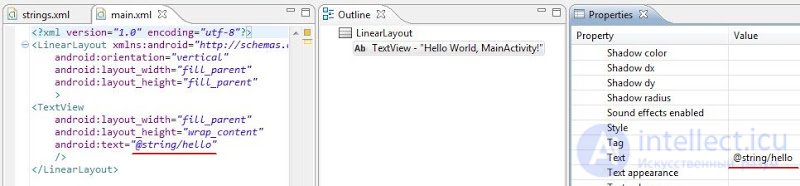
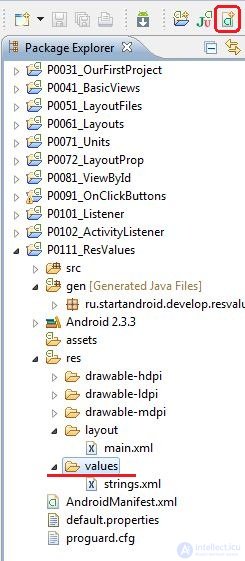
Open the file res / values / strings.xml
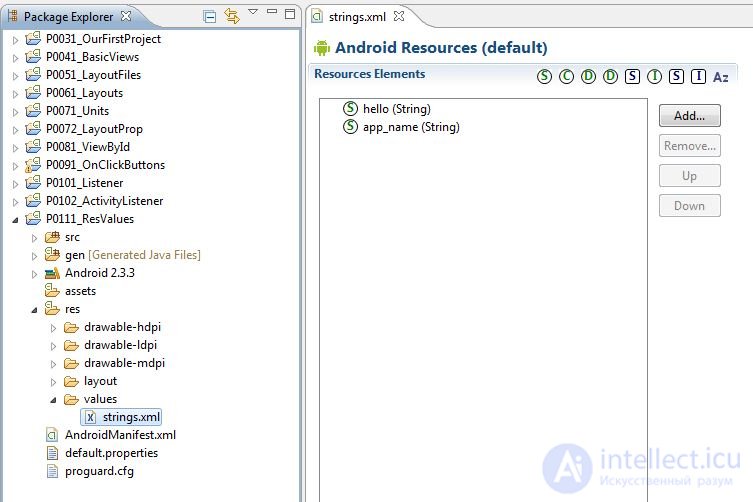
We see two String elements:
hello - by default it is used in the Text property in the TextView in main.xml. And accordingly TextView displays the value of this element.
app_name - the default is used as a title for the application and Activity. This is indicated in the manifest file, which we have not yet analyzed.
On these elements you can click and see to the right what they are: name (Name) and value (Value)
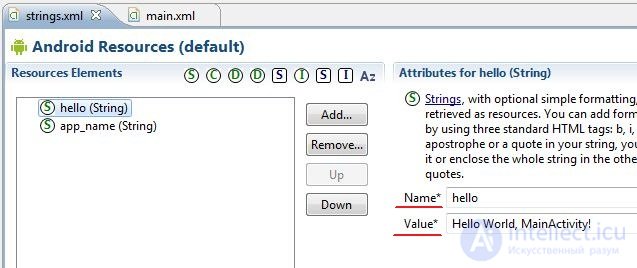
Name is an ID . It must be unique, and a constant is created for it in R.java so that we can access this String element.

If we look at the XML content of the strings.xml file (the tab below is the same as for main.xml), we see that everything is transparent and simple. Let's try and we use resources.
First, create such a screen in main.xml :
<? xml version = "1.0" encoding = "utf-8"?>
<LinearLayout
xmlns: android = "http://schemas.android.com/apk/res/android"
android: layout_height = "match_parent"
android: layout_width = "match_parent"
android: orientation = "vertical">
<LinearLayout
android: layout_width = "match_parent"
android: id = "@ + id / llTop"
android: orientation = "vertical"
android: layout_weight = "1"
android: layout_height = "match_parent">
<Textview
android: text = "TextView"
android: layout_width = "wrap_content"
android: layout_height = "wrap_content"
android: layout_gravity = "center_horizontal"
android: id = "@ + id / tvTop"
android: layout_marginTop = "30dp">
</ TextView>
<Button
android: text = "Button"
android: layout_height = "wrap_content"
android: layout_gravity = "center_horizontal"
android: id = "@ + id / btnTop"
android: layout_width = "wrap_content">
</ Button>
</ LinearLayout>
<LinearLayout
android: layout_width = "match_parent"
android: id = "@ + id / llBottom"
android: orientation = "vertical"
android: layout_weight = "1"
android: layout_height = "match_parent">
<Textview
android: text = "TextView"
android: layout_width = "wrap_content"
android: layout_height = "wrap_content"
android: layout_gravity = "center_horizontal"
android: id = "@ + id / tvBottom"
android: layout_marginTop = "30dp">
</ TextView>
<Button
android: text = "Button"
android: layout_width = "wrap_content"
android: layout_height = "wrap_content"
android: layout_gravity = "center_horizontal"
android: id = "@ + id / btnBottom">
</ Button>
</ LinearLayout>
</ LinearLayout>
The screen is divided into two identical halves, containing LinearLayout, Button and TextView. For LinearLayout, we will specify the background color , and for TextView and Button - change the text . We realize this with the help of resources. Moreover, we will adjust the top -elements of the upper part manually through the properties , and try to configure the lower part programmatically .
Let's create our own file with resources in the values folder, let it be the name myres.
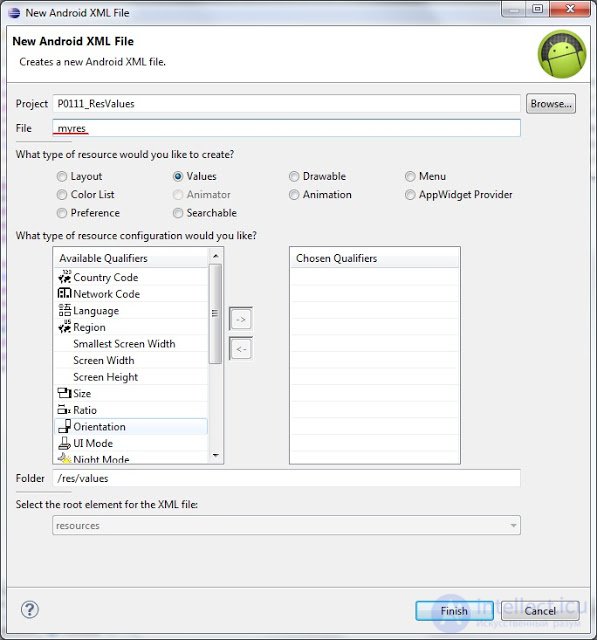
After creation, the file editor has opened. To add an element is simple - click the Add button and select the type , and on the right, write the name and value . Create 4 String-elements and 2 Color-elements:
  <? xml version = "1.0" encoding = "utf-8"?>
  <resources>
  <string name = "tvTopText"> Top Text </ string>
  <string name = "btnTopText"> Top Button </ string>
  <string name = "tvBottomText"> Bottom text </ string>
  <string name = "btnBottomText"> Bottom button </ string>
  <color name = "llTopColor"> # 336699 </ color>
  <color name = "llBottomColor"> # 339966 </ color>
  </ resources>
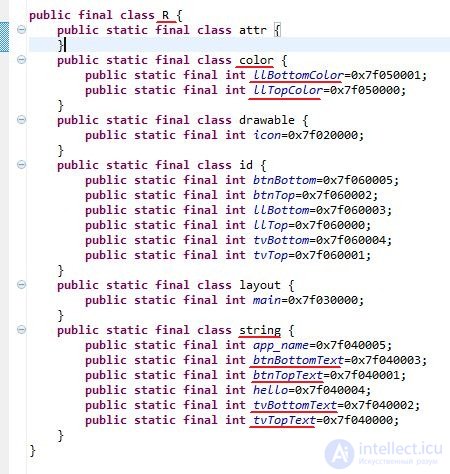
For practice, you can create it manually, or you can simply paste this text into the content of myres.xml. Remember to save. Let's take a look at R.java, make sure that everything has appeared here:
Ok, resources are created, we will configure View-elements on their use. Upper first:
llTop - in the Properties we find the Background property, click the select button (three dots), in the Color branch, select the llTopColor and click OK

tvTop - for the Text property, open the selection window and find tvTopText there.
btnTop - for the Text property, open the selection window and find btnTopText there.
The color of the upper part has changed and the texts have changed to those that we indicated in myres.xml.
To change the bottom part, we will code. First we find the elements, then we assign them values.
public class MainActivity extends Activity {
 /** Called when the activity is first created. */
 @Override
 public void onCreate(Bundle savedInstanceState) {
 super.onCreate(savedInstanceState);
 setContentView(R.layout.main);

 LinearLayout llBottom = (LinearLayout) findViewById(R.id.llBottom);
 TextView tvBottom = (TextView) findViewById(R.id.tvBottom);
 Button btnBottom = (Button) findViewById(R.id.btnBottom);

 llBottom.setBackgroundResource(R.color.llBottomColor);
 tvBottom.setText(R.string.tvBottomText);
 btnBottom.setText(R.string.btnBottomText);

 }
 }
Note that the setText method is used to change text. Only this is not the same setText that we used when we set the text directly. This input takes an ID and we use R.java, which stores the ID of all our resources. Those. methods are called the same, but they take different parameters as input. This is normal in Java.
Save, run and check. Now the texts and colors are taken from the resource file. You can change the contents of myres.xml (for example, the text for the top button), save, run the application and see the changes.
Sometimes it is necessary to get in the code not the resource ID, but its value. This is done as follows:
getResources().getString(R.string.tvBottomText); The expression returns the text "Bottom text" corresponding to a String-resource with name = tvBottomText .
Finally, I will say a few words about the organization of files for storing resources. We have now created String and Color resources in one myres.xml file , but it is recommended to separate them into different files (for example, strings.xml, colors.xml ...), and in the future I will follow this recommendation. There are reasons for this, we will see it later.
Resource names are pass-through for all files in the res / values folder. Those. You cannot create a resource with the same name and type in different files.
Resource file names can be arbitrary and you can create as many files as you like. In R.java get all the resources from these files.
In the next lesson:
- consider the application logs and pop-up messages

Comments
To leave a comment
Mobile Programming (Android IOs)
Terms: Mobile Programming (Android IOs)