Lecture
In this lesson:
- we use the query and delete methods with indication of the condition
In the last lesson we discussed how to insert a record, read all the records from the table, and clear the table. Now let's see how to update and delete a specific entry.
We will not create a new project, use P0341_SimpleSQLite from the last lesson. Let's change the screen a bit, add an ID field and buttons for updating and deleting .
Rewrite main.xml :
  <? xml version = "1.0" encoding = "utf-8"?>
  <LinearLayout
  xmlns: android = "http://schemas.android.com/apk/res/android"
  android: layout_width = "fill_parent"
  android: layout_height = "fill_parent"
  android: orientation = "vertical">
  <LinearLayout
  android: id = "@ + id / linearLayout4"
  android: layout_width = "match_parent"
  android: layout_height = "wrap_content"
  android: layout_marginTop = "5dp">
  <Textview
  android: layout_width = "wrap_content"
  android: layout_height = "wrap_content"
  android: text = "ID"
  android: layout_marginLeft = "5dp"
  android: layout_marginRight = "25dp">
  </ TextView>
  <Edittext
  android: id = "@ + id / etID"
  android: layout_width = "70dp"
  android: layout_height = "wrap_content"
  android: layout_marginTop = "2dp">
  </ Edittext>
  <Button
  android: id = "@ + id / btnUpd"
  android: layout_width = "wrap_content"
  android: layout_height = "wrap_content"
  android: text = "Update">
  </ Button>
  <Button
  android: id = "@ + id / btnDel"
  android: layout_width = "wrap_content"
  android: layout_height = "wrap_content"
  android: text = "Delete">
  </ Button>
  </ LinearLayout>
  <LinearLayout
  android: id = "@ + id / linearLayout1"
  android: layout_width = "match_parent"
  android: layout_height = "wrap_content">
  <Textview
  android: layout_width = "wrap_content"
  android: layout_height = "wrap_content"
  android: text = "Name"
  android: layout_marginLeft = "5dp"
  android: layout_marginRight = "5dp">
  </ TextView>
  <Edittext
  android: id = "@ + id / etName"
  android: layout_width = "wrap_content"
  android: layout_height = "wrap_content"
  android: layout_weight = "1">
  <requestFocus>
  </ requestFocus>
  </ Edittext>
  </ LinearLayout>
  <LinearLayout
  android: id = "@ + id / linearLayout3"
  android: layout_width = "match_parent"
  android: layout_height = "wrap_content">
  <Textview
  android: id = "@ + id / textView2"
  android: layout_width = "wrap_content"
  android: layout_height = "wrap_content"
  android: text = "Email"
  android: layout_marginLeft = "5dp"
  android: layout_marginRight = "5dp">
  </ TextView>
  <Edittext
  android: id = "@ + id / etEmail"
  android: layout_width = "wrap_content"
  android: layout_height = "wrap_content"
  android: layout_weight = "1">
  </ Edittext>
  </ LinearLayout>
  <LinearLayout
  android: id = "@ + id / linearLayout2"
  android: layout_width = "match_parent"
  android: layout_height = "wrap_content">
  <Button
  android: id = "@ + id / btnAdd"
  android: layout_width = "wrap_content"
  android: layout_height = "wrap_content"
  android: text = "Add">
  </ Button>
  <Button
  android: id = "@ + id / btnRead"
  android: layout_width = "wrap_content"
  android: layout_height = "wrap_content"
  android: text = "Read">
  </ Button>
  <Button
  android: id = "@ + id / btnClear"
  android: layout_width = "wrap_content"
  android: layout_height = "wrap_content"
  android: text = "Clear">
  </ Button>
  </ LinearLayout>
  </ LinearLayout>
By pressing the Update button, we will read the contents of the Name and Email fields, and update the record in the table for which id = value from the ID field. By pressing the Delete button we will delete the record from the table by id = value from the ID field. The screen turned out, of course, not the best from the point of view of ergonomics and usability, but we do not have a circle of young designers, but a serious study of the database.
Let's edit MainActivity.java . Add a description and definition of new screen elements, assigning handlers for buttons.
final String LOG_TAG = "myLogs";

 Button btnAdd, btnRead, btnClear, btnUpd, btnDel ;
 EditText etName, etEmail, etID ;

 ...

 public void onCreate(Bundle savedInstanceState) {

 ...

 btnClear = (Button) findViewById(R.id.btnClear);
 btnClear.setOnClickListener(this);

 btnUpd = (Button) findViewById(R.id.btnUpd);
 btnUpd.setOnClickListener(this);

 btnDel = (Button) findViewById(R.id.btnDel);
 btnDel.setOnClickListener(this) ;

 etName = (EditText) findViewById(R.id.etName);
 etEmail = (EditText) findViewById(R.id.etEmail);
 etID = (EditText) findViewById(R.id.etID) ;

 // создаем объект для создания и управления версиями БД
 dbHelper = new DBHelper(this);
 }
(Only add bold italic text. If not, zoom in)
Now we add onClick implementation:
public void onClick(View v) {

 // создаем объект для данных
 ContentValues cv = new ContentValues();

 // получаем данные из полей ввода
 String name = etName.getText().toString();
 String email = etEmail.getText().toString();
 String id = etID.getText ().toString() ;

 // подключаемся к БД
 SQLiteDatabase db = dbHelper.getWritableDatabase();

 switch (v.getId()) {
 case R.id.btnAdd:
 ...
 case R.id.btnRead:
 ...
 case R.id.btnClear:
 ...
 case R.id.btnUpd:
 if (id.equalsIgnoreCase("")) {
 break;
 }
 Log.d(LOG_TAG, "--- Update mytabe: ---");
 // подготовим значения для обновления
 cv.put("name", name);
 cv.put("email", email);
 // обновляем по id
 int updCount = db.update("mytable", cv, "id = ?",
 new String[] { id });
 Log.d(LOG_TAG, "updated rows count = " + updCount);
 break;
 case R.id.btnDel:
 if (id.equalsIgnoreCase("")) {
 break;
 }
 Log.d(LOG_TAG, "--- Delete from mytabe: ---");
 // удаляем по id
 int delCount = db.delete("mytable", "id = " + id, null);
 Log.d(LOG_TAG, "deleted rows count = " + delCount);
 break ;
 }
 // закрываем подключение к БД
 dbHelper.close();
 }
(Only add bold italic text)
We add the id variable, write the value of the etID field in it. We add two new branches to switch :
btnUpd - update record in mytable. We check that the id value is not empty, fill cv with the data for the update and update the record. To do this, use the update method. The input is the name of the table filled with ContentValues with the values to update, the condition string (Where), and an array of arguments for the condition string. In the condition line, I used the sign ? . When querying the database, the value from the array of arguments will be substituted for this sign, in our case it is the value of the id variable. If signs ? there are several conditions in the string, they will be assigned the values from the array in order. The update method returns us the number of updated records, which we output to the log.
btnDel - delete record from mytable. We check that id is not empty and call the delete method. The input is the name of the table, the condition string , and the argument array for the condition. The delete method returns the number of deleted lines, which we output to the log.
Please note that the conditions for both update and delete are the same for me, namely id = value from the etID field . But I implemented them a little differently. For update used the symbol ? in the string conditions and an array of arguments. And for delete, I inserted the value immediately into the condition string. Thus, I just showed ways to form the condition . And you already use the one that is more like or better in a particular situation.
All save and run. In the last lesson we added a couple of records, but then we deleted them. So I will add again. Add a couple of entries, click Read , I see in the log:
ID = 3, name = Ivan Petrov, email = ipetrov @ abc.com
ID = 4, name = Anton Sidorov, email = asidorov @ def.com
Now let's try to update the record with ID = 3. To do this, enter 3 in the ID field and new data in the Name and Email fields:
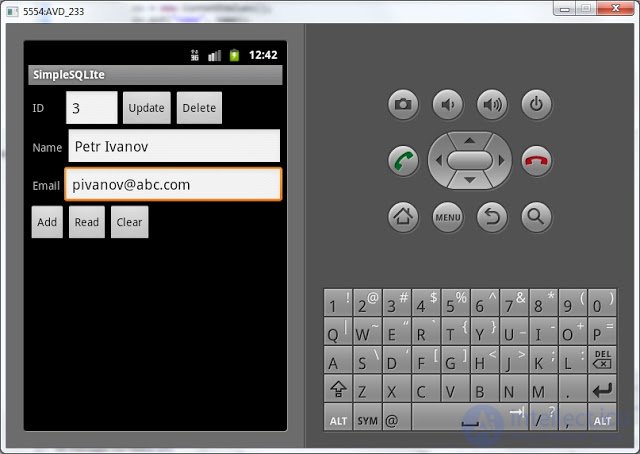
Click Update , look at the log:
- Update mytabe: ---
updated rows count = 1
one record updated, that's right.
Click Read and verify this. Log:
ID = 3, name = Petr Ivanov, email = pivanov @ abc.com
ID = 4, name = Anton Sidorov, email = asidorov @ def.com
Record really updated.
Now let's delete the record with ID = 4. Enter 4 in the ID field
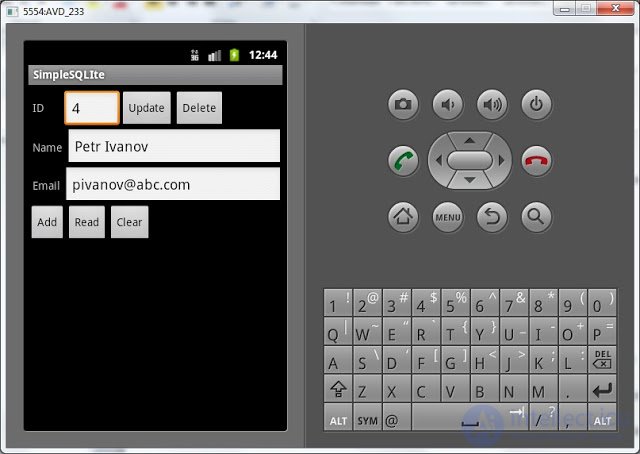
Click Delete , look at the log:
--- Delete from mytabe: ---
deleted rows count = 1
one record deleted.
Click Read , look at the log:
--- Rows in mytable: ---
ID = 3, name = Petr Ivanov, email = pivanov @ abc.com
there was one entry.
If you try to delete an entry with an empty ID field, nothing will happen, because we implemented a check. If you try to delete the record with a non-existent ID , then the delete method returns 0 . Those. nothing has been deleted because There were no records to delete.
Now you can read , insert , delete and modify records in SQLite.
Full code MainActivity.java :
package ru.startandroid.develop.p0341simplesqlite;

 import ru.startandroid.develop.p0341simpelsqlite.R;
 import android.app.Activity;
 import android.content.ContentValues;
 import android.content.Context;
 import android.database.Cursor;
 import android.database.sqlite.SQLiteDatabase;
 import android.database.sqlite.SQLiteOpenHelper;
 import android.os.Bundle;
 import android.util.Log;
 import android.view.View;
 import android.view.View.OnClickListener;
 import android.widget.Button;
 import android.widget.EditText;

 public class MainActivity extends Activity implements OnClickListener {

 final String LOG_TAG = "myLogs";

 Button btnAdd, btnRead, btnClear, btnUpd, btnDel;
 EditText etName, etEmail, etID;

 DBHelper dbHelper;

 /** Called when the activity is first created. */
 public void onCreate(Bundle savedInstanceState) {
 super.onCreate(savedInstanceState);
 setContentView(R.layout.main);

 btnAdd = (Button) findViewById(R.id.btnAdd);
 btnAdd.setOnClickListener(this);

 btnRead = (Button) findViewById(R.id.btnRead);
 btnRead.setOnClickListener(this);

 btnClear = (Button) findViewById(R.id.btnClear);
 btnClear.setOnClickListener(this);

 btnUpd = (Button) findViewById(R.id.btnUpd);
 btnUpd.setOnClickListener(this);

 btnDel = (Button) findViewById(R.id.btnDel);
 btnDel.setOnClickListener(this);

 etName = (EditText) findViewById(R.id.etName);
 etEmail = (EditText) findViewById(R.id.etEmail);
 etID = (EditText) findViewById(R.id.etID);

 // создаем объект для создания и управления версиями БД
 dbHelper = new DBHelper(this);
 }

 public void onClick(View v) {

 // создаем объект для данных
 ContentValues cv = new ContentValues();

 // получаем данные из полей ввода
 String name = etName.getText().toString();
 String email = etEmail.getText().toString();
 String id = etID.getText().toString();

 // подключаемся к БД
 SQLiteDatabase db = dbHelper.getWritableDatabase();

 switch (v.getId()) {
 case R.id.btnAdd:
 Log.d(LOG_TAG, "--- Insert in mytable: ---");
 // подготовим данные для вставки в виде пар: наименование столбца -
 // значение
 cv.put("name", name);
 cv.put("email", email);
 // вставляем запись и получаем ее ID
 long rowID = db.insert("mytable", null, cv);
 Log.d(LOG_TAG, "row inserted, ID = " + rowID);
 break;
 case R.id.btnRead:
 Log.d(LOG_TAG, "--- Rows in mytable: ---");
 // делаем запрос всех данных из таблицы mytable, получаем Cursor
 Cursor c = db.query("mytable", null, null, null, null, null, null);

 // ставим позицию курсора на первую строку выборки
 // если в выборке нет строк, вернется false
 if (c.moveToFirst()) {

 // определяем номера столбцов по имени в выборке
 int idColIndex = c.getColumnIndex("id");
 int nameColIndex = c.getColumnIndex("name");
 int emailColIndex = c.getColumnIndex("email");

 do {
 // получаем значения по номерам столбцов и пишем все в лог
 Log.d(LOG_TAG,
 "ID = " + c.getInt(idColIndex) + ", name = "
 + c.getString(nameColIndex) + ", email = "
 + c.getString(emailColIndex));
 // переход на следующую строку
 // а если следующей нет (текущая - последняя), то false -
 // выходим из цикла
 } while (c.moveToNext());
 } else
 Log.d(LOG_TAG, "0 rows");
 c.close();
 break;
 case R.id.btnClear:
 Log.d(LOG_TAG, "--- Clear mytable: ---");
 // удаляем все записи
 int clearCount = db.delete("mytable", null, null);
 Log.d(LOG_TAG, "deleted rows count = " + clearCount);
 break;
 case R.id.btnUpd:
 if (id.equalsIgnoreCase("")) {
 break;
 }
 Log.d(LOG_TAG, "--- Update mytabe: ---");
 // подготовим значения для обновления
 cv.put("name", name);
 cv.put("email", email);
 // обновляем по id
 int updCount = db.update("mytable", cv, "id = ?",
 new String[] { id });
 Log.d(LOG_TAG, "updated rows count = " + updCount);
 break;
 case R.id.btnDel:
 if (id.equalsIgnoreCase("")) {
 break;
 }
 Log.d(LOG_TAG, "--- Delete from mytabe: ---");
 // удаляем по id
 int delCount = db.delete("mytable", "id = " + id, null);
 Log.d(LOG_TAG, "deleted rows count = " + delCount);
 break;
 }
 // закрываем подключение к БД
 dbHelper.close();
 }

 class DBHelper extends SQLiteOpenHelper {

 public DBHelper(Context context) {
 // конструктор суперкласса
 super(context, "myDB", null, 1);
 }

 public void onCreate(SQLiteDatabase db) {
 Log.d(LOG_TAG, "--- onCreate database ---");
 // создаем таблицу с полями
 db.execSQL("create table mytable ("
 + "id integer primary key autoincrement,"
 + "name text,"
 + "email text" + ");");
 }

 public void onUpgrade(SQLiteDatabase db, int oldVersion, int newVersion) {

 }
 }

 }
In the next lesson:
- parse the method of reading the data query
- we use sorting, grouping, conditions, having

Comments
To leave a comment
Mobile Programming (Android IOs)
Terms: Mobile Programming (Android IOs)