Lecture
In this lesson:
- we understand why we need requestCode and resultCode in onActivityResult
 - video lesson version
In the last lesson we superficially looked at how to trigger an Activity , and how to make it return the result . Consider a little more detail this mechanism. Create an application that will call two different Activities and receive results from them. As we remember, the result comes in the ononActivityResult method. And the requestCode is used to distinguish the results from each other. A resultCode - allows you to determine whether the call was successful or not.
Create a project:
Project name : P0301_ActivityResult
Build Target : Android 2.3.3
Application name : ActivityResult
Package name : ru.startandroid.develop.p0301activityresult
Create Activity : MainActivity
Draw a screen in main.xml :
  <? xml version = "1.0" encoding = "utf-8"?>
  <LinearLayout
  xmlns: android = "http://schemas.android.com/apk/res/android"
  android: layout_width = "fill_parent"
  android: layout_height = "fill_parent"
  android: orientation = "vertical">
  <Textview
  android: id = "@ + id / tvText"
  android: layout_width = "fill_parent"
  android: layout_height = "wrap_content"
  android: layout_marginTop = "20dp"
  android: gravity = "center_horizontal"
  android: text = "Hello World"
  android: textSize = "20sp">
  </ TextView>
  <LinearLayout
  android: id = "@ + id / linearLayout1"
  android: layout_width = "match_parent"
  android: layout_height = "wrap_content"
  android: layout_margin = "20dp"
  android: orientation = "horizontal">
  <Button
  android: id = "@ + id / btnColor"
  android: layout_width = "match_parent"
  android: layout_height = "wrap_content"
  android: layout_marginRight = "5dp"
  android: layout_weight = "1"
  android: text = "Color">
  </ Button>
  <Button
  android: id = "@ + id / btnAlign"
  android: layout_width = "match_parent"
  android: layout_height = "wrap_content"
  android: layout_marginLeft = "5dp"
  android: layout_weight = "1"
  android: text = "Alignment">
  </ Button>
  </ LinearLayout>
  </ LinearLayout>
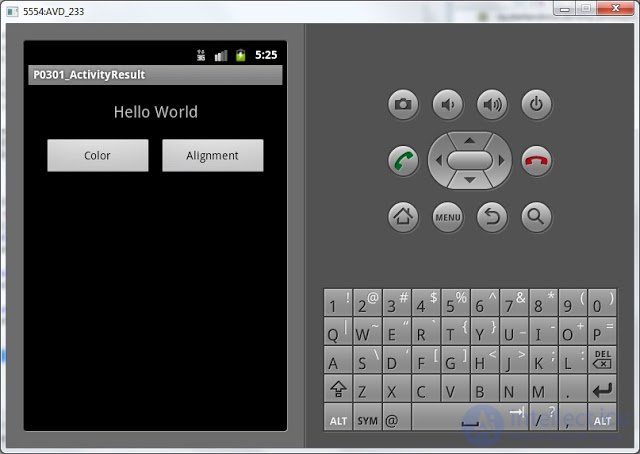
On screen textview with text. And two buttons to select the font color and text alignment in the TextView. Pressing the button will call the Activity to select and receive the result back.
Let's start the code in MainActivity.java :
package ru.startandroid.develop.p0301activityresult;

 import android.app.Activity;
 import android.os.Bundle;
 import android.view.View;
 import android.view.View.OnClickListener;
 import android.widget.Button;
 import android.widget.TextView;

 public class MainActivity extends Activity implements OnClickListener {

 TextView tvText;
 Button btnColor;
 Button btnAlign;

 /** Called when the activity is first created. */
 @Override
 public void onCreate(Bundle savedInstanceState) {
 super.onCreate(savedInstanceState);
 setContentView(R.layout.main);

 tvText = (TextView) findViewById(R.id.tvText);

 btnColor = (Button) findViewById(R.id.btnColor);
 btnAlign = (Button) findViewById(R.id.btnAlign);

 btnColor.setOnClickListener(this);
 btnAlign.setOnClickListener(this);

 }

 @Override
 public void onClick(View v) {
 // TODO Auto-generated method stub

 }
 }
We determined the screen elements, assigned a handler to the buttons and for the time being we’ll stop there.
Create two other activities. Let's start with an Activity to choose a color . Create a color.xml layout file:
  <? xml version = "1.0" encoding = "utf-8"?>
  <LinearLayout
  xmlns: android = "http://schemas.android.com/apk/res/android"
  android: layout_width = "match_parent"
  android: layout_height = "match_parent"
  android: orientation = "horizontal">
  <Button
  android: id = "@ + id / btnRed"
  android: layout_width = "match_parent"
  android: layout_height = "wrap_content"
  android: layout_margin = "5dp"
  android: layout_weight = "1"
  android: text = "Red">
  </ Button>
  <Button
  android: id = "@ + id / btnGreen"
  android: layout_width = "match_parent"
  android: layout_height = "wrap_content"
  android: layout_margin = "5dp"
  android: layout_weight = "1"
  android: text = "Green">
  </ Button>
  <Button
  android: id = "@ + id / btnBlue"
  android: layout_width = "match_parent"
  android: layout_height = "wrap_content"
  android: layout_margin = "5dp"
  android: layout_weight = "1"
  android: text = "Blue">
  </ Button>
  </ LinearLayout>
Create a ColorActivity class. ColorActivity.java :
package ru.startandroid.develop.p0301activityresult;

 import android.app.Activity;
 import android.content.Intent;
 import android.graphics.Color;
 import android.os.Bundle;
 import android.view.View;
 import android.view.View.OnClickListener;
 import android.widget.Button;

 public class ColorActivity extends Activity implements OnClickListener {

 Button btnRed;
 Button btnGreen;
 Button btnBlue;

 @Override
 protected void onCreate(Bundle savedInstanceState) {
 super.onCreate(savedInstanceState);
 setContentView(R.layout.color);

 btnRed = (Button) findViewById(R.id.btnRed);
 btnGreen = (Button) findViewById(R.id.btnGreen);
 btnBlue = (Button) findViewById(R.id.btnBlue);

 btnRed.setOnClickListener(this);
 btnGreen.setOnClickListener(this);
 btnBlue.setOnClickListener(this);
 }

 @Override
 public void onClick(View v) {
 Intent intent = new Intent();
 switch (v.getId()) {
 case R.id.btnRed:
 intent.putExtra("color", Color.RED);
 break;
 case R.id.btnGreen:
 intent.putExtra("color", Color.GREEN);
 break;
 case R.id.btnBlue:
 intent.putExtra("color", Color.BLUE);
 break;
 }
 setResult(RESULT_OK, intent);
 finish();
 }
 }
As usual, we define the elements, assign the handler to the buttons and implement onClick. In onClick, we create an Intent , then we define a button with which color was pressed and place an object with the name color and a color value into the Intent. We set the status to RESULT_OK , indicate that we need to return an intent object as a result, and close the Activity. For color values, we use system constants.
Similarly, create an Activity to select alignment.
Layout file align.xml :
  <? xml version = "1.0" encoding = "utf-8"?>
  <LinearLayout
  xmlns: android = "http://schemas.android.com/apk/res/android"
  android: layout_width = "match_parent"
  android: layout_height = "match_parent"
  android: orientation = "horizontal">
  <Button
  android: id = "@ + id / btnLeft"
  android: layout_width = "match_parent"
  android: layout_height = "wrap_content"
  android: layout_margin = "5dp"
  android: layout_weight = "1"
  android: text = "Left">
  </ Button>
  <Button
  android: id = "@ + id / btnCenter"
  android: layout_width = "match_parent"
  android: layout_height = "wrap_content"
  android: layout_margin = "5dp"
  android: layout_weight = "1"
  android: text = "Center">
  </ Button>
  <Button
  android: id = "@ + id / btnRight"
  android: layout_width = "match_parent"
  android: layout_height = "wrap_content"
  android: layout_margin = "5dp"
  android: layout_weight = "1"
  android: text = "Right">
  </ Button>
  </ LinearLayout>
AlignActivity.java :
package ru.startandroid.develop.p0301activityresult;

 import android.app.Activity;
 import android.content.Intent;
 import android.os.Bundle;
 import android.view.Gravity;
 import android.view.View;
 import android.view.View.OnClickListener;
 import android.widget.Button;

 public class AlignActivity extends Activity implements OnClickListener {

 Button btnLeft;
 Button btnCenter;
 Button btnRight;

 @Override
 protected void onCreate(Bundle savedInstanceState) {
 super.onCreate(savedInstanceState);
 setContentView(R.layout.align);

 btnLeft = (Button) findViewById(R.id.btnLeft);
 btnCenter = (Button) findViewById(R.id.btnCenter);
 btnRight = (Button) findViewById(R.id.btnRight);

 btnLeft.setOnClickListener(this);
 btnCenter.setOnClickListener(this);
 btnRight.setOnClickListener(this);
 }

 @Override
 public void onClick(View v) {
 Intent intent = new Intent();
 switch (v.getId()) {
 case R.id.btnLeft:
 intent.putExtra("alignment", Gravity.LEFT);
 break;
 case R.id.btnCenter:
 intent.putExtra("alignment", Gravity.CENTER);
 break;
 case R.id.btnRight:
 intent.putExtra("alignment", Gravity.RIGHT);
 break;
 }
 setResult(RESULT_OK, intent);
 finish();
 }
 }
Here, everything is the same as in ColorActivity. Only we work not with flowers, but with alignment . Do not forget to register both Activities in the manifest.
Now we can complete the code in MainActivity.java. Add a couple of its constants to the class for convenience:
final int REQUEST_CODE_COLOR = 1;
 final int REQUEST_CODE_ALIGN = 2;
These constants will continue to be used as the requestCode.
Let's add the onClick method:
@Override
 public void onClick(View v) {
 Intent intent;
 switch (v.getId()) {
 case R.id.btnColor:
 intent = new Intent(this, ColorActivity.class);
 startActivityForResult(intent, REQUEST_CODE_COLOR);
 break;
 case R.id.btnAlign:
 intent = new Intent(this, AlignActivity.class);
 startActivityForResult(intent, REQUEST_CODE_ALIGN);
 break;
 }
 }
We determine which button was pressed and send an Intent with the expectation of returning the result. The two calls differ in the class of the called Activity and in the requestCode parameter in the startActivityForResult method. When calling ColorActivity , we use the REQUEST_CODE_COLOR constant, and when calling AlignActivity , we use REQUEST_CODE_ALIGN . We will get this constant back in the method of processing the result - onActivityResult , and we will be able to determine from it exactly from which Activity the result came.
Let's implement the onActivityResult method in MainActivity.java:
@Override
 protected void onActivityResult(int requestCode, int resultCode, Intent data) {
 // запишем в лог значения requestCode и resultCode
 Log.d("myLogs", "requestCode = " + requestCode + ", resultCode = " + resultCode);
 // если пришло ОК
 if (resultCode == RESULT_OK) {
 switch (requestCode) {
 case REQUEST_CODE_COLOR:
 int color = data.getIntExtra("color", Color.WHITE);
 tvText.setTextColor(color);
 break;
 case REQUEST_CODE_ALIGN:
 int align = data.getIntExtra("alignment", Gravity.LEFT);
 tvText.setGravity(align);
 break;
 }
 // если вернулось не ОК
 } else {
 Toast.makeText(this, "Wrong result", Toast.LENGTH_SHORT).show();
 }
 }
For clarity, we write in the log values of variables.
We recall that in ColorActivity and AlignActivity in the setResult method we set the RESULT_OK status when sending the result. So in onActivityResult we need to expect this status as a symbol of a successful call termination.
If the call was successful (resultCode = RESULT_OK), then we look at the value of requestCode . If it is equal to the REQUEST_CODE_COLOR constant, then we recall that we used this constant in the startActivityForResult method when we sent a color selection request. So, we have the result of this choice . We take an Intent (data) and extract from it the value of an object with the name color and assign this value to the color of the text in the TextView. The constant Color.WHITE in the getIntExtra method means the default value. Those. if there is no object with the name color in the Intent, the method will return a white color.
Similarly for REQUEST_CODE_ALIGN . This constant we used to query the choice of alignment . And if in the onActivityResult method, the requestCode = parameter is constant, then the answer to the alignment request came. And we read this value from the Intent and assign it to the Gravity attribute for the TextView.
If resultCode is not equal to RESULT_OK , then something went wrong. We display the corresponding message. This case may occur, for example, if the selection screen does not make a choice, but press the Back button.
Let's all save and run the application.
Click Color
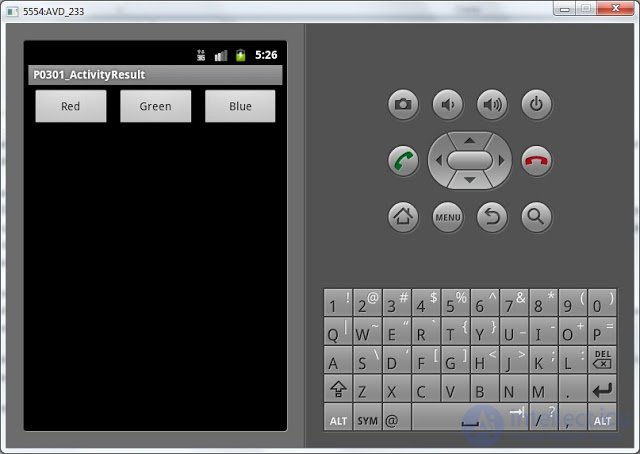
and choose, for example Red
The color has changed
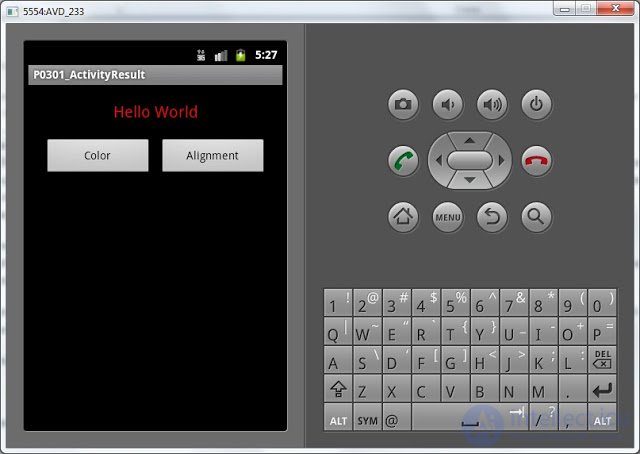
look at the log:
requestCode = 1, resultCode = -1
The requestCode that came to the onActivityResult method is 1. That's right, this is the value of the REQUEST_CODE_COLOR constant that we used when calling.
resultCode = -1 is the value of the system constant RESULT_OK
Those. that's right, the answer came to the color request, and its status = RESULT_OK .
Now click Alignment and select Right, we obtain the alignment to the right:

We look at the log:
requestCode = 2, resultCode = -1
requestCode = 2, which is equal to the REQUEST_CODE_ALIGN constant. So came the answer to the alignment request.
resultCode = -1, i.e. RESULT_OK.
Now press Color again.
but instead of choosing a color, press the back button

Our error message was displayed. Look logs:
requestCode = 1, resultCode = 0
requestCode = 1 - that's right, we requested a color ( REQUEST_CODE_COLOR )
resultCode = 0, this is the value of the RESULT_CANCELED constant, which means the call failed
There are no restrictions on the status value in the setResult method. RESULT_OK and RESULT_CANCELED are system common constants. But you can freely use your own values, if necessary.
So let's summarize.
requestCode is a kind of request ID. It is set in the startActivityForResult method, and then checked in onActivityResult to know exactly which call was answered.
resultCode - call status. It is set in the setResult method, and checked in onActivityResult to understand how successfully the call passed. If something went wrong during the call, the system constant RESULT_CANCELED will return.
Full code MainActivity.java :
package ru.startandroid.develop.p0301activityresult;

 import android.app.Activity;
 import android.content.Intent;
 import android.graphics.Color;
 import android.os.Bundle;
 import android.util.Log;
 import android.view.Gravity;
 import android.view.View;
 import android.view.View.OnClickListener;
 import android.widget.Button;
 import android.widget.TextView;
 import android.widget.Toast;

 public class MainActivity extends Activity implements OnClickListener {

 final int REQUEST_CODE_COLOR = 1;
 final int REQUEST_CODE_ALIGN = 2;

 TextView tvText;
 Button btnColor;
 Button btnAlign;

 /** Called when the activity is first created. */
 @Override
 public void onCreate(Bundle savedInstanceState) {
 super.onCreate(savedInstanceState);
 setContentView(R.layout.main);

 tvText = (TextView) findViewById(R.id.tvText);

 btnColor = (Button) findViewById(R.id.btnColor);
 btnAlign = (Button) findViewById(R.id.btnAlign);

 btnColor.setOnClickListener(this);
 btnAlign.setOnClickListener(this);
 }

 @Override
 public void onClick(View v) {
 Intent intent;
 switch (v.getId()) {
 case R.id.btnColor:
 intent = new Intent(this, ColorActivity.class);
 startActivityForResult(intent, REQUEST_CODE_COLOR);
 break;
 case R.id.btnAlign:
 intent = new Intent(this, AlignActivity.class);
 startActivityForResult(intent, REQUEST_CODE_ALIGN);
 break;
 }
 }

 @Override
 protected void onActivityResult(int requestCode, int resultCode, Intent data) {
 // запишем в лог значения requestCode и resultCode
 Log.d("myLogs", "requestCode = " + requestCode + ", resultCode = " + resultCode);
 // если пришло ОК
 if (resultCode == RESULT_OK) {
 switch (requestCode) {
 case REQUEST_CODE_COLOR:
 int color = data.getIntExtra("color", Color.WHITE);
 tvText.setTextColor(color);
 break;
 case REQUEST_CODE_ALIGN:
 int align = data.getIntExtra("alignment", Gravity.LEFT);
 tvText.setGravity(align);
 break;
 }
 // если вернулось не ОК
 } else {
 Toast.makeText(this, "Wrong result", Toast.LENGTH_SHORT).show();
 }
 }
 }
In the next lesson:
- find out what a URI is
- we cause system applications (browser, dialer, map)

Comments
To leave a comment
Mobile Programming (Android IOs)
Terms: Mobile Programming (Android IOs)