Lecture
In this lesson we:
- change layout parameters for already existing screen components
We can create screen components and customize their layout using LayoutParams . In this lesson we will understand how to change the layout-parameters of existing components.
We will change the weight - weight . Draw a SeekBar (slider or slider) and two buttons . And we will adjust the space occupied by the buttons using the weight parameter.
Create a project:
Project name : P0181_DynamicLayout3
Build Target : Android 2.3.3
Application name : DynamicLayout3
Package name : ru.startandroid.develop.dynamiclayout3
Create Activity : MainActivity
Open main.xml and create such a screen:
  <? xml version = "1.0" encoding = "utf-8"?>
  <LinearLayout
  xmlns: android = "http://schemas.android.com/apk/res/android"
  android: orientation = "vertical"
  android: layout_width = "fill_parent"
  android: layout_height = "fill_parent">
  <SeekBar
  android: layout_height = "wrap_content"
  android: layout_width = "match_parent"
  android: max = "100"
  android: progress = "50"
  android: layout_marginTop = "20dp"
  android: id = "@ + id / sbWeight">
  </ SeekBar>
  <LinearLayout
  android: id = "@ + id / linearLayout1"
  android: layout_width = "match_parent"
  android: orientation = "horizontal"
  android: layout_height = "wrap_content"
  android: layout_marginTop = "30dp">
  <Button
  android: layout_height = "wrap_content"
  android: id = "@ + id / btn1"
  android: text = "Button1"
  android: layout_weight = "1"
  android: layout_width = "wrap_content">
  </ Button>
  <Button
  android: layout_height = "wrap_content"
  android: id = "@ + id / btn2"
  android: text = "Button2"
  android: layout_weight = "1"
  android: layout_width = "wrap_content">
  </ Button>
  </ LinearLayout>
  </ LinearLayout>
We use the SeekBar component. It looks like a scroll bar and allows you to set any value from a range. This component has max and progress properties. Max is what value the SeekBar gives when it is maxed out. Progress is the current value of the slider. Maximum will do = 100 , and the current value will be at half - 50 .
The buttons have a width in content and weight for both = 1 . They equally divide the space of the LinearLayout in which they are located.
It remains only to write the necessary code to make it work. Open MainActivity.java , describe and find the components and access their LayoutParams.
public class MainActivity extends Activity {

 SeekBar sbWeight;
 Button btn1;
 Button btn2;

 LinearLayout.LayoutParams lParams1;
 LinearLayout.LayoutParams lParams2;

 public void onCreate(Bundle savedInstanceState) {
 super.onCreate(savedInstanceState);
 setContentView(R.layout.main);

 sbWeight = (SeekBar) findViewById(R.id.sbWeight);

 btn1 = (Button) findViewById(R.id.btn1);
 btn2 = (Button) findViewById(R.id.btn2);

 lParams1 = (LinearLayout.LayoutParams) btn1.getLayoutParams();
 lParams2 = (LinearLayout.LayoutParams) btn2.getLayoutParams();
 }
 }
We use the getLayoutParams method to get the LayoutParams component. But this method returns the base ViewGroup.LayoutParams , and we need LinearLayout.LayoutParams , so we do the conversion. As a result, lParams1 and lParams2 are now LayoutParams for the btn1 and btn2 components . Those. working, for example, with lParams1, we influence btn1. Now we use it.
SeekBar will need a handler that will respond to changes. We will entrust this Activity. To do this, add to the description of the class implements OnSeekBarChangeListener :
public class MainActivity extends Activity implements OnSeekBarChangeListener { You also need to add handler methods that are now required to implement the Activity.
@Override
 public void onProgressChanged(SeekBar seekBar, int progress,
 boolean fromUser) {

 }

 @Override
 public void onStartTrackingTouch(SeekBar seekBar) {

 }

 @Override
 public void onStopTrackingTouch(SeekBar seekBar) {

 }
The handler contains three methods. From the names it is clear that:
- onStartTrackingTouch is triggered when we start dragging the slider
- onProgressChanged works as long as the value changes
- onStopTrackingTouch is triggered when you release the slider
We will use the onProgressChanged method. So changes will be visible while dragging the slider.
@Override
public void onProgressChanged(SeekBar seekBar, int progress,
boolean fromUser) {
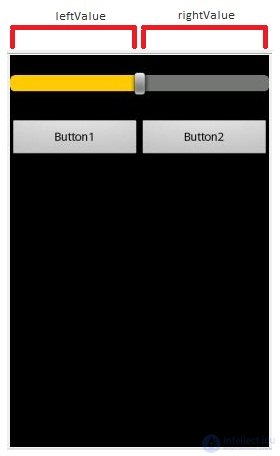
int leftValue = progress;
int rightValue = seekBar.getMax() - progress;
// настраиваем вес
lParams1.weight = leftValue;
lParams2.weight = rightValue;
// в текст кнопок пишем значения переменных
btn1.setText(String.valueOf(leftValue));
btn2.setText(String.valueOf(rightValue));
} variable leftValue - the current value of the SeekBar, i.e. what is to the left of the slider
the rightValue variable is that to the right of the slider, i.e. from the maximum subtract the current value.
Accordingly, these values and use as weight. The slider to the left , the smaller the leftValue and the greater the rightValue , which means that the width is btn1 and the width is btn2 . And vice versa.
Also for clarity, the text of the buttons will record the values of variables.
And of course, we don’t forget that we need to assign an Activity handler to the View component whose events need to be processed:
setContentView(R.layout.main);

 sbWeight = (SeekBar) findViewById(R.id.sbWeight);
 sbWeight.setOnSeekBarChangeListener (this) ;

 btn1 = (Button) findViewById(R.id.btn1);
(Please note. I introduce a new method of filing a code. What is underlined is a new code, and a regular font is an already existing code. You need to find the existing code and add a new code to it to make this fragment.)
All save and run the application. Drag the slider to change the size of the buttons:

It looks spectacular, I think) And the code is just a few lines.
There is a small nuance. As it was rightly noted in kamenta, if you just write the code lParams1.weight = 1, then the component will not change. It is necessary to add the code: btn1.requestLayout (). Then the button will read the Layout and redraw it. This method is already called in setText, so we do not explicitly call it here.
Now we know quite a lot, and in the following lessons we will try to write the first meaningful application - a calculator.
Full lesson code:
public class MainActivity extends Activity implements OnSeekBarChangeListener {

 SeekBar sbWeight;
 Button btn1;
 Button btn2;

 LinearLayout.LayoutParams lParams1;
 LinearLayout.LayoutParams lParams2;

 /** Called when the activity is first created. */
 @Override
 public void onCreate(Bundle savedInstanceState) {
 super.onCreate(savedInstanceState);
 setContentView(R.layout.main);

 sbWeight = (SeekBar) findViewById(R.id.sbWeight);
 sbWeight.setOnSeekBarChangeListener(this);

 btn1 = (Button) findViewById(R.id.btn1);
 btn2 = (Button) findViewById(R.id.btn2);

 lParams1 = (LinearLayout.LayoutParams) btn1.getLayoutParams();
 lParams2 = (LinearLayout.LayoutParams) btn2.getLayoutParams();
 }

 @Override
 public void onProgressChanged(SeekBar seekBar, int progress,
 boolean fromUser) {
 int leftValue = progress;
 int rightValue = seekBar.getMax() - progress;
 // настраиваем вес
 lParams1.weight = leftValue;
 lParams2.weight = rightValue;
 // в текст кнопок пишем значения переменных
 btn1.setText(String.valueOf(leftValue));
 btn2.setText(String.valueOf(rightValue));
 }

 @Override
 public void onStartTrackingTouch(SeekBar seekBar) {
 }

 @Override
 public void onStopTrackingTouch(SeekBar seekBar) {
 }
 }
In the next lesson:
- we write application the calculator

Comments
To leave a comment
Mobile Programming (Android IOs)
Terms: Mobile Programming (Android IOs)