Lecture
In this lesson:
- we cause Activity, using an implicit call and Intent Filter
The last lessons turned out to be a congested theory. This theory needs to be understood so that there are no problems with practice. These topics are the basis - Task, Lifecycle, Intent. If something remains unclear, then you can always re-open and re-read the material. And then we will implement examples that will confirm this theory and everything will become clearer.
In past lessons, we learned to invoke an Activity using an Intent and explicitly specifying a class . We also know that there is another way to invoke an Activity - implicit . It is based on the fact that Activity is called not by name, but by functionality. Those. we want to perform certain actions, create and configure the appropriate Intent and send it to look for those Activities that could cope with our task.
Let's see how this is implemented in practice. We will create an application that will display to us the current time or date. We will do this with the help of three Activities:
- the first will contain two buttons: Show time and Show date
- the second will display the time
- the third will display the date
Clicking the Show time button will call the second Activity, and clicking the Show date button will cause the third Activity. But we realize this not through a direct indication of the Activity classes in the Intent, but through the Intent Filter .
Create a project:
Project name : P0261_IntentFilter
Build Target : Android 2.3.3
Application name : IntentFilter
Package name : ru.startandroid.develop.p0261intentfilter
Create Activity : MainActivity
Open main.xml and draw two buttons:
  <? xml version = "1.0" encoding = "utf-8"?>
  <LinearLayout
  xmlns: android = "http://schemas.android.com/apk/res/android"
  android: layout_width = "fill_parent"
  android: layout_height = "fill_parent"
  android: orientation = "horizontal">
  <Button
  android: layout_width = "wrap_content"
  android: layout_height = "wrap_content"
  android: id = "@ + id / btnTime"
  android: text = "Show time">
  </ Button>
  <Button
  android: layout_width = "wrap_content"
  android: layout_height = "wrap_content"
  android: id = "@ + id / btnDate"
  android: text = "Show date">
  </ Button>
  </ LinearLayout>
We write the implementation of MainActivity.java :
package ru.startandroid.develop.p0261intentfilter;

 import android.app.Activity;
 import android.content.Intent;
 import android.os.Bundle;
 import android.view.View;
 import android.view.View.OnClickListener;
 import android.widget.Button;

 public class MainActivity extends Activity implements OnClickListener {

 /** Called when the activity is first created. */
 @Override
 public void onCreate(Bundle savedInstanceState) {
 super.onCreate(savedInstanceState);
 setContentView(R.layout.main);

 Button btnTime = (Button) findViewById(R.id.btnTime);
 Button btnDate = (Button) findViewById(R.id.btnDate);

 btnTime.setOnClickListener(this);
 btnDate.setOnClickListener(this);
 }

 @Override
 public void onClick(View v) {
 Intent intent;

 switch(v.getId()) {
 case R.id.btnTime:
 intent = new Intent("ru.startandroid.intent.action.showtime");
 startActivity(intent);
 break;
 case R.id.btnDate:
 intent = new Intent("ru.startandroid.intent.action.showdate");
 startActivity(intent);
 break;
 }
 }
 }
In the code, we defined the buttons and assigned them to the Activity as a click handler . In the onCilck method , we determine which button was pressed and create an Intent .
To create an Intent, use the constructor: Intent (String action). Those. we create an attribute of the Intent object, called action, when we create it. This is a common string constant. Action usually indicates the action we want to perform. For example, there are the following system action constants: ACTION_VIEW — view, ACTION_EDIT — edit, ACTION_PICK — select from the list, ACTION_DIAL — make a call.
If an action is performed with something, then one more Intent-attribute - data - is paired with the action . In it, we can specify an object: a user in the address book, coordinates on a map, a phone number, etc. Those. action indicates what to do , and data - what to do .
We'll talk more about data in the following lessons, but for now we will only use action . Above, I have already listed some system action constants, but we can use our own action.
As you can see from the code, I came up with and use such an action:
ru.startandroid.intent.action.showtime
ru.startandroid.intent.action.showdate
The first one will mean that I want to call an Activity, which the current time will show me. The second is an Activity with a date.
Here it is necessary to clearly understand the following: action is just a text . And I could just as well come up with the action abcdefg123456 . But the text showtime - reflects what I want to do, it is clearer and clearer. And the prefix ru.startandroid.intent.action I use so that there are no collisions. The system may have an application that already uses action showtime - I do not want to intersect with it. Therefore, my action is ru.startandroid.intent.action.showtime .
So, we created an Intent with action and launched it into the system to look for an Activity. In order for an Activity to fit, its Intent Filter must contain an action attribute with the same value as the action in the Intent . So it remains for us to create two Activities , configure them with the Intent Filter and implement the display of time and date.
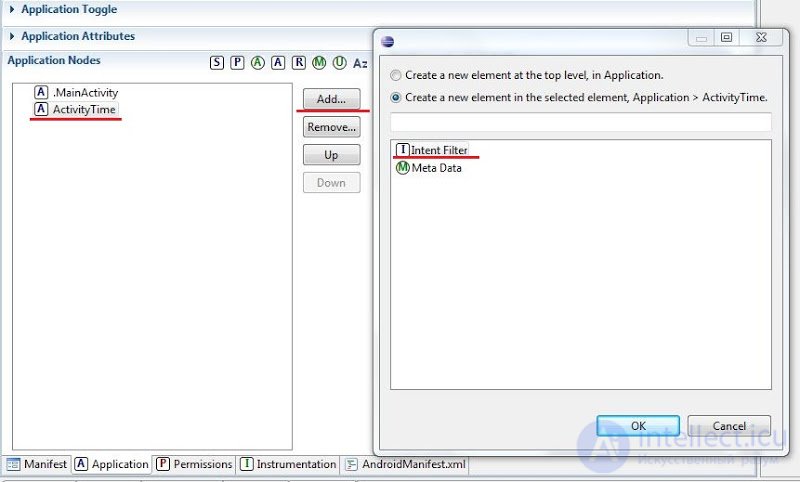
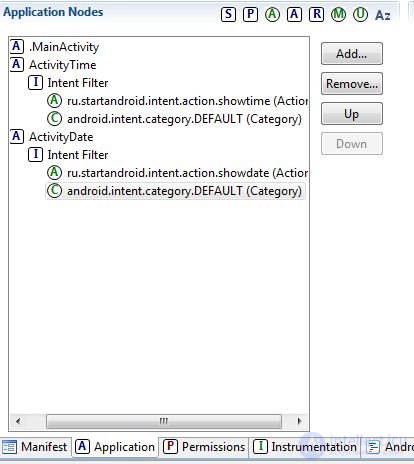
An activity is created as usual - we create an ActivityTime class with the superclass android.app.Activity and write it in the manifest as an Activity. Once registered in the manifest, it will be necessary to create an Intent Filter in the same place. To do this, select ActivityTime , click Add , select Intent Filter and click OK .
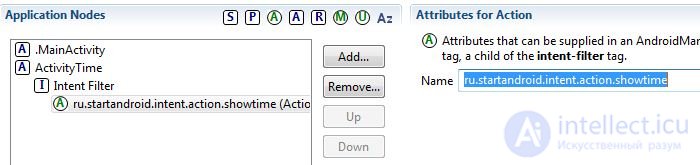
Next, in the Intent Filter we create the Action in the same way and in the Name field we set ru.startandroid.intent.action.showtime
Also in the Intent Filter you need to create a Category and in the name field select from the list android.intent.category.DEFAULT . While we will not understand in detail why it is needed. But without this, the startActivity (Intent) call will not find an Activity.

Create a layout for the new Activity, call it time.xml :
  <? xml version = "1.0" encoding = "utf-8"?>
  <LinearLayout
  xmlns: android = "http://schemas.android.com/apk/res/android"
  android: layout_width = "match_parent"
  android: layout_height = "match_parent"
  android: orientation = "vertical">
  <Textview
  android: layout_width = "wrap_content"
  android: layout_height = "wrap_content"
  android: id = "@ + id / tvTime"
  android: text = "TextView"
  android: layout_gravity = "center_horizontal"
  android: layout_marginTop = "20dp"
  android: textSize = "30sp">
  </ TextView>
  </ LinearLayout>
We write code in ActivityTime.java :
package ru.startandroid.develop.p0261intentfilter;

 import java.sql.Date;
 import java.text.SimpleDateFormat;

 import android.app.Activity;
 import android.os.Bundle;
 import android.widget.TextView;

 public class ActivityTime extends Activity {

 @Override
 protected void onCreate(Bundle savedInstanceState) {
 super.onCreate(savedInstanceState);
 setContentView(R.layout.time);

 SimpleDateFormat sdf = new SimpleDateFormat("HH:mm:ss");
 String time = sdf.format(new Date(System.currentTimeMillis()));

 TextView tvTime = (TextView) findViewById(R.id.tvTime);
 tvTime.setText(time);
 }
 }
Everything is simple - we calculate the current time and show it in TextView.
All save and run the application.
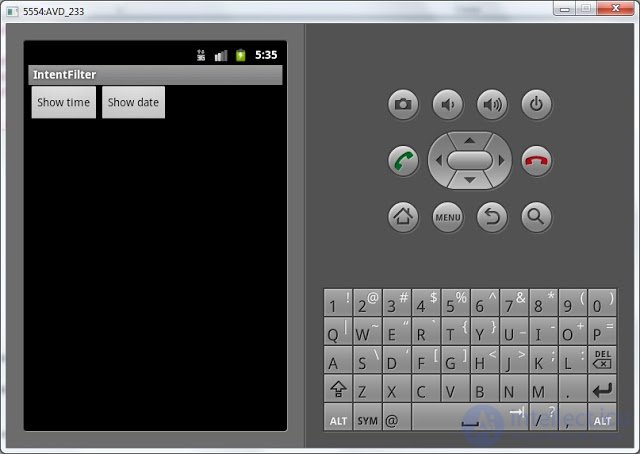
Click the Show time button:
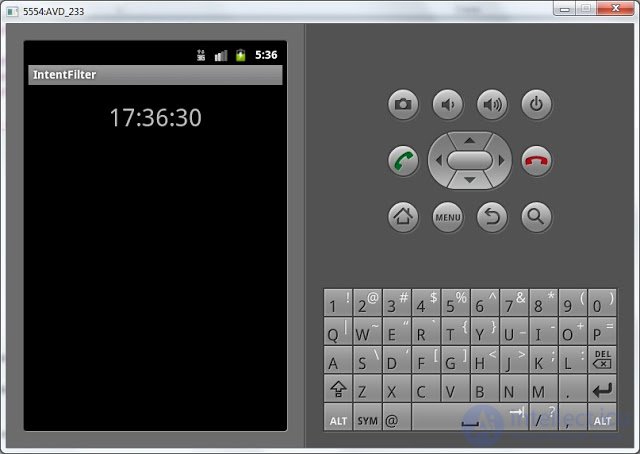
time is displayed. Those. Intent with action = ru.startandroid.intent.action.showtime found and displayed an Activity for which the action is also equal to ru.startandroid.intent.action.showtime in the Intent Filter .
Let's go back (the Back button) and click the Show date button now. The application will give an error, because it could not find an Activity that would match an Intent with action = ru.startandroid.intent.action.showdate (we created it only for showtime).
Let's create such an Activity, let's call it ActivityDate . Actions are the same as when creating an ActivityTime:
- class creation
- creating an Activity in the manifest and creating an Intent Filter for it (c action = ru.startandroid.intent.action.showdate and category = android.intent.category.DEFAULT )
Layout file is called date.xml :
  <? xml version = "1.0" encoding = "utf-8"?>
  <LinearLayout
  xmlns: android = "http://schemas.android.com/apk/res/android"
  android: layout_width = "match_parent"
  android: layout_height = "match_parent"
  android: orientation = "vertical">
  <Textview
  android: layout_width = "wrap_content"
  android: layout_height = "wrap_content"
  android: id = "@ + id / tvDate"
  android: text = "TextView"
  android: layout_gravity = "center_horizontal"
  android: layout_marginTop = "20dp"
  android: textSize = "30sp">
  </ TextView>
  </ LinearLayout>
ActivityDate.java code:
package ru.startandroid.develop.p0261intentfilter;

 import java.sql.Date;
 import java.text.SimpleDateFormat;

 import android.app.Activity;
 import android.os.Bundle;
 import android.widget.TextView;

 public class ActivityDate extends Activity {

 @Override
 protected void onCreate(Bundle savedInstanceState) {
 super.onCreate(savedInstanceState);
 setContentView(R.layout.date);

 SimpleDateFormat sdf = new SimpleDateFormat("dd.MM.yyyy");
 String date = sdf.format(new Date(System.currentTimeMillis()));

 TextView tvDate = (TextView) findViewById(R.id.tvDate);
 tvDate.setText(date);
 }
 }
All save, run the application, click Show date and see the date. This means that the Intent with action = ru.startandroid.intent.action.showdate found and displayed the ActivityDate suitable for it by the Intent Filter .
To fix the topic, let's do something else. If you remember, in lesson number 22, where I talked about the Intent Filter, I said that an Intent can find several suitable Activities . In this case, the user is given the choice of which Activity to use. Let's provoke such a case. We will make another Activity that will respond to Intent with action = ru.startandroid.intent.action.showdate . And it will display the current date as ActivityDate. But the date display format will be slightly different.
Let's create this Activity, let's call it ActivityDateEx . Actions are the same as when creating ActivityDate:
- class creation
- creating an Activity in the manifest and creating an Intent Filter for it (with action = ru.startandroid.intent.action.showdate and category = android.intent.category.DEFAULT )
We will not create a new layout file, we will use the already existing date.xml . In principle, all three Activities with us could use one layout, since they are exactly the same - one TextView.
ActivityDateEx.java code:
package ru.startandroid.develop.p0261intentfilter;

 import java.sql.Date;
 import java.text.SimpleDateFormat;

 import android.app.Activity;
 import android.os.Bundle;
 import android.widget.TextView;

 public class ActivityDateEx extends Activity {

 @Override
 protected void onCreate(Bundle savedInstanceState) {
 super.onCreate(savedInstanceState);
 setContentView(R.layout.date);

 SimpleDateFormat sdf = new SimpleDateFormat("EEE, MMM d, yyyy");
 String date = sdf.format(new Date(System.currentTimeMillis()));

 TextView tvDate = (TextView) findViewById(R.id.tvDate);
 tvDate.setText(date);
 }
 }
As you can see, the difference from ActivityDate is only in the date format. Save all and run. Click Show date and see this choice:
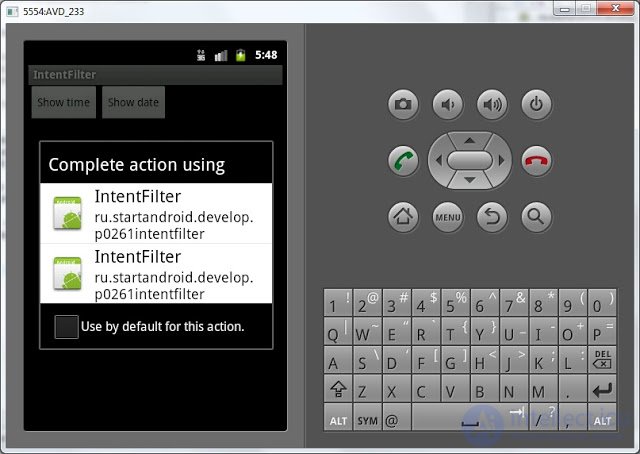
Intent found two Activities , but showed for each of them the name of the parent application and the package. In our case, both are Activities from our application, so the text is the same and you can’t figure out which one is. Let's fix this by writing normal names.
Click Back to close the selection dialog. We go to the manifesto and write the label for the Activity :
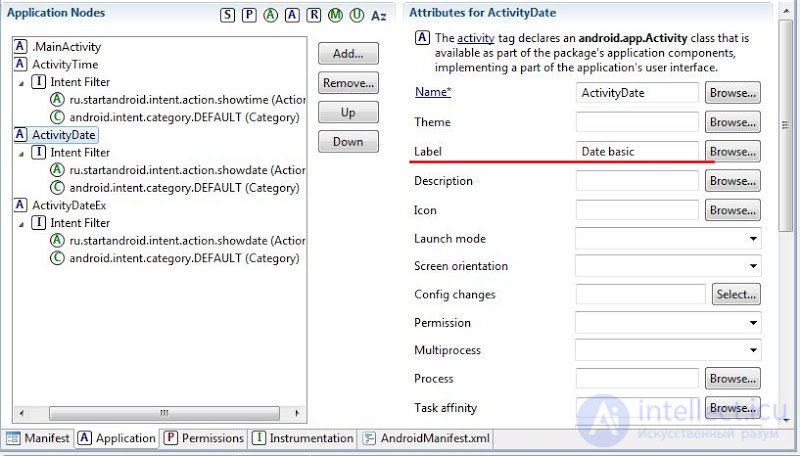
Date basic for ActivityDate
Date extended for ActivityDateEx
Save and run. Click Show date and see this choice:

So much better. We press Date extended and we see date in an expanded format on ActivityDateEx.
So we created and sent an Intent with action . This Intent found an Activity with a suitable Intent Filter and displayed it. If I found several , I gave a choice . The examples perfectly show the mechanism.
If you are confused about what and where to create, I quote the project screen and the contents of the manifest.
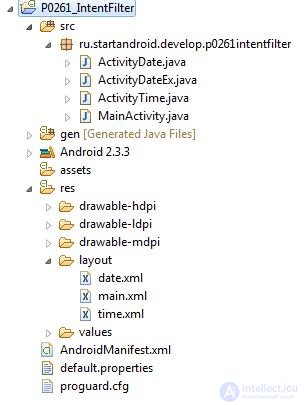
Manifest content (AndroidManifest.xml tab):
  <? xml version = "1.0" encoding = "utf-8"?>
  <manifest xmlns: android = "http://schemas.android.com/apk/res/android" package = "ru.startandroid.develop.p0261intentfilter" android: versionCode = "1" android: versionName = "1.0">
  <uses-sdk android: minSdkVersion = "10"> </ uses-sdk>
  <application android: icon = "@ drawable / icon" android: label = "@ string / app_name">
  <activity android: name = ". MainActivity" android: label = "@ string / app_name">
  <intent-filter>
  <action android: name = "android.intent.action.MAIN"> </ action>
  <category android: name = "android.intent.category.LAUNCHER"> </ category>
  </ intent-filter>
  </ activity>
  <activity android: name = "ActivityTime">
  <intent-filter>
  <action android: name = "ru.startandroid.intent.action.showtime"> </ action>
  <category android: name = "android.intent.category.DEFAULT"> </ category>
  </ intent-filter>
  </ activity>
  <activity android: name = "ActivityDate" android: label = "Date basic">
  <intent-filter>
  <action android: name = "ru.startandroid.intent.action.showdate"> </ action>
  <category android: name = "android.intent.category.DEFAULT"> </ category>
  </ intent-filter>
  </ activity>
  <activity android: name = "ActivityDateEx" android: label = "Date extended">
  <intent-filter>
  <action android: name = "ru.startandroid.intent.action.showdate"> </ action>
  <category android: name = "android.intent.category.DEFAULT"> </ category>
  </ intent-filter>
  </ activity>
  </ application>
  </ manifest>
In the next lesson:
- we read action from Intent

Comments
To leave a comment
Mobile Programming (Android IOs)
Terms: Mobile Programming (Android IOs)