Lecture
In this lesson we:
- learn to use one handler for multiple view-elements
- teach the Activity to act as a handler
Create a project:
Project name : P0101_Listener
Build Target : Android 2.3.3
Application name : Listener
Package name : ru.startandroid.develop.listener
Create Activity : MainActivity
We will work with the same View as in the previous lesson. Code for main.xml :
<? xml version = "1.0" encoding = "utf-8"?>
<LinearLayout
xmlns: android = "http://schemas.android.com/apk/res/android"
android: layout_height = "match_parent"
android: layout_width = "match_parent"
android: orientation = "horizontal">
<LinearLayout
android: id = "@ + id / linearLayout1"
android: layout_height = "match_parent"
android: orientation = "vertical"
android: layout_width = "match_parent"
android: layout_margin = "30dp">
<Textview
android: layout_width = "wrap_content"
android: text = "TextView"
android: layout_height = "wrap_content"
android: id = "@ + id / tvOut"
android: layout_gravity = "center_horizontal"
android: layout_marginBottom = "50dp">
</ TextView>
<Button
android: layout_height = "wrap_content"
android: layout_gravity = "center_horizontal"
android: id = "@ + id / btnOk"
android: text = "OK"
android: layout_width = "100dp">
</ Button>
<Button
android: layout_height = "wrap_content"
android: layout_gravity = "center_horizontal"
android: id = "@ + id / btnCancel"
android: text = "Cancel"
android: layout_width = "100dp">
</ Button>
</ LinearLayout>
</ LinearLayout>
So, we have a TextView with text and two buttons. As in the last lesson, we will make the TextView contents change when the button is pressed. By pressing the OK button - we will display the text: “OK button pressed”, by pressing Cancel - “Cancel button pressed”. But now we will do it with one handler , which will handle pressing for both buttons .
Let me remind the event handling mechanism on the example of a button. The button itself cannot handle clicks, it needs a listener, which is assigned using the setOnClickListener method. When a button is clicked, the handler responds and executes code from the onClick method.
Accordingly, for the implementation, you must perform the following steps:
- create handler
- fill the onClick method
- assign the handler to the button
In our case, we will assign one handler to both buttons, and inside the handler it will be necessary to determine which button was pressed.
Prepare objects and create a handler:
public class MainActivity extends Activity {

 TextView tvOut;
 Button btnOk;
 Button btnCancel;

 /** Called when the activity is first created. */
 @Override
 public void onCreate(Bundle savedInstanceState) {
 super.onCreate(savedInstanceState);
 setContentView(R.layout.main);

 // найдем View-элементы
 tvOut = (TextView) findViewById(R.id.tvOut);
 btnOk = (Button) findViewById(R.id.btnOk);
 btnCancel = (Button) findViewById(R.id.btnCancel);

 // создание обработчика
 OnClickListener oclBtn = new OnClickListener() {
 @Override
 public void onClick(View v) {
 // TODO Auto-generated method stub

 }
 };

 }
 }
Let's fill in the onClick method. At the entrance it is given an object of class View , this is just what we need. This is the View on which the click occurred and which caused the handler. Those. in our case, it will be either the OK button or Cancel. It remains for us to find out the ID of this View and compare it with our R.id.btnOk and R.id.btnCancel , in order to determine which button it is. To get the ID of a View, the getId method is used. To iterate over the results, use the java-operator switch.
The implementation of the onClick method:
public void onClick(View v) {
 // по id определеяем кнопку, вызвавшую этот обработчик
 switch (v.getId()) {
 case R.id.btnOk:
 // кнопка ОК
 tvOut.setText("Нажата кнопка ОК");
 break;
 case R.id.btnCancel:
 // кнопка Cancel
 tvOut.setText("Нажата кнопка Cancel");
 break;
 }
 }
If you now start the application and check, nothing will happen. We created the handler, but did not assign it to the buttons. We assign the same handler to both buttons:
btnOk.setOnClickListener(oclBtn);
 btnCancel.setOnClickListener(oclBtn);
Now we can run and check, everything should work.
As you understand, one handler can be assigned not to two, but to any number of buttons. And not just buttons. The rest of the View elements also have various events that need handlers. In the future we will work with them. And now it is important to understand the scheme, how the event handling happens.
The difference between the method of implementation in this lesson and the previous lesson is that now we have created one handler object for both buttons , and in the last lesson two objects, one for each button . There is a rule - the smaller objects you create, the better, because memory is allocated for each object, and this is a rather limited resource, especially for phones. Therefore, to create one handler for several View is more correct from the point of view of optimization. In addition, the code becomes smaller and easier to read.
There is another way to create a handler, which does not require creating objects at all. An already created object will be used - Activity
The button assigns itself a handler using the setOnClickListener (View.OnClickListener l) method. Those. any object with the View.OnClickListener interface will do. Why should the Activity class not be such an object? We simply indicate that the Activity class implements the View.OnClickListener interface and populates the onCreate method.
Create a new project for this:
Project name : P0102_ActivityListener
Build Target : Android 2.3.3
Application name : ActivityListener
Package name : ru.startandroid.develop.activitylistener
Create Activity : MainActivity
The screen again take the same:
<? xml version = "1.0" encoding = "utf-8"?>
<LinearLayout
xmlns: android = "http://schemas.android.com/apk/res/android"
android: layout_height = "match_parent"
android: layout_width = "match_parent"
android: orientation = "horizontal">
<LinearLayout
android: id = "@ + id / linearLayout1"
android: layout_height = "match_parent"
android: orientation = "vertical"
android: layout_width = "match_parent"
android: layout_margin = "30dp">
<Textview
android: layout_width = "wrap_content"
android: text = "TextView"
android: layout_height = "wrap_content"
android: id = "@ + id / tvOut"
android: layout_gravity = "center_horizontal"
android: layout_marginBottom = "50dp">
</ TextView>
<Button
android: layout_height = "wrap_content"
android: layout_gravity = "center_horizontal"
android: id = "@ + id / btnOk"
android: text = "OK"
android: layout_width = "100dp">
</ Button>
<Button
android: layout_height = "wrap_content"
android: layout_gravity = "center_horizontal"
android: id = "@ + id / btnCancel"
android: text = "Cancel"
android: layout_width = "100dp">
</ Button>
</ LinearLayout>
</ LinearLayout>
Prepare objects and add an interface implementation (implements onClickListener)
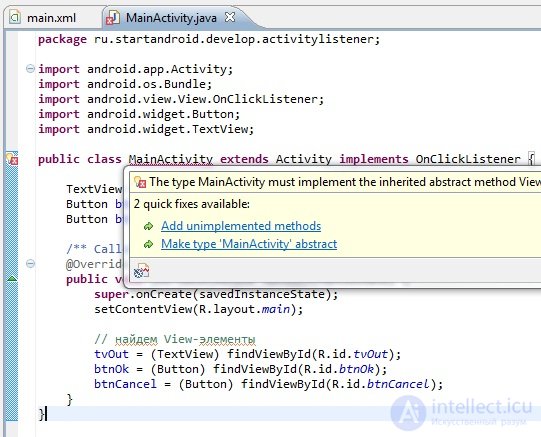
public class MainActivity extends Activity implements OnClickListener {

 TextView tvOut;
 Button btnOk;
 Button btnCancel;

 /** Called when the activity is first created. */
 @Override
 public void onCreate(Bundle savedInstanceState) {
 super.onCreate(savedInstanceState);
 setContentView(R.layout.main);

 // найдем View-элементы
 tvOut = (TextView) findViewById(R.id.tvOut);
 btnOk = (Button) findViewById(R.id.btnOk);
 btnCancel = (Button) findViewById(R.id.btnCancel);
 }
 }
OnClickListener is underlined in red, because it is not in import. Therefore, CTRL + SHIFT + O and select View.OnClickListener.
Eclipse now curses the MainActivity class. This happens because the interface is registered for the class, but there is no implementation of the methods of this interface. Fix it with Eclipse. Hover over MainAcivity and select Add unimplemented methods
Eclipse will add the familiar onClick method. Only now this method will be implemented in the Activity, and not in a separate handler object. Accordingly, the Activity will act as a handler.
Fill the method in the same way as before. Nothing changed. The View (on which the event occurred) is also given to its input, according to Id, we will determine which View is exactly and perform the corresponding actions:
public void onClick(View v) {
 // по id определеяем кнопку, вызвавшую этот обработчик
 switch (v.getId()) {
 case R.id.btnOk:
 // кнопка ОК
 tvOut.setText("Нажата кнопка ОК");
 break;
 case R.id.btnCancel:
 // кнопка Cancel
 tvOut.setText("Нажата кнопка Cancel");
 break;
 }
 }
It remains to assign a handler to the buttons in the onCreate method. This will be this object, i.e. current object MainActivity.
btnOk.setOnClickListener(this);
 btnCancel.setOnClickListener(this);
With this implementation, we have not created a single extra object (Activity is created anyway) and the memory costs are minimal, this is the recommended method. But perhaps this method will seem complicated and incomprehensible, especially if there is little experience in object-oriented programming. In this case, use the implementation that you understand and convenient. And with time and experience understanding will come.
Full code:
public class MainActivity extends Activity implements OnClickListener {

 TextView tvOut;
 Button btnOk;
 Button btnCancel;

 /** Called when the activity is first created. */
 @Override
 public void onCreate(Bundle savedInstanceState) {
 super.onCreate(savedInstanceState);
 setContentView(R.layout.main);

 // найдем View-элементы
 tvOut = (TextView) findViewById(R.id.tvOut);
 btnOk = (Button) findViewById(R.id.btnOk);
 btnCancel = (Button) findViewById(R.id.btnCancel);

 // присваиваем обработчик кнопкам
 btnOk.setOnClickListener(this);
 btnCancel.setOnClickListener(this);
 }

 @Override
 public void onClick(View v) {
 // по id определеяем кнопку, вызвавшую этот обработчик
 switch (v.getId()) {
 case R.id.btnOk:
 // кнопка ОК
 tvOut.setText("Нажата кнопка ОК");
 break;
 case R.id.btnCancel:
 // кнопка Cancel
 tvOut.setText("Нажата кнопка Cancel");
 break;
 }
 }

} There is another way to implement. In the layout file (main.xml), when describing a button, we write:
  <? xml version = "1.0" encoding = "utf-8"?>
  <Button
  android: id = "@ + id / btnStart"
  android: layout_width = "wrap_content"
  android: layout_height = "wrap_content"
  android: onClick = "onClickStart"
  android: text = "start">
  </ Button>
Those. use the onClick attribute. In it we specify the name of the method from the Activity. This method will work when you click on the button.
Next, add this method to the Activity (MainActivity.java). Requirements for the method: public, void and at the input takes View:
public void onClickStart(View v) {
 // действия при нажати на кнопку
 }
In the method, you register the actions you need, and they will be executed at the touch of a button.

Comments
To leave a comment
Mobile Programming (Android IOs)
Terms: Mobile Programming (Android IOs)