Lecture
In this lesson:
- use the methods SetViewText and SetViewImage
We already know that SimpleAdapter can insert text into TextView elements and images in an ImageView. It uses the SetViewText and SetViewImage methods for this. We can create our adapter based on SimpleAdapter and implement these methods for our purposes.
These methods provide us with a view and data , which means we can change the view depending on the data. As an example, we will make a list reflecting the dynamics of a certain indicator in the context of days. If the dynamics is positive - we will decorate the elements in green, if negative - in red.
Create a project:
Project name : P0491_SimpleAdapterCustom1
Build Target : Android 2.3.3
Application name : SimpleAdapterCustom1
Package name : ru.startandroid.develop.p0491simpleadaptercustom1
Create Activity : MainActivity
Draw the main.xml screen:
  <? xml version = "1.0" encoding = "utf-8"?>
  <LinearLayout
  xmlns: android = "http://schemas.android.com/apk/res/android"
  android: layout_width = "fill_parent"
  android: layout_height = "fill_parent"
  android: orientation = "vertical">
  <ListView
  android: id = "@ + id / lvSimple"
  android: layout_width = "match_parent"
  android: layout_height = "wrap_content">
  </ Listview>
  </ LinearLayout>
On the screen only a list.
And the layout for the item list item.xml :
  <? xml version = "1.0" encoding = "utf-8"?>
  <LinearLayout
  xmlns: android = "http://schemas.android.com/apk/res/android"
  android: layout_width = "match_parent"
  android: layout_height = "wrap_content"
  android: orientation = "horizontal">
  <LinearLayout
  android: layout_width = "match_parent"
  android: layout_height = "wrap_content"
  android: layout_marginBottom = "5dp"
  android: layout_marginTop = "5dp"
  android: orientation = "horizontal">
  <ImageView
  android: id = "@ + id / ivImg"
  android: layout_width = "30dp"
  android: layout_height = "22dp"
  android: scaleType = "fitCenter">
  </ ImageView>
  <Textview
  android: id = "@ + id / tvValue"
  android: layout_width = "wrap_content"
  android: layout_height = "wrap_content"
  android: layout_marginLeft = "10dp"
  android: text = "TextView"
  android: textSize = "20sp">
  </ TextView>
  <Framelayout
  android: layout_width = "match_parent"
  android: layout_height = "wrap_content">
  <Textview
  android: id = "@ + id / tvText"
  android: layout_width = "wrap_content"
  android: layout_height = "wrap_content"
  android: layout_gravity = "center_vertical | center_horizontal"
  android: text = "TextView"
  android: textSize = "20sp">
  </ TextView>
  </ FrameLayout>
  </ LinearLayout>
  </ LinearLayout>
The ivImg component will display an up or down arrow, tvValue is the dynamic value, tvText is the day number.
MainActivity.java code:
package ru.startandroid.develop.p0491simpleadaptercustom1;

 import java.util.ArrayList;
 import java.util.HashMap;
 import java.util.List;
 import java.util.Map;

 import android.app.Activity;
 import android.content.Context;
 import android.graphics.Color;
 import android.os.Bundle;
 import android.widget.ImageView;
 import android.widget.ListView;
 import android.widget.SimpleAdapter;
 import android.widget.TextView;

 public class MainActivity extends Activity {

 // имена атрибутов для Map
 final String ATTRIBUTE_NAME_TEXT = "text";
 final String ATTRIBUTE_NAME_VALUE = "value";
 final String ATTRIBUTE_NAME_IMAGE = "image";

 // картинки для отображения динамики
 final int positive = android.R.drawable.arrow_up_float;
 final int negative = android.R.drawable.arrow_down_float;

 ListView lvSimple;

 /** Called when the activity is first created. */
 public void onCreate(Bundle savedInstanceState) {
 super.onCreate(savedInstanceState);
 setContentView(R.layout.main);

 // массив данных
 int[] values = { 8, 4, -3, 2, -5, 0, 3, -6, 1, -1 };

 // упаковываем данные в понятную для адаптера структуру
 ArrayList<Map<String, Object>> data = new ArrayList<Map<String, Object>>(
 values.length);
 Map<String, Object> m;
 int img = 0;
 for (int i = 0; i < values.length; i++) {
 m = new HashMap<String, Object>();
 m.put(ATTRIBUTE_NAME_TEXT, "Day " + (i + 1));
 m.put(ATTRIBUTE_NAME_VALUE, values[i]);
 if (values[i] == 0) img = 0; else
 img = (values[i] > 0) ? positive : negative;
 m.put(ATTRIBUTE_NAME_IMAGE, img);
 data.add(m);
 }

 // массив имен атрибутов, из которых будут читаться данные
 String[] from = { ATTRIBUTE_NAME_TEXT, ATTRIBUTE_NAME_VALUE,
 ATTRIBUTE_NAME_IMAGE };
 // массив ID View-компонентов, в которые будут вставлять данные
 int[] to = { R.id.tvText, R.id.tvValue, R.id.ivImg };

 // создаем адаптер
 MySimpleAdapter sAdapter = new MySimpleAdapter(this, data,
 R.layout.item, from, to);

 // определяем список и присваиваем ему адаптер
 lvSimple = (ListView) findViewById(R.id.lvSimple);
 lvSimple.setAdapter(sAdapter);
 }

 class MySimpleAdapter extends SimpleAdapter {

 public MySimpleAdapter(Context context,
 List<? extends Map<String, ?>> data, int resource,
 String[] from, int[] to) {
 super(context, data, resource, from, to);
 }

 @Override
 public void setViewText(TextView v, String text) {
 // метод супер-класса, который вставляет текст
 super.setViewText(v, text);
 // если нужный нам TextView, то разрисовываем
 if (v.getId() == R.id.tvValue) {
 int i = Integer.parseInt(text);
 if (i < 0) v.setTextColor(Color.RED); else
 if (i > 0) v.setTextColor(Color.GREEN);
 }
 }

 @Override
 public void setViewImage(ImageView v, int value) {
 // метод супер-класса
 super.setViewImage(v, value);
 // разрисовываем ImageView
 if (value == negative) v.setBackgroundColor(Color.RED); else
 if (value == positive) v.setBackgroundColor(Color.GREEN);
 }
 }
 }
Adapter creation code is common. We create data values and package them into a collection of Map objects. Each Map will consist of three attributes.
ATTRIBUTE_NAME_TEXT - text with the number of the day
ATTRIBUTE_NAME_VALUE - the value of the dynamics
ATTRIBUTE_NAME_IMAGE - id of the image to display, depending on the value (positive or negative)
Then we populate the data mapping arrays (from) and View (to), create an adapter using our MySimpleAdapter class, and set up a list.
We look implementation of MySimpleAdapter . The constructor calls the super class constructor; we do not change anything here. We will change the methods:
setViewText
First, we execute the super class method that inserts the data. And then we look, if View, this is the TextView that will display the values, then we change the text color to red or green depending on the value that it will display.
setViewImage
We execute the super-class method so that the ImageView receives the image, and then we change its background depending on the value. The image we insert is with an alpha layer, so the background will be visible. We do not check the ImageView id, since We have only one imageView.
All save and run.
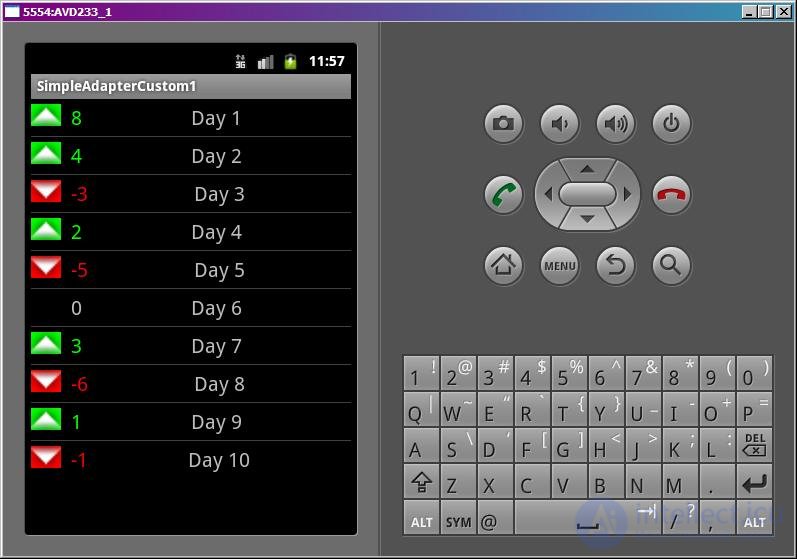
Picture, value and day are displayed. The background of the picture and the color of the text values change depending on the value - positive or negative.
An example, of course, is not particularly interesting, but it was necessary to consider the operation of these methods. Nothing better came to mind)
In the next lesson:
- we use our SimpleAdapter.ViewBinder

Comments
To leave a comment
Mobile Programming (Android IOs)
Terms: Mobile Programming (Android IOs)