Lecture
In this lesson we:
- add components to the screen directly from the application
In the last lesson, we created components in the Activity.onCreate method, i.e. when creating an application. In this lesson we will create in the running application. We will create Button-s, because they are most clearly displayed. We will specify the text that will be displayed on the button and the alignment: left, center or right. We also provide the ability to delete created items.
Create a project:
Project name : P0171_DynamicLayout2
Build Target : Android 2.3.3
Application name : DynamicLayout2
Package name : ru.startandroid.develop.dynamiclayout2
Create Activity : MainActivity
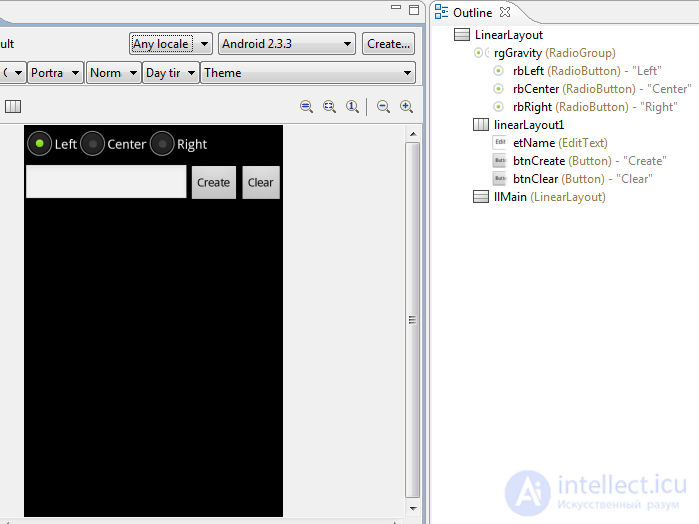
Create a screen that will help us create View-components. Open main.xml and write the following there:
<? xml version = "1.0" encoding = "utf-8"?>
<LinearLayout
xmlns: android = "http://schemas.android.com/apk/res/android"
android: orientation = "vertical"
android: layout_width = "fill_parent"
android: layout_height = "fill_parent">
<RadioGroup
android: layout_height = "wrap_content"
android: layout_width = "match_parent"
android: orientation = "horizontal"
android: id = "@ + id / rgGravity">
<RadioButton
android: layout_height = "wrap_content"
android: layout_width = "wrap_content"
android: checked = "true"
android: text = "Left"
android: id = "@ + id / rbLeft">
</ RadioButton>
<RadioButton
android: layout_height = "wrap_content"
android: layout_width = "wrap_content"
android: text = "Center"
android: id = "@ + id / rbCenter">
</ RadioButton>
<RadioButton
android: layout_height = "wrap_content"
android: layout_width = "wrap_content"
android: text = "Right"
android: id = "@ + id / rbRight">
</ RadioButton>
</ RadioGroup>
<LinearLayout
android: id = "@ + id / linearLayout1"
android: layout_width = "match_parent"
android: orientation = "horizontal"
android: layout_height = "wrap_content">
<Edittext
android: layout_height = "wrap_content"
android: layout_width = "wrap_content"
android: layout_weight = "1"
android: id = "@ + id / etName"
android: fadeScrollbars = "true">
</ Edittext>
<Button
android: layout_width = "wrap_content"
android: layout_height = "wrap_content"
android: text = "Create"
android: id = "@ + id / btnCreate">
</ Button>
<Button
android: layout_width = "wrap_content"
android: layout_height = "wrap_content"
android: text = "Clear"
android: id = "@ + id / btnClear">
</ Button>
</ LinearLayout>
<LinearLayout
android: layout_width = "match_parent"
android: layout_height = "match_parent"
android: id = "@ + id / llMain"
android: orientation = "vertical">
</ LinearLayout>
</ LinearLayout>
Consider in detail the screen.
rgGravity is RadioGroup, with three RadioButton ( rbLeft , rbCenter , rbRight ). We use this component to select the alignment of the generated component.
etName - text field, here we will specify the text that will be displayed on the created component
btnCreate - the button that starts the creation process.
btnClear - a button that erases everything that was created
llMain - vertical LinearLayout, in which components will be created
The screen is ready, let's code the implementation. Open MainActivity.java . To begin with, we describe and find all the components we need. By the way, we have a couple of buttons that we will use, which means they need a handler. Assign an Activity as a handler (ie, you need to add: implements OnClickListener) and create an empty onClick processing method while :
public class MainActivity extends Activity implements OnClickListener{

 LinearLayout llMain;
 RadioGroup rgGravity;
 EditText etName;
 Button btnCreate;
 Button btnClear;

 int wrapContent = LinearLayout.LayoutParams.WRAP_CONTENT;


 /** Called when the activity is first created. */
 @Override
 public void onCreate(Bundle savedInstanceState) {
 super.onCreate(savedInstanceState);
 setContentView(R.layout.main);

 llMain = (LinearLayout) findViewById(R.id.llMain);
 rgGravity = (RadioGroup) findViewById(R.id.rgGravity);
 etName = (EditText) findViewById(R.id.etName);

 btnCreate = (Button) findViewById(R.id.btnCreate);
 btnCreate.setOnClickListener(this);

 btnClear = (Button) findViewById(R.id.btnClear);
 btnClear.setOnClickListener(this);
 }


 @Override
 public void onClick(View v) {
 // TODO Auto-generated method stub

 }
 }
I also created the wrapContent variable and will store the value LinearLayout.LayoutParams.WRAP_CONTENT in it. I do this only to reduce the bulkiness of the code.
Now we describe the process of creating a Button component by filling in the onClick method:
@Override
 public void onClick(View v) {
 switch (v.getId()) {
 case R.id.btnCreate:
 // Создание LayoutParams c шириной и высотой по содержимому
 LinearLayout.LayoutParams lParams = new LinearLayout.LayoutParams(
 wrapContent, wrapContent);
 // переменная для хранения значения выравнивания
 // по умолчанию пусть будет LEFT
 int btnGravity = Gravity.LEFT;
 // определяем, какой RadioButton "чекнут" и
 // соответственно заполняем btnGravity
 switch (rgGravity.getCheckedRadioButtonId()) {
 case R.id.rbLeft:
 btnGravity = Gravity.LEFT;
 break;
 case R.id.rbCenter:
 btnGravity = Gravity.CENTER_HORIZONTAL;
 break;
 case R.id.rbRight:
 btnGravity = Gravity.RIGHT;
 break;
 }
 // переносим полученное значение выравнивания в LayoutParams
 lParams.gravity = btnGravity;

 // создаем Button, пишем текст и добавляем в LinearLayout
 Button btnNew = new Button(this);
 btnNew.setText(etName.getText().toString());
 llMain.addView(btnNew, lParams);

 break;
 }
 }
We analyze written. To begin with, we check that the btnCreate button was pressed - i.e. create button. Then create a LayoutParams with height and width in content. Here I used a variable about which I wrote above - wrapContent. Otherwise it would be rather cumbersome.
Next, create the btnGravity variable, in which, by default, we write the alignment value LEFT. To determine which RadioButton is currently selected, we use the getCheckedRadioButtonId method — it returns the “checked” RadioButton ID for the RadoiGroup. We compare it with our three IDs and put the corresponding value in the btnGravity variable. Drop this value into gravity in LayoutParams.
Next, create a button and assign text to it from etName . Please note that it is not enough to write getText, since it will not give text. You must also call the toString method. Well and at the end we add the created Button to our LinearLayout.
Save everything and run the application. Add a few buttons.
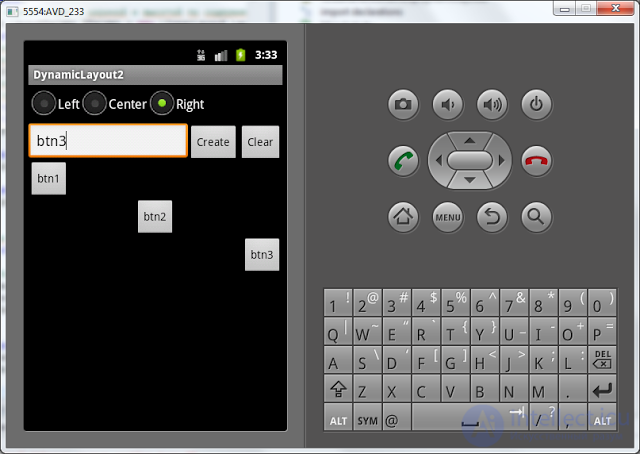
Buttons should appear with the specified alignment and text.
When you enter text, a keyboard appears at the bottom and closes the view. To make it disappear, you need to press the Back button on the emulator or ESC on a regular keyboard. If the keyboard appears Japanese with hieroglyphs, call the context menu for the input field (long-click with the left mouse button), click the Input method and select the Android Keyboard from the list.
There is an unrealized button Clear , which is designed to delete everything created. To do this, we need to supplement the onClick method, add another case to switch (v.getId ()):
case R.id.btnClear:
llMain.removeAllViews();
Toast.makeText(this, "Удалено", Toast.LENGTH_SHORT).show();
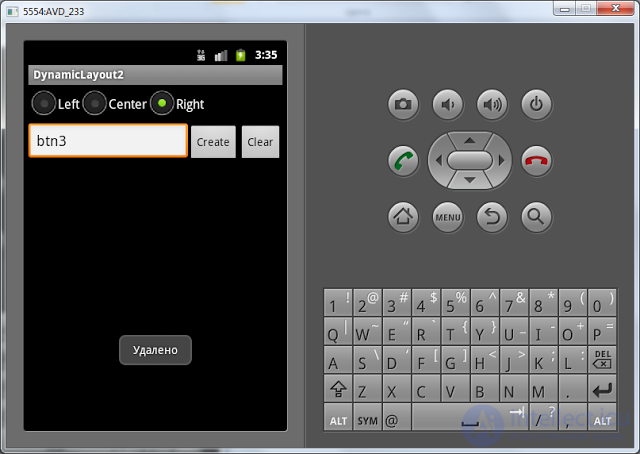
break; The removeAllViews method removes all child View-components from our LinearLayout. With the help of Toast we display a success message . Save, run and check. Add a few buttons, click the Clear button and see the result:
As a result, we got a very dynamic application that can change itself.
The forum asks the question: how then to access these components created. There are a couple of simple options.
1) When you create, you can assign components ID. This is done using the setId method. And then on these IDs just call findViewById.
2) You can save the created components in your array or list. Or you can use the getChildAt method. Calling this method for llMain allows you to get its child components by index. The getChildCount method allows to get the number of child elements.
Full lesson code:
public class MainActivity extends Activity implements OnClickListener {

 LinearLayout llMain;
 RadioGroup rgGravity;
 EditText etName;
 Button btnCreate;
 Button btnClear;

 int wrapContent = LinearLayout.LayoutParams.WRAP_CONTENT;

 /** Called when the activity is first created. */
 @Override
 public void onCreate(Bundle savedInstanceState) {
 super.onCreate(savedInstanceState);
 setContentView(R.layout.main);

 llMain = (LinearLayout) findViewById(R.id.llMain);
 rgGravity = (RadioGroup) findViewById(R.id.rgGravity);
 etName = (EditText) findViewById(R.id.etName);

 btnCreate = (Button) findViewById(R.id.btnCreate);
 btnCreate.setOnClickListener(this);

 btnClear = (Button) findViewById(R.id.btnClear);
 btnClear.setOnClickListener(this);
 }

 @Override
 public void onClick(View v) {
 switch (v.getId()) {
 case R.id.btnCreate:
 // Создание LayoutParams c шириной и высотой по содержимому
 LinearLayout.LayoutParams lParams = new LinearLayout.LayoutParams(
 wrapContent, wrapContent);
 // переменная для хранения значения выравнивания
 // по умолчанию пусть будет LEFT
 int btnGravity = Gravity.LEFT;
 // определяем, какой RadioButton "чекнут" и
 // соответственно заполняем btnGravity
 switch (rgGravity.getCheckedRadioButtonId()) {
 case R.id.rbLeft:
 btnGravity = Gravity.LEFT;
 break;
 case R.id.rbCenter:
 btnGravity = Gravity.CENTER_HORIZONTAL;
 break;
 case R.id.rbRight:
 btnGravity = Gravity.RIGHT;
 break;
 }
 // переносим полученное значение выравнивания в LayoutParams
 lParams.gravity = btnGravity;

 // создаем Button, пишем текст и добавляем в LinearLayout
 Button btnNew = new Button(this);
 btnNew.setText(etName.getText().toString());
 llMain.addView(btnNew, lParams);

 break;

 case R.id.btnClear:
 llMain.removeAllViews();
 Toast.makeText(this, "Удалено", Toast.LENGTH_SHORT).show();
 break;

 }
 }

 }
In the next lesson:
- change layout parameters for already existing screen components

Comments
To leave a comment
Mobile Programming (Android IOs)
Terms: Mobile Programming (Android IOs)