Lecture
In the last lesson, we found that the Activity reads a layout file and displays what is configured in it. Now find out where the Activity knows which layout file to read. And in this lesson is a hint how to register on our forum;)
The lesson has been updated 02.02.2015
Create an application for this tutorial. To do this, you need to create a module in the Android lessons project. We have created this project in past lessons. If you have not yet remembered how to create modules, you can review Lesson 3 and 4 again.
And let's just take a look at one moment. The lessons were written long ago, and they were written under the Eclipse development environment. Accordingly, all lessons contain information for creating a project in Eclipse.
But Eclipse is different from Android Studio in the organization of projects / modules. And now we will understand how to use information on creating a project in Eclipse when creating modules in Android Studio.
Infa to create a project in Eclipse looks like this:
Project name : P0051_LayoutFiles
Build Target : Android 2.2
Application name : LayoutFiles
Package name : ru.startandroid.develop.LayoutFiles
Create Activity : MainActivity
Usually, similar text is at the beginning of each lesson.
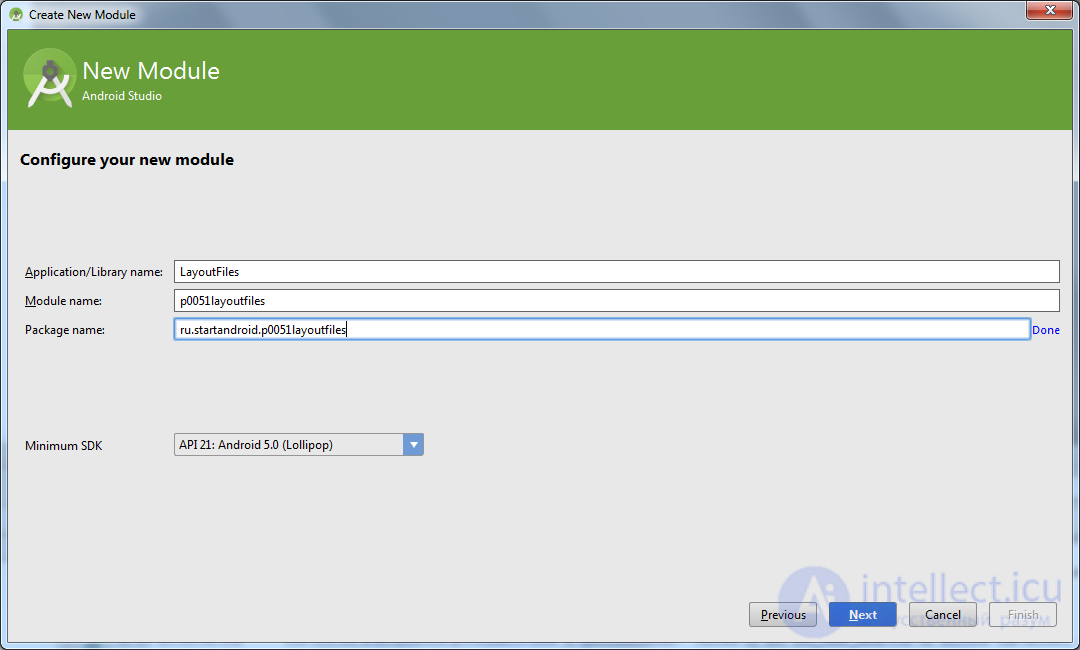
And to create a module in Android Studio, we need information in this form
Application / Library name : LayoutFiles
Module name : p0051layoutfiles
Package name : ru.startandroid.p0051layoutfiles
How to get new from old? Consider the example of this lesson. We will take values for Eclipse and substitute them in Android Studio.
For the Application / Library field name take the value of Application name , without any changes. Those. LayoutFiles .
For Module name you can take the value of the Project name , but capital letters must be made small, and the underscore must be removed. Those. from P 0051_ LayoutFiles we get p 0051 layoutfiles .
Package name is ru . startandroid . plus the newly received Module name , i.e. ru.startandroid.p0051layoutfiles
Use this diagram in all subsequent lessons to create modules.
Also, in the information for Eclipse there is a field Create Activity . We will use it when creating a module when we specify the name of the Activity in the Activity field. Name
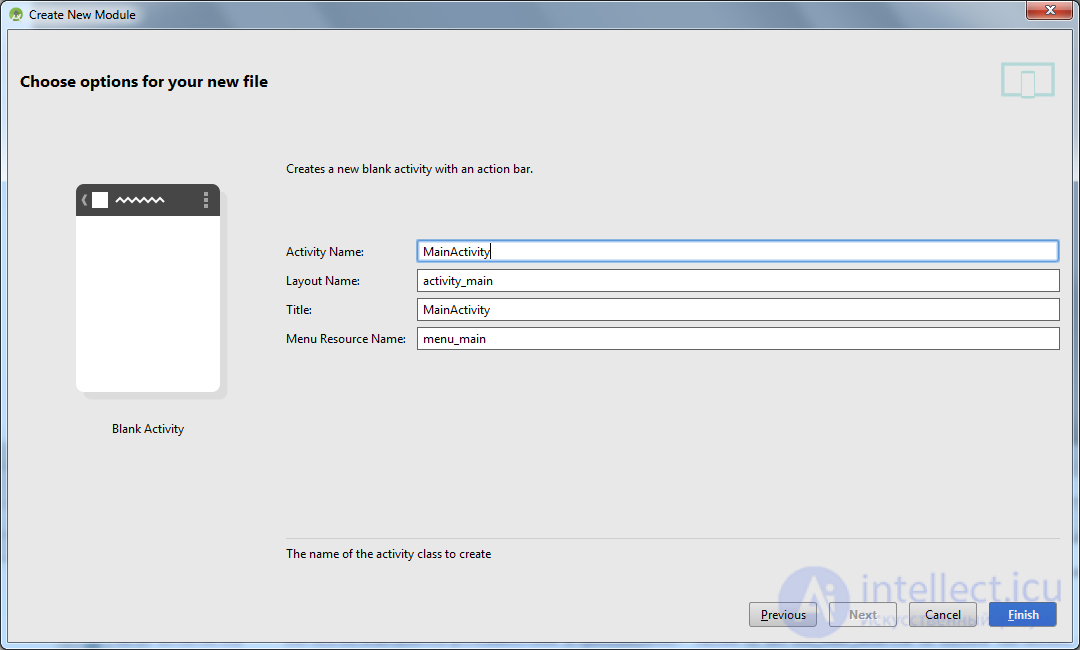
Here you need to substitute the value from Create Activity . Usually this is always the MainActivity.
Keep this instruction in mind and use it in each lesson to create modules.
We return to the lesson.
When developing, each Activity is associated with the same java-class (the heir of the android.app.Activity class). When you start the application, when the system should show Activity and continue to work with it, it will call methods of this class. And from the fact that we in these methods code, depends on the behavior of the Activity.
When creating the module, we indicated that we need to create an Activity with the name MainActivity
We asked to create an Activity and the development environment created the corresponding class for us (later we will learn how to create them ourselves).
Let's take a look at this class: double-click the file: java \ ru \ startandroid \ p0051layoutfiles \ MainActivity.java
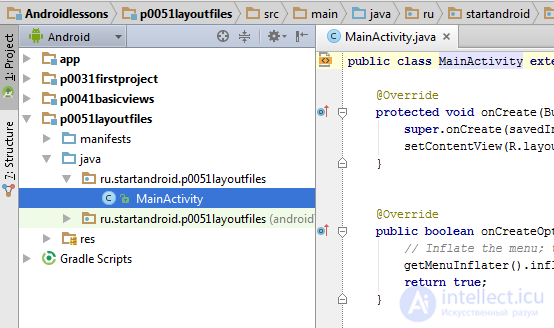
We look java-code. We are interested in the onCreate method - it is called when the application creates and displays an Activity (we do not pay attention to the other methods yet). Let's see the onCreate implementation code.
First line:
super.onCreate(savedInstanceState); This is a call to a parent class method that performs the necessary procedures; we don’t touch it.
We are now very interested in the following line:
setContentView(R.layout.activity_main); The setContentView (int) method sets the contents of the Activity from a layout file. But as an argument we specify not the path to the layout-file (res / layout / activity_main.xml), but the constant, which is the file ID. This constant is generated automatically in the R.java file, which we will not touch for now. This class will store the generated IDs for all project resources (from the res / * folder) so that we can access them. The names of these ID-constants coincide with the names of resource files (without extensions).
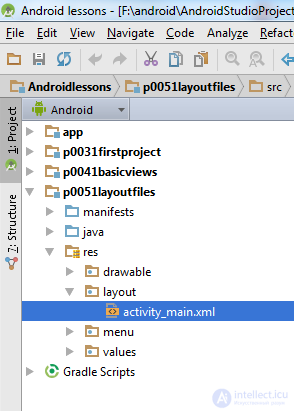
The res / layout / activity_main.xml file was created by the development environment along with the Activity. Its name was requested on the same screen as the name of the Activity (screen above).
Double-click res / layout / activity_main.xml
 s
s
let's see what is there

Run the application and see what it shows us.
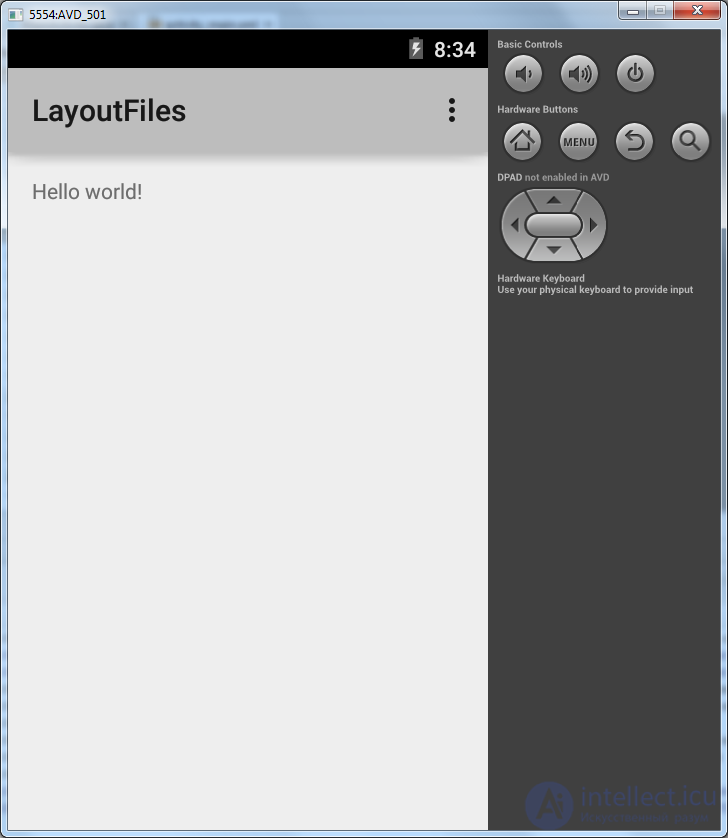
That's right - Activity has displayed what is written in activity_main.xml.
Let's try to display the contents of another file. Create another layout file, such as myscreen.xml. To do this, select the res / layout folder in our module and click on it with the right mouse button. In the menu that appears, select New> Layout resource file. For lovers of hot keys, there is a more convenient way: with the res / layout folder highlighted, press ALT + Insert, and there you have to Enter on the item Layout resource file.
Wizard will open
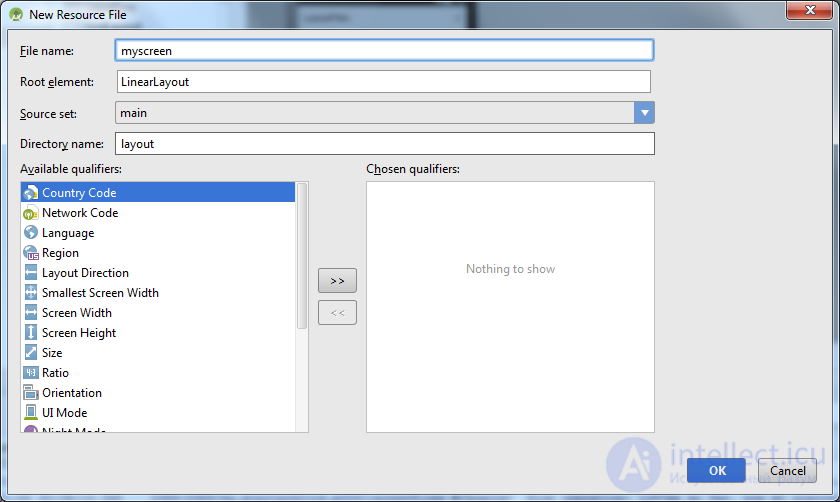
Enter the name of the myscreen file, do not change the rest yet, click OK.
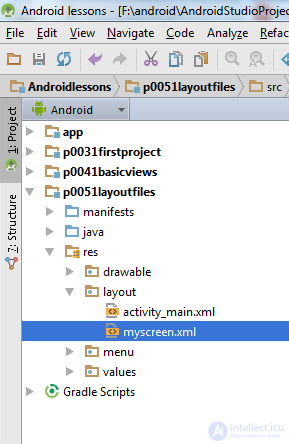
A new myscreen.xml file should appear in the layout folder.
This new layout file should immediately open for editing. Add a Plain TextView element from the list on the left and use the Properties to change its text to: “new layout file myscreen for activity”.
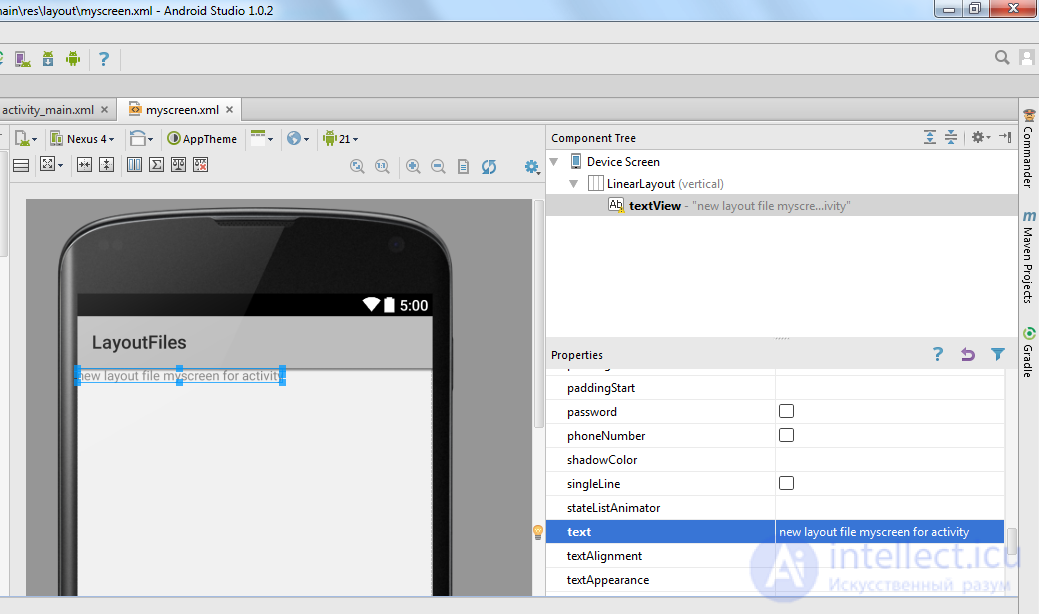
Be sure to save (CTRL + S).
When creating a new myscreen layout file, the environment added a new constant for this file to R.java — R.layout.myscreen. And now in the code we will be able to point to this new layout file through this constant.
We’ll configure Activity to use the new myscreen.xml file, not the activity_main.xml that was originally. Open MainActivity.java and change the argument to the setContentView method. Replace "R.layout.activity_main" with "R.layout.myscreen" (ID of the new layout file). It should turn out like this:
@Override
 protected void onCreate(Bundle savedInstanceState) {
 super.onCreate(savedInstanceState);
 setContentView(R.layout.myscreen);
 }
Save the code (CTRL + S) and run the application (SHIFT + F10).
Now we will be asked to confirm that we want to run the application on the included emulator.
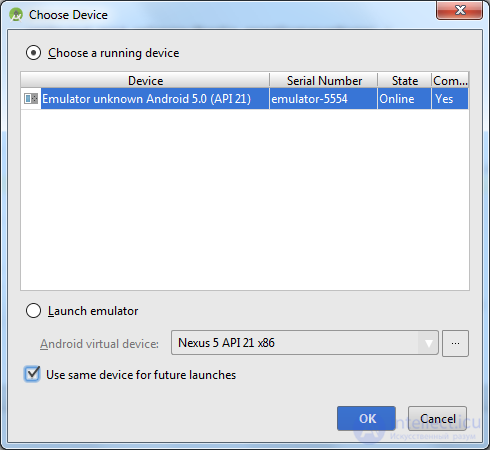
So that it doesn’t ask at each launch, turn on the Use same device for future launches checkbox and click OK.
Application started
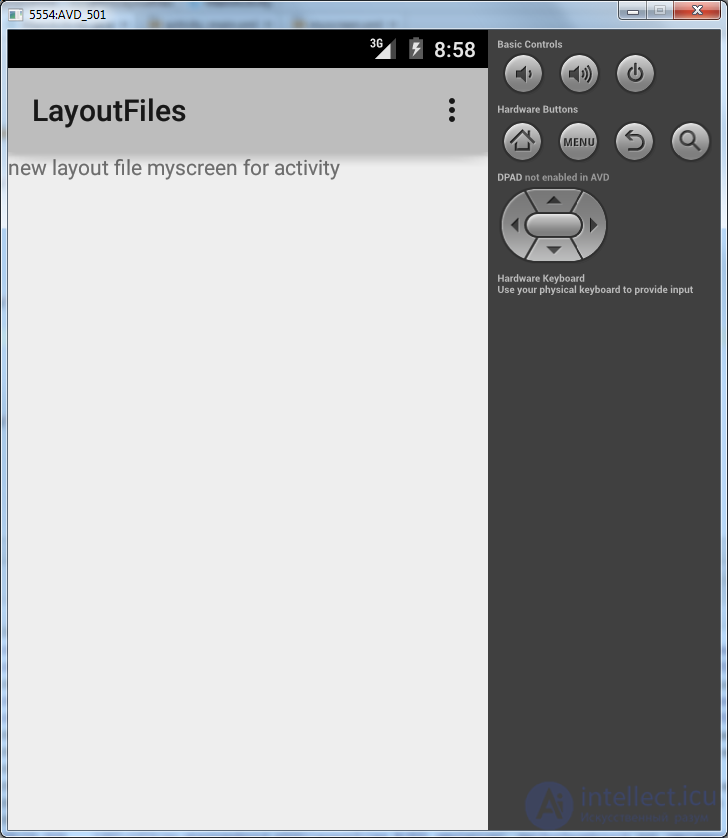
We see that now it displays the contents of myscreen.xml, because we explicitly told him this in the setContentView method, which is executed when creating (onCreate) Activity
XML Layout File
When you open the activity_main or myscreen file in Android Studio layout, you can see its visual representation. Those. a preview of how it will look on the screen. Below you can see two tabs - Design and Text. Open the Text tab.
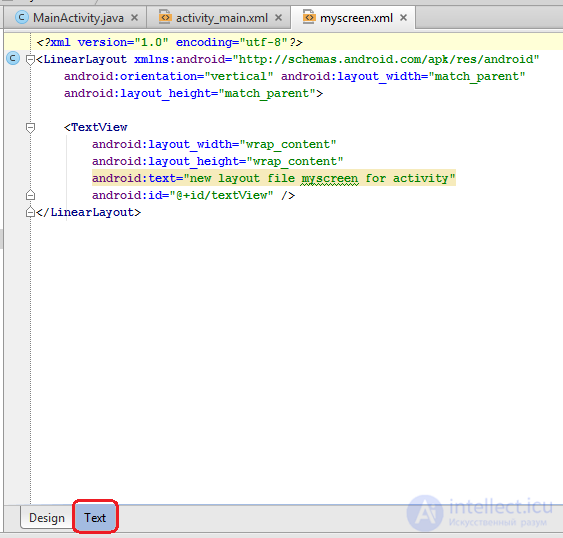
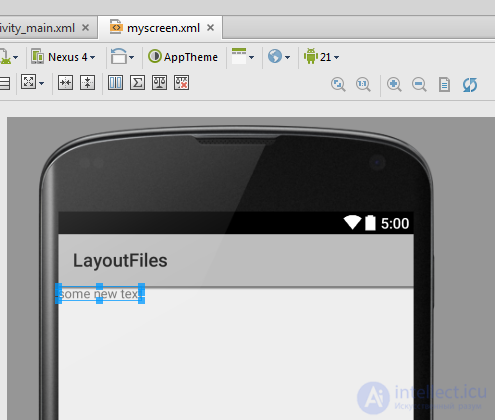
We see a fairly readable xml description of all the Views of our layout file. The names of xml-elements are classes of View-elements, xml-attributes are parameters of View-elements, i.e. all the parameters that we change through the Properties tab. You can also make changes right here and the changes will be displayed in the Design tab. For example, change the text in TextView. Instead of "new layout file myscreen for activity", we will write the text "some new text"
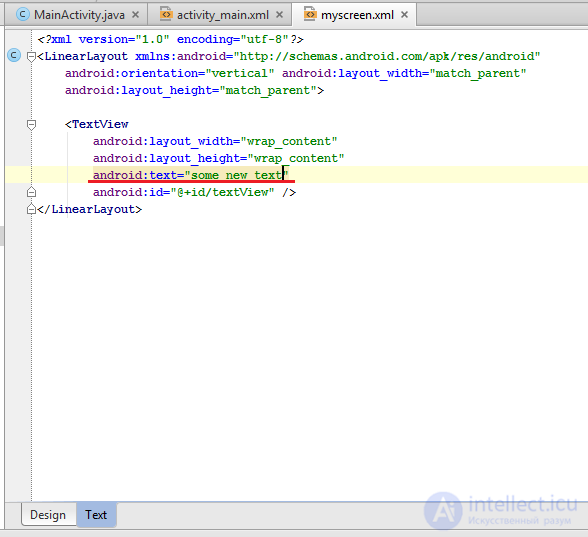
We save. Open Design and see the changes.
Usually authors of textbooks give the content of layout-files in the xml form. This is convenient - you can simply copy the fragment and use it, and you do not need to manually add View elements, run around Properties and customize everything by hand. I will do the same in my projects.
Layout file when changing screen orientation
By default, we customize the layout file to the vertical orientation of the screen. But what will happen if we turn on the smartphone and turn on the horizontal orientation? Let's watch.
Modify myscreen.xml. Add a vertical row of buttons and change the label.
The xml-code (you can copy it and replace it with the contents of your layout of the myscreen file in the Text tab):
  <? xml version = "1.0" encoding = "utf-8"?>
  <LinearLayout
  xmlns: android = "http://schemas.android.com/apk/res/android"
  android: layout_width = "match_parent"
  android: layout_height = "match_parent"
  android: orientation = "vertical">
  <Textview
  android: id = "@ + id / textView1"
  android: layout_width = "wrap_content"
  android: layout_height = "wrap_content"
  android: text = "Vertical screen orientation">
  </ TextView>
  <LinearLayout
  android: id = "@ + id / linearLayout1"
  android: layout_width = "match_parent"
  android: layout_height = "wrap_content"
  android: orientation = "vertical">
  <Button
  android: id = "@ + id / button1"
  android: layout_width = "100dp"
  android: layout_height = "100dp"
  android: text = "Button1">
  </ Button>
  <Button
  android: id = "@ + id / button2"
  android: layout_width = "100dp"
  android: layout_height = "100dp"
  android: text = "Button2">
  </ Button>
  <Button
  android: id = "@ + id / button3"
  android: layout_width = "100dp"
  android: layout_height = "100dp"
  android: text = "Button3">
  </ Button>
  <Button
  android: id = "@ + id / button4"
  android: layout_width = "100dp"
  android: layout_height = "100dp"
  android: text = "Button4">
  </ Button>
  </ LinearLayout>
  </ LinearLayout>
Please note - I added a vertical LinearLayout and placed 4 buttons in it. We will discuss this in more detail in the next lesson.
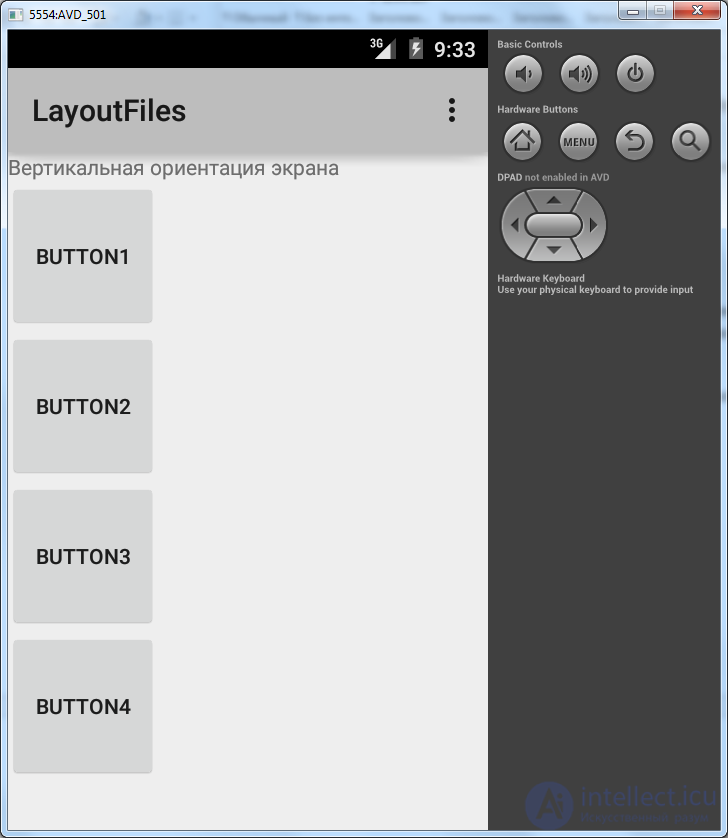
Save the file, run the application.
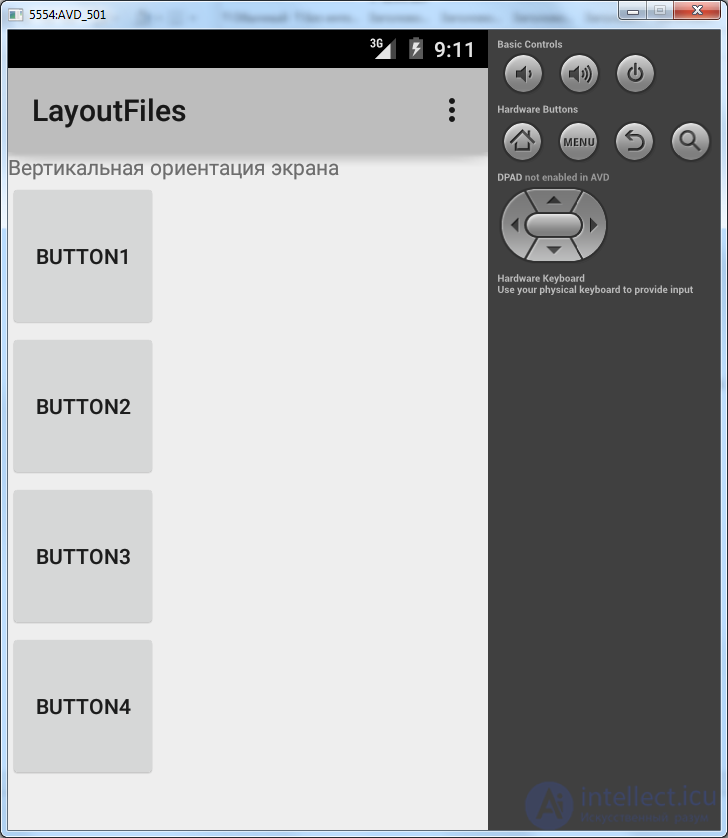
In vertical orientation everything is ok.
Press the CTRL + F12 in the emulator, the orientation has changed to horizontal and our buttons no longer fit into the screen.
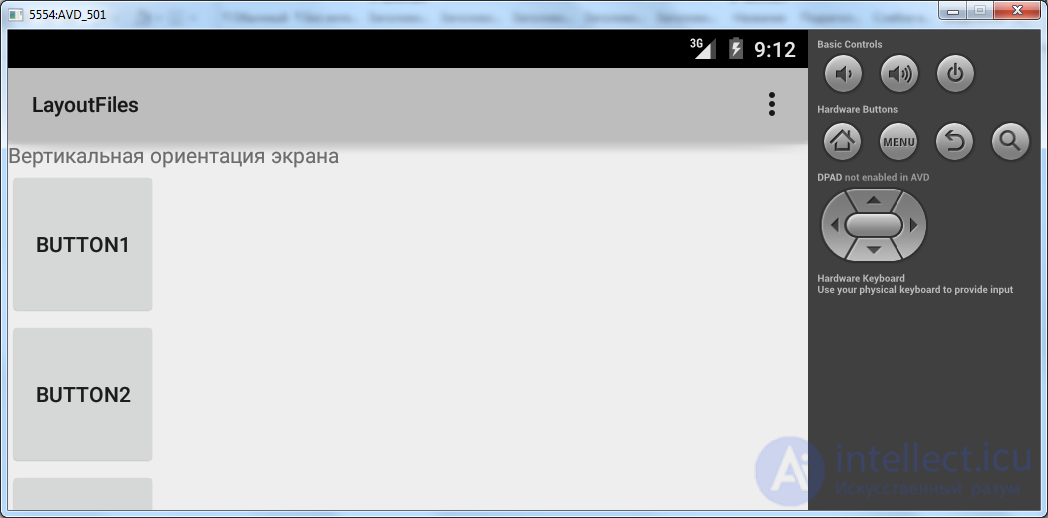
Those. we need another layout file, which would be sharpened by a horizontal orientation and in our case would draw the buttons horizontally.
But how to let the Activity know that it should use one layout file in the vertical orientation, and another in the horizontal one? The creators of Android have already thought about this for us. We have the ability to create a layout file that will be used by the application when the device is in horizontal orientation.
Creating such a file is almost the same as creating a regular layout file. We become on the res / layout folder and create a new Layout resource file. File name indicate the same: myscreen. It remains to add a qualifier that will let the application understand that this layout file must be used in the horizontal orientation. To do this, in the list of qualifiers on the left below we find Orientation
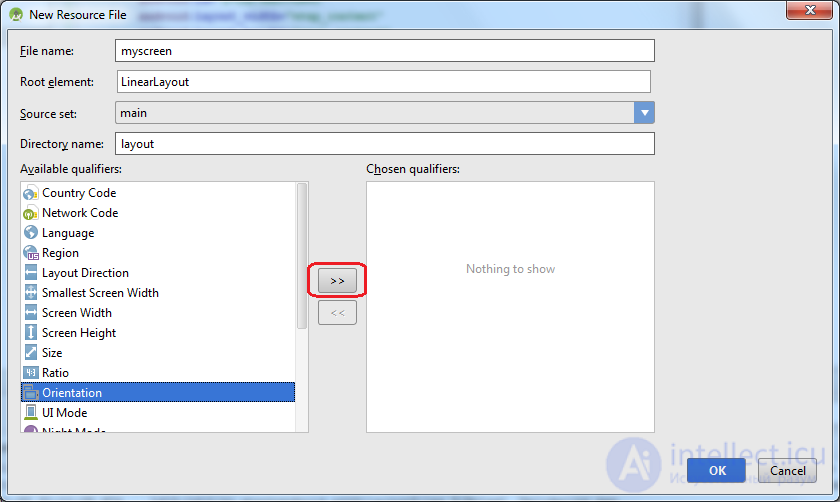
And click the button with the arrow to the right. We thereby included the use of an orientation qualifier. We need to indicate that we are interested in horizontal orientation: Landscape. Select this value from the drop-down list.
Note that the value of the Directory name field has changed.
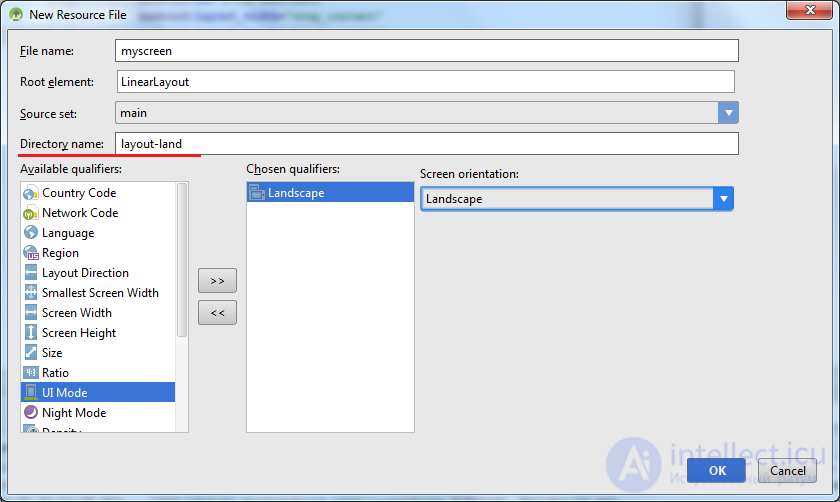
By specifying the qualifier, we indicated that our new layout file will be created in the res / layout-land folder, not res / layout, as usual. Those. the –land qualifier indicates that the layout files from this folder will be used in the horizontal orientation of the device.
Click OK
Let's look at the structure of the module
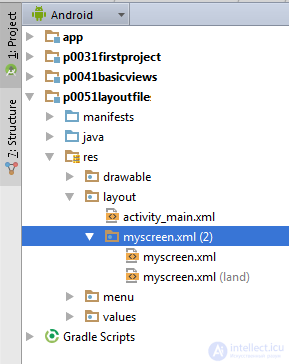
We see that we now have two myscreen files: normal and land. You can see this in the folder structure. To do this, change the top view of the project from Android to Project
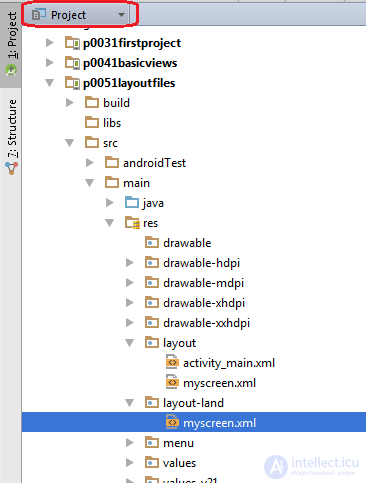
And you will see that the module now has res / layout and res / layout-land folders. And both of them contain a myscreen file.
Double-click the res / layout-land / myscreen file and change its contents to the following xml code:
  <? xml version = "1.0" encoding = "utf-8"?>
  <LinearLayout
  xmlns: android = "http://schemas.android.com/apk/res/android"
  android: layout_width = "match_parent"
  android: layout_height = "match_parent"
  android: orientation = "vertical">
  <Textview
  android: id = "@ + id / textView1"
  android: layout_width = "wrap_content"
  android: layout_height = "wrap_content"
  android: text = "Horizontal screen orientation">
  </ TextView>
  <LinearLayout
  android: id = "@ + id / linearLayout1"
  android: layout_width = "match_parent"
  android: layout_height = "wrap_content"
  android: orientation = "horizontal">
  <Button
  android: id = "@ + id / button1"
  android: layout_width = "100dp"
  android: layout_height = "100dp"
  android: text = "Button1">
  </ Button>
  <Button
  android: id = "@ + id / button2"
  android: layout_width = "100dp"
  android: layout_height = "100dp"
  android: text = "Button2">
  </ Button>
  <Button
  android: id = "@ + id / button3"
  android: layout_width = "100dp"
  android: layout_height = "100dp"
  android: text = "Button3">
  </ Button>
  <Button
  android: id = "@ + id / button4"
  android: layout_width = "100dp"
  android: layout_height = "100dp"
  android: text = "Button4">
  </ Button>
  </ LinearLayout>
  </ LinearLayout>
The Design tab shows the following:

In this layout file, we positioned the buttons horizontally so that they are adequately displayed in horizontal orientation.
Note the name of the file above. There is a land qualifier, so that you always understand which of the two myscreens you are currently editing.
Run the application.
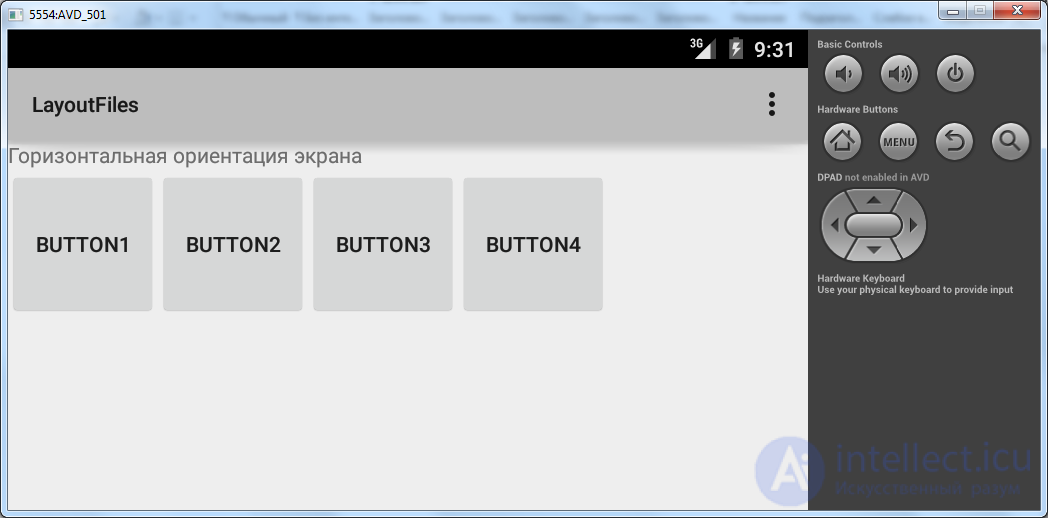
Activity reads the layout file we specified in the setContentView method, i.e. myscreen.xml and displays its contents. At the same time, it takes into account the orientation of the device, and in the case of horizontal orientation it takes myscreen from the res / layout-land folder (if it exists, of course).
Switch the orientation CTRL + F12.
Activity understands what is in a vertical orientation, and uses the myscreen layout file from the res / layout folder.
PS
A little more about the lessons. Further, in almost all lessons, the main layout file will be called main.xml. Don't let that confuse you, just remember that your main file is activity_main.xml.

Comments
To leave a comment
Mobile Programming (Android IOs)
Terms: Mobile Programming (Android IOs)