Lecture
In previous chapters, we wrote programs related to a text terminal and launched from the command line. Such programs are called console applications. They are designed to run on servers where interactive communication with the user is not required. Programs that interact closely with the user, perceive the signals from the keyboard and mouse, work in a graphical environment. Each application designed to work in a graphical environment must create at least one window in which it will work, and register it in the GUI of the operating system so that the window can interact with the operating system and other windows: overlap, move, resize , fold to shortcut.
There are many different graphics systems: MS Windows, X Window System, Macintosh. Each of them has its own rules for constructing windows and their components: menus, input fields, buttons, lists, scroll bars. These rules are complex and confusing. Graphic APIs contain hundreds of functions.
To facilitate the creation of windows and their components, class libraries have been written: MFC, Motif, OpenLook, Qt, Tk, Xview, OpenWindows, and many others. Each class of such a library immediately describes a graphical component, controlled by the methods of this and other classes.
In Java technology, the matter is complicated by the fact that Java applications must work in any or at least in many graphical environments. You need a class library that is independent of the specific graphics system. In the first version of JDK, the problem was solved as follows: interfaces were developed containing methods for working with graphic objects. AWT library classes implement these interfaces for building applications. Java applications use these methods to place and move graphic objects, resize them, and interact with objects.
On the other hand, to work with the screen in a specific graphical environment, these interfaces are implemented in each such environment separately. In each graphical shell, this is done in its own way, by means of this shell with the help of graphic libraries of the given operating system. Such interfeys were called peer interfaces.
The Java class library based on peer interfaces is called AWT (Abstract Window Toolkit). When displaying an object created in a Java application and based on a peer interface, a paired to peer-to-peer object of the graphics subsystem of the operating system is created on the screen and displayed on the screen. These objects interact closely while the application is running. Therefore, AWT graphic objects in each graphical environment look like this environment: in MS Windows, Motif, OpenLook, OpenWindows, everywhere windows created in AWT look like native windows.
It is because of this implementation of peer interfaces and other "native" methods, written mainly in C ++, that for each platform we have to release our own version of JDK.
In JDK 1.1, the AWT library has been redesigned. It added the ability to create components that are completely written in Java and are not dependent on peer interfaces. Such components began to be called "lightweight" (lightweight) in contrast to the components implemented through peer-interfaces, called "heavy" (heavy).
"Light" components look the same everywhere; they retain the look and feel that was set at creation. Moreover, the application can be developed in such a way that after its launch it was possible to select a particular type: Motif, Metal, Windows 95 or some other, and change this type at any moment of work.
This interesting feature of the "light" components is called PL & F (Pluggable Look and Feel) or "plaf."
An extensive library of lightweight Java components, called Swing, was created. All components of the AWT library were rewritten, so the Swing library can be used independently, despite the fact that all the classes from it extend the AWT library classes.
The Swing class library was supplied as an add-on to JDK 1.1. It is included in the Java 2 SDK as the main graphic class library that implements the idea of "100% Pure Java", along with AWT.
In Java 2, the AWT library has been greatly expanded by adding new drawing tools, text and image rendering, called Java 2D, and tools that move the text using the DnD (Drag and Drop) method.
In addition, Java 2 includes the new Input Method I / O Input Method Framework and means of communicating with additional I / O devices, such as a light pen or a Broglie keyboard, called Accessibility.
All of these Java 2 tools: AWT, Swing, Java 2D, DnD, Input Method Framework, and Accessibility make up the Java Graphic Tools Library (Java Foundation Classes).
A description of each of these tools will make up a whole book, so we have to limit ourselves to presenting only fixed assets of the AWT library.
Component and container
The basic concept of a graphical user interface (GUI) is a component (component) of a graphics system. In Russian, this word simply implies an integral part, an element of something, but in the graphical interface this concept is much more specific. It means a separate, fully defined element that can be used in the GUI independently of other elements. For example, this is an input field, a button, a menu bar, a scroll bar, a radio button. The application window itself is also its component. Components can be invisible, for example, a panel that combines components is also a component.
You will not be surprised to learn that in AWT a component is considered an object of the Component class or an object of any class that extends the class component. The component class contains general methods for working with any GUI component. This class is the center of the AWT library.
Each component before displaying on the screen is placed in a container (container). The container "knows" how to place components on the screen. Of course, in Java, a container is an object of the Container class or any of its extensions. The direct descendant of this class — the jcomponent class — is the top of the hierarchy of many Swing library classes.
Having created a component - an object of the Component class or its extensions, you should add it to the previously created object of the class container or its extension by one of the add () methods.
The Container class itself is an invisible component; it extends the Component class. Thus, in the container, along with the components, you can place the containers in which there are some other components, thereby achieving great flexibility in the arrangement of the components.
The main application window, actively interacting with the operating system, must be built according to the rules of the graphics system. It should move around the screen, resize, respond to action
mouse and keyboard. The window should have at least the following standard components.
The window with these components in finished form is described in the Frame class. To create a window, it is enough to make your class an extension of the Frame class, as shown in Listing 8.1. Only eight lines of text and the window is ready.
Listing 8.1. Application window too simple
import j ava.awt. *;
class TooSimpleFrame extends Frame {
public static void main (String [] args) {
Frame fr = new TooSimpleFrame ();
fr.setSize (400, 150);
fr.setVisible (true);
}
}
The TooSimpleFrame class has all the properties of the Frame class, being its extension. It creates an instance of the fr window, and sets the window size on the screen — 400x150 pixels — by the setsizeo method. If you do not set the window size, then the window of the minimum size will appear on the screen - only the title bar. Of course, then it can be stretched with the mouse to any size.
The window is then displayed using the setvisibie (true) method. The fact is that, from the point of view of the AWT library, to create a window means to allocate a region of RAM filled with the required pixels, and outputting the contents of this region to the screen is another task, which the method solves
setVisible (true).
Of course, such a window is unsuitable for work. Not to mention the fact that it does not have a title and therefore the window cannot be closed. Although it can be moved around the screen, resized, minimized to the taskbar and expanded, we have not programmed the application completion command. The window can not be closed by either clicking the button on the button with a cross in the upper right corner of the window, nor by the key combination <Alt> + <F4>. Have to
Shut down the application using the operating system, for example, by pressing the <Ctrl> + <C> key combination.
Listing 8.2 adds a window title and a call to the method in Listing 8.1 that allows you to terminate the application. '
Listing 8.2. Simple application window
import java.awt. *;
import j ava.awt.event. *;
class SimpleFrame extends Frame {
SimpleFrame (String s) {
super (s);
setSize (400, 150);
setvisible (true);
addWindowListener (windowAdapter () {
public void windowClosing (WindowEvent ev) {
System.exit (0);
}
});
}
public static void main (String [] args) {
new SimpleFrame ("My program");
}
}
A constructor for the class SimpleFrame has been added to the program, which refers to the constructor of its superclass Frame, which writes its argument s to the window's title bar.
The installation of the window size, its output to the screen, and the call to the addWindowListener () method, which reacts to actions with the window, are moved to the designer. As an argument, an instance of an unnamed inner class that extends the WindowAdapter class is passed to this method. This unnamed class implements the windowciosing () method, which processes the attempt to close the window. This implementation is very simple - the application ends with a static method exit about the class system. The window closes automatically.
We will discuss all this in detail in Chapter 12, but for now just add these lines to all your programs to close the window and close the application.
So, the window is ready. But it is still empty. We will deduce in it, by tradition, the greeting "Hello, World!", However, slightly changed. Listing 3.3 shows the complete program for this output, and Fig. 8.1 shows a window.
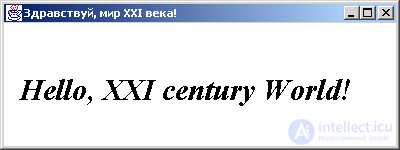
Fig. 8.1. Welcome window
Listing 8.3. Graphic program with a greeting
import java.awt. *;
import java.awt.event. *;
class HelloWorldFrame extends Frame {
HelloWorldFrame (String s) {
super (s);
}
public void paint (Graphics g) {
g.setFont (new Font ("Serif", Font.ITALIC | Font.BOLD, 30));
g.drawstring ("Hello, XXI century World!", 20, 100);
}
public static void main (String [] args) {
Frame f = new HelloWorldFrame ("Hello, the world of the XXI century!");
f.setSize (400, 150);
f.setvisible (true);
f.addWindowListener (new WindowAdapter () {
public void windowciosing (WindowEvent ev) (
System.exit (0);
}
});
}
}
To output text, we override the paint () method of the component class. The Frame class inherits this method with an empty implementation.
The paint about method receives as an argument an instance g of the class Graphics, which, in particular, can draw text using the drawstring () method. In this method, in addition to the text, we indicate the position of the beginning of the line in the window — 20 pixels from the left edge and 100 pixels from the top. This point is the bottom left point of the first letter of the text n.
In addition, we installed a larger font "Serif" - 30 points, bold, italics. Each font is an object of the Font class, and it is specified by the setFont () method of the Graphics class.
We will consider working with fonts in the next chapter.
In Listing 8.3, for a change, we have made calls to the methods of setting the window size, displaying it on the screen, and ending the program in the method
main ().
As you can see from this simple example, the AWT library is large and branched, with many classes interacting with each other. Consider the hierarchy of some of the most commonly used AWT classes.
AWT Class Hierarchy
In fig. Figure 8.2 shows the main AWT class hierarchy. It is based on ready-made components: Button, Canvas, Checkbox, Choice, Container, Label, List, Scrollbar, TextArea, TextField, Menubar, Menu, PopupMenu, Menultem, CheckboxMenuItem. If this set is not enough, then from the class Canvas, you can generate your own "heavy" components, and from the class Component - "light" components.
The main containers are the Panel, ScrollPane, Window, Frame, Dialog, FileDialog classes. You can spawn your "heavy" containers from the Panel class, and "light" containers from the container class.
A whole set of classes helps to place components, set colors, fonts, drawings and images, respond to signals from the mouse and keyboard.
In fig. 8.2 shows the initial classes of the hierarchy of the library Swing - classes JComponent, JWindow, JFrame, JDialog, JApplet.
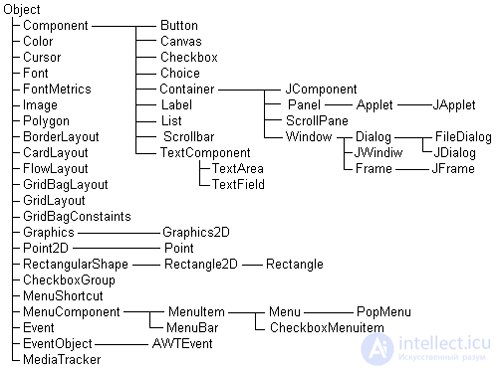
Fig. 8.2. AWT Main Class Hierarchy
Conclusion
As you can see, the AWT graphic class library is very large and has been extensively developed. This variety of classes only reflects the variety of tasks for constructing a graphical interface. The desire to improve the interface is limitless. It leads to the creation of all new class libraries and the expansion of existing ones. Independent producers have already created many Java graphic libraries: KL Group, JBCL, and more and more new libraries are emerging. Information about them can be obtained on the sites specified in the introduction.
In the following chapters, we will look at how you can use the AWT library to create your own applications with a graphical user interface, images, animation, and sound.

Comments
To leave a comment
Object oriented programming
Terms: Object oriented programming