Lecture
In the appendix, we briefly list aspects of Java technology that are not covered in the main text of the book.
Move to swing
In Part 3, we examined in detail the capabilities of the AWT graphics library. There we also noticed that the Java 2 SDK includes another graphics library, Swing, with more features than AWT. SUN strongly recommends using Swing, not AWT, but, first, Swing requires more resources, which is significant for a Russian developer, and second, most browsers do not include Swing. Thirdly, it is more convenient to first get acquainted with the AWT library, and only then learn Swing.
All examples of graphic programs given in the book will be performed by methods of the Swing library after a small alteration:
1. Add the import javax.swing. *; To the header.
2. Change Frame to JFrame, Applet to JApplet, Component to JComponent, Panel to JPanei. Do not extend your classes from the canvas class, use jpanei or other Swing containers.
3. Replace AWT components with Swing components close to them. Most often, you just need to assign the letter j: JButton, JcheckBox, JDialog, jList, JMenu, etc. Comment out the import java.awt. * Temporarily line; and try to compile the program. The compiler will show which components need replacing.
4. Include in the constructor of the class that extends JFrame, the line Container with = getContentPane (); and place all components in a container with, i.e. write c.add (), c.setLayout ().
5. The jFrame class contains the means to close its window; you just need to configure them. You can remove addwindowListener (...) and include in the constructor a call to the setDefaultCloseQperation method (JFrame.EXITJB_CLOSE).
6. In direct subclasses of the jpanei class, replace the paint o method with paintcomponent () and delete the update o method. The jpanei class automatically performs double buffering, and the update method is no longer needed. Remove all double buffering code. At the beginning of the paintcomponent () method, turn on the super.paintcomponent (g) call. From subclasses of JFrame, joialog, JAppiet classes, the paintcomponent () method must be moved to other components, for example, JButton, JLabel, jpanei.
7. Use imageicon instead of image class. Constructors of this class will perform the necessary conversion. The imageicon class automatically applies the methods of the MediaTracker class to wait for the download to complete.
8. When creating applets as an extension of the JAppiet class, do not forget that in the Applet class the default placement manager is the FiowLayout class, and in the JAppiet class the default placement manager is BorderLayout.
Clauses 4 and 6 require clarification. A top-level window in Swing, such as a JFrame, contains a root panel (root pane) that holds a layered pane. Components on the layered panel can be placed in several layers, overlapping each other. In one of the layers there is a content pane and a menu bar. Over the topmost layer is a transparent panel (glass pane). Therefore, you cannot simply place a component in a top-level window. It must be "put" on any panel. Item 4 recommends placing components in the content pane.
Compiling and running the modified program, you will see that its appearance has changed, often not for the better. Now you need to configure Swing components. The Swing library provides the broadest possibilities for this.
Jar archiver
To package multiple files into one archive file, with or without compression, Java technology has developed a JAR format. The name of the archive jar file can be anything, but usually it gets the jar extension. The method of packaging and compression is based on the ZIP method. The name JAR (Java ARchive) echoes the name of the famous TAR utility (Tape ARchive) developed in UNIX.
The only difference between jar files and zip files is that the first automatically includes the META-INF directory, which contains several files with information about archived files.
Archive files are very convenient to use in applets, since the entire archive is downloaded over the network immediately, in one request. All files of the applet with bytecodes, images, sound files are packed into one or several archives. To load them, it is enough to specify the names of the archives in the archive parameter in the <appiet> tag, for example:
<applet code = "MillAnim.class" archive = "first.jar, second.jar"
width = "100%" height = "100%"> </ applet>
The main file MillAnim.class must be in any of the archive files first.jar or second.jar. The remaining files are searched for in archive files, and if they are not found there, then on the server, in the same directory as the HTML file. However, the applet files can be packaged in a zip-archive, with or without compression.
Archive files are conveniently used in applications. All application files are packaged in an archive, for example, appl.jar. The application is executed directly from the archive, the interpreter is started with the -jar parameter, for example:
Java-jar appl.jar
The name of the main class of the application containing the main () method is specified in the MANIFEST.MF file, which will be discussed below.
Archive files are convenient and simple for compact storage of all information necessary for the program to work. You can work with archive files directly from the archive, without unpacking them, using the classes of the java.util.jar package .
Create archive
Jar archives are created using the classes of the java.util.jar package or using the jar command line utility.
The rules for using the jar utility are very similar to the rules for using the tar utility. Typing the word jar on the command line and pressing the <Enter> key will give you a brief explanation, as shown in fig. P.1.
In line
jar {ctxu} [vfmOM] [jar-file] [manifest-file] [-C dir] files ...
encrypted rules for using the utility. The curly brackets indicate that after the word jar and a space you must write one of the letters с, t, x, or and. These letters mean the following operations:
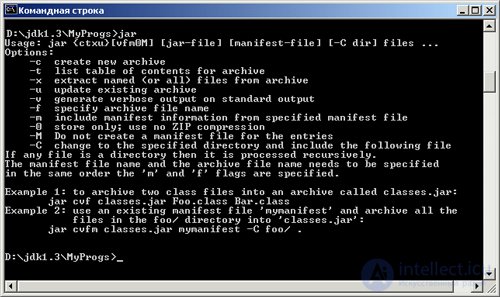
Fig. P.1. Rules for using the jar utility
After the letter, without a space, you can write one or more letters listed in square brackets. They mean the following:
The -i (index) parameter instructs to create the file INDEX.LIST in the archive. It is used after the formation of the archive file.
After the alphabetic file-parameters, the name of the jar-file archive file is written down, then, after the space, the name of the manifest-file description file, then the names of the files that need to be archived or extracted from the archive are listed. If these are directory names, then the operation is performed recursively with all the files in the directory.
Before the first directory name may be the option -c. The construction of -c dir means that while the jar utility is running, the current directory will be the dir directory. ,
Optional parameters are in square brackets.
So, at the end of the command line at least one file or directory name must be written. If among the parameters there is the letter f, then the first of these files is understood as an archive jar file. If among the parameters is the letter m, then the first file is understood as a description file (manifest-file). If among the parameters are both letters, then the name of the archive file and the name of the description file must be in the same order as the letters f and m.
If the parameter f and the name of the archive file are missing, the standard output will serve as the archive file.
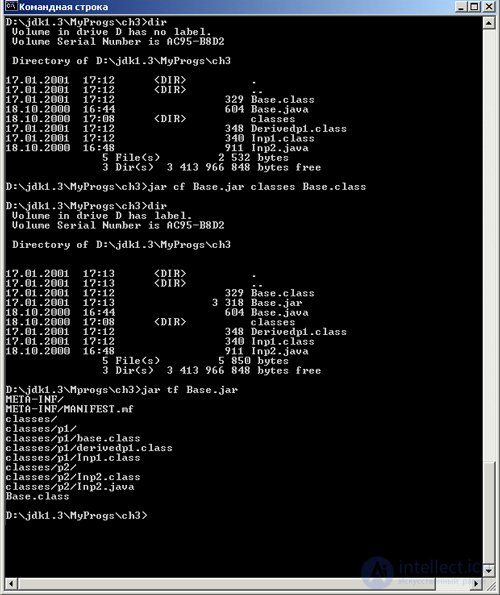
Fig. A.2. Work with the jar utility
If the parameter m and the name of the description file are missing, then by default the file MANIFEST.MF located in the META-INF directory of the archive file will contain only the version number.
In fig. P.2 shows the process of creating the Base.jar archive in the ch3 directory. The contents of the ch3 directory are shown first. Then an archive is created that includes the Base.class file and the entire contents of the classes subdirectory. The contents of the ch3 directory is displayed again. The Base.jar file appears in it. Then the contents of the archive are displayed.
As you can see, the archive has created the directory META-INF, and in it the file MANIFEST.MF.
MANIFEST.MF Description File
The file MANIFEST.MF, located in the META-INF directory of the archive file, is intended for several purposes:
All information is first recorded in a plain text file with any name, for example, manif. Then the jar utility is launched, in which this file is specified as the value of the parameter t, for example:
jar cmf manif Base.jar classes Base.class
The utility checks the correctness of the records in the manif file and transfers them to the MANIFEST.MF file by adding its own records.
The description file manif must be written according to strict rules set forth in the JAR File Specification. It can be found in the Java 2 SDK documentation, in the docs \ guide \ jar \ jar.html file.
For example, if we want to run an application with the main Base.class file from the Base.jar archive, then the manif file must contain at least two lines:
Main-Class: Base
The first line contains the relative path to the main class, but not to the file, that is, without the class extension. In this line, each character has a value, even a space. The second line is empty - the file must end with an empty line, more precisely, the line feed character '\ n'.
After the Base.jar archive has been created, you can run the application directly from it:
Java-jar Base.jar
INDEX.LIST file
To speed up the search for files and their faster download, you can create a search file INDEX.LIST. This is done after creating the archive. The jar utility starts again with the -i parameter , for example:
jar -i Base.jar
After this, the file INDEX.LIST appears in the META-INF directory of the archive. In fig. Section 3 shows how the search file is created and how the contents of the archive look after it is created.
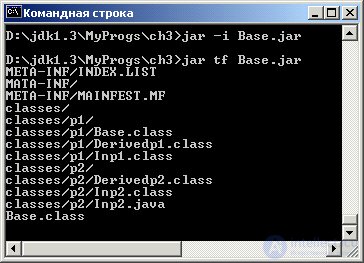
Fig. P.3. Creating a search file
Javabeans components
Many programmers prefer to develop applications with a graphical user interface using visual development tools: JBuilder, Visual Age for Java, Visual Cafe, etc. These tools allow you to place components in a container graphically, using the mouse. In fig. P.4 shows the JBuilder 4 window.
The lower left corner of the window takes the form on which the components are placed. The components themselves are shown by labels on the components panel located above the form. In fig. Item 4 on the component panel you can see the label of the Button component, shown as a rectangle with the inscription OK, the checkbox component label, shown with a small square with a cross, the checkboxGroup component label, indicated by the group of radio buttons. Next, you can see the labels for the choice, Label, List, and other AWT components.
To place a component on a form, click on the component label, move the mouse cursor to the desired location on the form, and click the button again.
Then use the mouse to set the required size of the component. In this case, you can move the component to another location. In fig. Clause 4 A button of the Button type is placed on the form.

Fig. P.4. JBuilder 4 window
Next, you should define the properties (properties) of the component: text, color of text and background, type of mouse cursor when it appears above the component. The properties are defined in the properties window located to the right of the form. . In fig. Clause 4 property label - labels on the button - given the value Run. This value immediately appears on the button
Then you can set event handling by opening the second page of the properties window.
In order for a component to be applied in a visual development tool like JBuilder, it must have additional qualities. It should have a shortcut placed on the component panel. Among the component fields, properties (properties) should be highlighted, which will be shown in the properties window. You must define accessor methods getXxx () / setXxx () / isXxx () for each property.
A component equipped with these and other necessary qualities is called a JavaBean component in Java technology. It can include one or more classes. As a rule, the files of these classes are packaged in a jar-archive and marked in the file MANIFEST.MF as Java-Bean: True.
All AWT and Swing components are JavaBeans components. If you create your graphical component according to the rules outlined in Part 3, then you also get your JavaBean. But in order not to miss any important qualities of JavaBean, it is better to use special tools for their development.
SUN provides a set of necessary utilities and BDK (Beans Development Kit) classes for developing JavaBeans. As well as the SDK, this set is stored on the company's website as a self-extracting archive, for example, bdkl_l-win.exe. Its contents are unpacked into one directory, for example, D: \ bdkl.l. After switching to the bdkl.l \ beanbox \ directory and launching the run.bat file (or run.sh on UNIX), several windows of the Bean-Box utility are opened, which is handled according to the same principle as in visual development tools.
The design rules for JavaBeans components are set out in the JavaBeans API Specification, which can be found at http: // java.sun.com/products/javabeans/docs/spec.html.
Visual development tools are not the main use of JavaBeans. The main advantage of components designed as JavaBeans is that they easily integrate into any application. Moreover, an application can be assembled from ready-made JavaBeans as from building blocks; all that remains is to adjust their properties.
Experts predict a great future for component programming. They believe that thousands of JavaBeans components will be created for all occasions and programming will come down to searching the Internet for the right components and building an application from them.
Database connectivity via JDBC
Most information is not stored in files, but in databases. The application must be able to communicate with the database to obtain information from it or to place information in a database. The matter here is complicated by the fact that the DBMS (database management systems) are very different from each other and completely different manage databases. Each DBMS provides its own set of functions for accessing databases, and you have to write your own application for each DBMS. But what to do when working over the network when it is not known which DBMS controls the database on the server?
The solution was found by Microsoft, which created a set of ODBC (Open Database Connectivity) interfaces for communicating with databases, designed as prototypes of C functions. These prototypes are the same for any DBMS, they simply describe a set of actions with database tables. ODBC function calls are written to the application accessing the database. For each database management system, a so-called ODBC driver is developed that implements these functions for a specific DBMS. The driver scans the application, finds the access to the database, transfers them to the DBMS, gets the results from it and inserts them into the application. The idea turned out to be very successful, and the use of ODBC to work with databases became generally accepted.
SUN picked up this idea and developed a set of interfaces and classes, called JDBC, for working with databases. These interfaces and classes made up the java.sqi package included in the J2SDK Standard Edition, and its extension javax.sql included in the J2SDK Enterprise Edition.
In addition to classes with database access methods, a JDBC driver is required for each DBMS, an intermediate program that implements JDBC methods. There are four types of JDBC drivers.
1. A driver that implements JDBC methods by calling ODBC functions. This is the so-called JDBC-ODBC bridge. The direct connection with the database is provided by the ODBC driver.
2. A driver that implements JDBC methods by calling the API functions of the DBMS itself.
3. A driver that implements JDBC methods by calling functions of a network protocol independent of the DBMS. This protocol must then be implemented by means of a DBMS.
4. A driver that implements JDBC methods by calling functions of the network protocol of the DBMS.
Before accessing the database, install the necessary driver, for example, the JDBC-ODBC bridge:
try {
Class dr = sun.jdbc.odbc.JdbcOdbcDriver.class;
} catch (ClassNotFoundException e) {
System.err.println ("JDBC-ODBC bridge not found" + e);
}
The dr object is not needed in the program, but this is the syntax. Another way to install the driver is shown in Listing A.1.
After the driver is installed, it is necessary to contact the database. Connection methods are described in the connection interface. An instance of a class that implements this interface can be obtained by using one of the static getConnection () methods of the DriverManager class, for example:
String url = "jdbc: odbc: mydb";
String login = "habib";
String password = "lnF4vb";
Connection qon = DriverManager.getConnection (url, login, password);
Notice how the url database address is generated. It starts with the string "jdbc:", then the subprotocol (subprotocol) is written, in this example the JDBC-ODBC bridge is used, therefore the "odbc:" is written. Next, the address (subname) is specified according to the rules of the subprotocol, here it is just the name of the local database "mydb". The second and third arguments are the name and password for connecting to the database.
If the javax.sql package is installed on your computer system, then instead of using the DriverManager class, it is better to use the DataSource interface.
By contacting the database, you can send requests. The request is stored in an object that implements the statement interface. This object is created by the createstatement () method described in the connection interface. For example:
Statement st = con.createStatement ();
Then the query (query) is entered into this object by the execute () method and then executed by the getResultSet () method. In simple cases, this can be done with one method executeQuery (), for example:
ResultSet rs = st.executeQuery("SELECT name, code FROM tbll");
Здесь из таблицы tbll извлекается содержимое двух столбцов name и code и заносится в объект rs класса, реализующего интерфейс ResultSet.
SQL-операторы INSERT, UPDATE, DELETE, CREATE TABLE и другие в простых случаях ВЫПОЛНЯЮТСЯ методом executeUpdate ().
Остается методом next () перебрать элементы объекта rs — строки полученных столбцов — и извлечь данные многочисленными методами getxxx () интерфейса ResultSet:
while (rs.next()){
emp[i] = rs.getString("name") ;
num[i] = rs.getlnt("code");
i++; }
Методы интерфейса ResuitsetMetaData позволяют узнать количество полученных столбцов, их имена и типы, название таблицы, имя ее владельца и прочие сведения о представленных в объекте rs сведениях.
Если объект st получен методом
Statement st = con.createStatement(ResultSet.TYPE_SCROLL_SENSITIVE, ResultSet.CONCUR_OPDATABLE);
то можно перейти к предыдущему элементу методом previous (), к первому элементу — методом first о, к последнему — методом last о. Можно также изменять объект rs методами updatexxx () и даже изменять, удалять и добавлять соответствующие строки базы данных. Не все драйверы обеспечивают эти возможности, поэтому, надо проверить реальный тип объекта rs методами rs.getType() И rs.getConcurrency().
Интерфейс Statement расширен интерфейсом PreparedStatement, тоже позволяющим изменять объект ResultSet методами setxxxo.
Интерфейс Preparedstatement, в свою очередь, расширен интерфейсом caiiablestatement, в котором описаны методы выполнения хранимых процедур.
Listing A.1 shows a typical example of a query to an Oracle database through an Oracle Thin driver. The applet displays four input fields for the database address, user name and password, and request in the browser window. By default, a request is made to the Oracle start database located on the local computer. The result of the query is displayed in the browser window.
Listing A.1. An applet that accesses the Oracle database
import j ava.awt. *;
import java.awt.event. *;
import j ava.applet. *;
import java.util. *;
import j ava.sql. *;
public class JdbcApplet extends Applet
implements ActionListener, Runnable {
private TextField tfl, tf2, tf3;
private TextArea ta;
bl, b2; private button;
private String url = "jdbc: oracle: thin: Slocalhost: 1521: ORCL",
login = "scott",
password = "tiger",
query = "SELECT * FROM dept";
private thread th;
private Vector results;
public void init () {
setBackground (Color.white);
try {
DriverManager.registerDriver (
new oracle.j dbc.driver. OracleDriver ());
} catch (SQLException e) {
System.err.println (e); }
setLayout (null);
setFont (new Font ("Serif", Font.PLAIN, 14));
Label l1 = new Label ("Base URL:", Label.RIGHT);
11.setBounds (20, 30, 70, 25); add (ll);
Label 12 = new Label ("Name:", Label.RIGHT);
12.setBounds (20, 60, 70, 25); add (12);
Label 13 = new Label ("Password:", Label.RIGHT);
13.setBounds (20, 90, 70, 25); add (13);
tfl = new TextField (url, 30);
tfl.setBounds (100, 30, 280, 25); add (tfl);
tf2 = new TextField (login, 30);
tf2.setBounds (100, 60, 280, 25); add (tf2);
tf3 = new TextField (password, 30);
tf3.setBounds (100, 90, 280, 25); add (tf3);
tf3.setEchoChar ('*');
Label 14 = new Label ("Request:", Label.LEFT);
14.setBounds(10, 120, 70, 25); add(14);
ta = new TextArea(query, 5, 50, TextArea.SCROLLBARS_NONE);
ta.setBounds(10, 150, 370, 100); add(ta);
Button bl = new Button("Отправить");
bl.setBounds(280, 260, 100, 30); add(bl);
b1.addActionListener(this);
}
public void actionPerformed(ActionEvent ae){
url = tfl.getText() ;
login = tf2.getText();
password = tf3.getText();
query = ta.getText();
if (th == null){
th = new Thread(this);
th. start () ;
}
}
public void run(){
try{
Connection con =
DriverManager.getConnection(url, login, password);
Statement st = con.createStatement();
ResultSet rs = st.executeQuery(query);
ResultSetMetaData rsmd = rs.getMetaData();
// Узнаем число столбцов
int n = rsmd.getColumnCount();
results = new Vector();
while (rs.nextOH String s = " ";
// Номера столбцов начинаются с 1!
for (int i = 1; i <= n; i++)
s += " " + rs.getObject(i);
results.addElement(s); }
rs.close();
st.close () ;
con.closet);
repaint();
}catch(Exception e){
System, err.println(e);
}
repaint();
}
public void paint(Graphics g)(
if (results == null){
g.drawstring("Can't execute the query", 5, 30);
return;
}
int у = 30, n = results.size();
for (int i = 0; i < n; i++)
g.drawString((String)results.elementAt(i), 5, у += 20); } }
Замечание по отладке
В главе 19 упоминалось, что для отладки сетевой программы удобно запустить и клиентскую, и серверную часть на одном компьютере, обращаясь к серверной части по адресу 127.0.0.1 или доменному имени localhost. He забывайте, что апплет может связаться по сети только с тем хостом, откуда он загружен. Следовательно, на компьютере должен работать Web-сервер. Если Web-сервер прослушивает порт 8080, то, чтобы загрузить HTML-страницу с апплетом, надо в браузере указывать адрес URL видаhttp://loca(host:8080/public/JdbcApplet.html. При этом учтите, что Web-сервер устанавливает свою иерархию каталогов, и каталог public на самом деле может быть каталогом usr/local/http/public или каким-нибудь другим.
Таким образом, JDBC позволяет проделать весь цикл работы с базой данных. Подробно со всеми возможностями JDBC можно познакомиться, прочитав спецификацию JDBC, имеющуюся в документации Java 2 SDK, в каталоге docs\guide\jdbc\spec\. Дополнения спецификации версии JDBC 2.0 изложены в каталоге docs\guide\jdbc\spec2\. В каталоге docs\guide\jdbc\getstart\ есть пособие по использованию JDBC.
Сервлеты
В главе 19 была упомянута технология CGI. Ее суть в том, что сетевой клиент, обычно браузер, посылает Web-серверу информацию вместе с указанием программы, которая будет обрабатывать эту информацию. Web-сервер, получив информацию, запускает программу, передает информацию на ее стандартный ввод и ждет окончания обработки. Результаты обработки программа отправляет на свой стандартный вывод, Web-сервер забирает их оттуда и отправляет клиенту. Написать программу можно на любом языке, лишь бы Web-сервер мог взаимодействовать с ней.
В технологии Java такие программы оформляются как сервлеты (servlets). Это название не случайно похоже на название "апплеты". Сервлет на Web-сервере играет такую же роль, что и апплет в браузере, расширяя его возможности.
Чтобы Web-сервер мог выполнять сервлеты, в его состав должна входить JVM и средства связи с сервлетами. Обычно все это поставляется в виде отдельного модуля, встраиваемого в Web-сервер. Существует много таких модулей: Resin, Tomcat, JRun, JServ. Они называются на жаргоне сервлетными движками (servlet engine).
Основные интерфейсы и классы, описывающие сервлеты, собраны в пакет javax.servlet. Расширения этих интерфейсов и классов, использующие конкретные особенности протокола HTTP, собраны в пакет javax.servlet.http. Еще два пакета— javax.servlet.jsp и javax.servlet.jsp.tagext — предназначены для связи сервлетов со скриптовым языком JSP (JavaServer Pages). Все эти пакеты входят в состав J2SDK Enterprise Edition. Они могут поставляться и отдельно как набор JSDK (Java Servlet Development Kit). Сервлет-ный движок должен реализовать эти интерфейсы.
Основу пакета javax.servlet составляет интерфейс servlet, частично реализованный в абстрактном классе GenericServiet и его абстрактном подклассе HttpServiet. Основу этого интерфейса составляют три метода:
An experienced reader has already realized that the entire work of the servlet is concentrated in the service method of. Indeed, this is the only method not implemented in the GenericServiet class. Enough to expand your class from class. GenericServiet and implement the service () method in it to get your own servlet. The Servlet engine built into the Web server implements the ServletRequest and ServletResponse interfaces. It creates objects req and resp, puts all the information received in the object req and passes this object to the servlet along with the empty object resp. The servlet accepts these objects as the req and resp arguments of the service about method, processes the information enclosed in req, and executes the response, filling in the resp object. The engine takes this response and sends it via the Web server to the client.
The main information contained in the req object can be obtained by the read () and readLine () methods FROM the byte stream of the ServletlnputStream class, which directly extends the inputstream class, or from the character stream of the BufferedReader class. These streams are opened, respectively, by the req.getlnputStream () method or by the req.getReader () method. Additional query characteristics can be obtained by using the req getxxxo multiple methods. In addition, the GenericServlet class implements a plethora of getxxxo methods that provide additional information about the client’s configuration.
The servietResponse interface describes symmetric methods for generating a response. The getoutputstreamo method opens a byte stream of the ServletOutputStream class, which directly extends the OutputStream class. The getWriter () method opens the PrintWriter character stream.
So, implementing the service method!), You need to get information from the input stream of the req object, process it and write the result to the output stream of the resp object.
Very often, the req object contains a query to the database. In this case, the service about method accesses the database through JDBC and generates a response resp from the resulting ResultSet object.
The HTTP protocol offers several data transfer methods: GET, POST, PUT, DELETE. To use them, the GenericServlet class is extended by the HttpServlet class, located in the javax.servlet.http package. In this class there are methods for implementing each data transfer method:
doGet (HttpServletRequest req, HttpServletResponse resp)
doPost (HttpServletRequest req, HttpServletResponse resp)
doPut (HttpServletRequest req, HttpServletResponse resp)
doDelete (HttpServletRequest req, HttpServletResponse resp)
To work with a specific HTTP data transfer method, it suffices to expand your class from the HttpServlet class and implement one of these methods. The service () method is not necessary to redefine; in the HttpServlet class, it only determines by which HTTP method the client request is transmitted, and calls the corresponding doXxxo method. The arguments of the listed methods req and resp are objects that implement the HttpServletRequest and HttpServletResponse Interfaces, extending the ServletRequest and ServietResponse interfaces, respectively.
The HttpServletRequest interface also describes a number of getxxx () methods that allow you to get additional properties of the req request.
The HttpServletResponse interface describes the addxxxO and setxxxo methods, which supplement the resp answer, and static constants with the response codes of the Web server.
In listings P.2 and PZ, the same actions that the program performs in listing P. 1 are implemented using a servlet. The applet is no longer needed, the HTML form shown in listing A.2 is displayed in the browser window.
Listing A.2. HTML database request form
<htmlxheadxtitle> JDBC Servlet </ title> </ head>
<body>
<form method = "POST" action = "/ servlet / JdbcServlet">
<pre>
Base URL: <input type = "text" size = "40" name = "url"
value = "jdbc: oracle: thin: @localhost: 1521: ORCL">
Name: <input type = "text" size = "40" name = "login"
value = "scott">
Password: <input type = "password" size = "40" name = "password"
value = "tiger">
Request:
<textarea rows = "5" cols "70" name = "query">
SELECT * FROM dept
</ textarea>
<input type = "submit" value = "Send">
</ pre>
</ form>
</ body>
</ html>
The servlet receives from this form the address of the url database, the login name and password of the user's password, and a query query. It accesses the Oracle database through the Oracle Thin JDBC driver, generates the response in the form of an HTML page and sends it to the browser.
Listing A.3 . Servlet querying Oracle i database
import java.io. *;
import javax.servlet. *;
import javax.servlet.http. *;
import java.util. *;
import j ava.sql. *;
public class JdbcServlet extends HttpServlet {static)
try {
DriverManager.registerDriver (
new oracle.j dbc.driver. OracleDriver ());
) catch (SQLException e) {
System.err.println (e);
}
)
private Vector results = new Vector ();
private int n;
public void doPost (HttpServletRequest req, HttpServletResponse resp)
throws IOException {
ServletExceptionf String url = req.getParameter ("url"),
login = req.getParameter ("login"),
password = req.getParameter ("password"),
query = req.getParameter ("query");
// Set the MIME type and encoding for the output stream pw
resp.setContentType ("text / html; charset = windows-1251");
PrintWriter pw = resp.getWriter ();
try {
Connection con =
DriverManager.getConnection (url, login, password);
Statement st = con.createStatement ();
ResultSet rs = st.executeQuery (query);
ResultSetMetaData rsmd = rs.getMetaData ();
n = rsmd.getColumnCount (); while (rs.next ()) {
String s = "";
for (int i = 1; i <= n; i ++)
s + = "" + rs.getObject (i);
results.addElement (s); }
rs.close ();
st.close ();
con.close ();
} catch (SQLException e) {
pw.println ("From doPostf):" + e);
}
pw.println ("<html> <head> <title> Answers </ titlex / head>");
pw.r.rintln ("<body> <h2> Results 3anpoca </ h2>");
n = results.size ();
for (int i = 0; i <n; i ++)
pw.println ((String) results.elementAt (i) + "<br>");
pw.println ("</ bodyx / html>");
pw.flush ();
pw.close ();
}
}
The use of the servlet allowed to “ease” the client - the browser does not load the applet, but only sends a request and receives a response. All request processing is done in the servlet on the server.
In the J2SDKEE system (Java 2 SDK Enterprise Edition), the HTML file and servlet form one Web component. They are packaged in a single file with the war (web archive) extension and placed in a so-called Web container managed by a Web server enhanced by J2SDKEE.
Java server
The tendency to write network programs is to assign more functions to the server part of the program and leave the client part smaller, making the client thin and the server thick. This allows, on the one hand, to use the client part of the program on the oldest and lowest-powered computers, and on the other hand, it facilitates the modification of the program - all changes are sufficient to be done only in one place, on the server.
The server performs more and more functions, as they say, of services or services . It both sends Web pages to the client, runs servlets, and communicates with the database, and provides transactions. Such a multifunctional server is called an application server. WebLogic application servers from BEA Systems, IAS (Inprise Application Server) from Borland, WebSphere from IBM, and OAS (Oracle Application Server) are now very popular. An important characteristic of the application server is the ability to expand its capabilities by including new modules. This is convenient to do with the help of components.
SUN Microsystems has introduced its Enterprise JavaBeans (EJB) component system, included in the Java 2 SDK Enterprise Edition. Just as JavaBeans graphical components implement a graphical user interface, residing in graphical containers, EJB components implement various services on a server, residing in EJB containers. These containers are managed by an EJB server that is included in the application server. As part of the J2SDKEE, the EJB server is a j2ee program. An application server can run this program to use EJB components.
Unlike JavaBeans, EJB components cannot have a graphical interface or keyboard input. They may not even have console output. An EJB container is not engaged in locating components, but creating and deleting their objects, communicating with clients and other components, checking access rights and securing transactions.
Programs designed as EJBs can be of two types: EntityBean and sessionBean. They implement the corresponding interfaces from the javax.ejb package. The first type of EJB components is convenient for creating programs that access databases and perform complex processing of the information received. Components of this type can work with several clients at once. The second type of EJB components is more convenient for organizing interaction with the client. Components of this type are of two types: preserving their state from a request to request (stateful) and losing that state (stateless). The methods of the EntityBean and SessionBean interfaces to the EJB container control the behavior of class instances. If standard control is enough, then you can make an empty implementation of these methods.
In addition to the class that implements the interface EntityBean or SessionBean, to create an EJB component, you need to create two more interfaces that extend the interfaces of the outlook and EjBObject. The first interface (home interface) is used to create an EJB object with its own create () methods, to search for and communicate with this object in the process, and to remove it with the remove o method. The second interface (remote interface) describes the methods of the EJB component. An interesting feature of the EJB technology is that the client program does not form the objects of the EJB component. Instead, it creates objects for home and remote interfaces and works with these objects. Implementing home and remote interfaces, creating and interacting with EJB component objects is left to the EJB container.
We give the simplest example. Suppose that we decided to process a sample from the database listed in the rs object in the servlet of P. 3 listing using the EJB component. For simplicity, let processing be the merging of two columns with the merge () method. Write the program:
import java.rmi.RemoteException;
import javax.ejb. *;
public class MergeBean implements SessionBean {
public String merge (String si, String s2) {
String s = si + "" + s2;
return s;
}
// Executed when accessing the create () method
// interface MergeHome. Plays the role of class constructor
public void ejbCreate () {}
// Empty implementation of interface methods
public void setSessionContext (SessionContext ctx) {}
public void ejbRemoveO {}
public void ejbActivate () (}
public void ejbPassivate () {}}
public interface MergeHome extends EJBHome {
// Implemented by the ejbCreate () method of the MergeBean class
Merge create)} throws CreateException, RemoteException;
}
public interface Merge extends EJBObject {
public double merge (String si, String s2)
throws RemoteException;
}
In listing 3 of the servlet, we create objects of the type MergeHome and Merge and refer to their methods:
import j avax.servlet. *;
import j avax.servlet.http. *;
import java.io. *;
import j avax.naming. *;
import j avax.rmi.PortableRemoteObj ect;
public class JDBCServlet extends HttpServlet {
MergeHome mh;
Merge m;
// The following definitions
// .......
public void init (ServletConfig conf) throws ServletExceptionf
try (// Search for a merge object that implements MergeHome
InitialContext ic = new InitialContext (};
Object ref = ic.lookup ("merge");
mh = (MergeHome) PortableRemoteObject.narrow (
ref, MergeHome.class); } catch (Exception e) {
e.printStackTrace (); }
public void doPost (HttpServletRequest req, HttpServletResponse resp)
throws IOException, ServletExceptionf
// Start of method
// ........
m = mh.create ();
String s = m.merge (si, s2);
// etc.
}
}
After compilation we get an EJB application consisting of five files: JdbcServlet.html, JdbcServlet.class, MergeBean.class, MergeHome.class and Merge.class. It remains to correctly install (deploy) it to the EJB container. The jdbcserviet.html and JdbcServlet.class files should be packaged into one war file, the remaining files into one jar file, then both of the resulting files be packaged into one ear file (Enterprise ARchive). In addition, you need to create another deployment description file (deployment descriptor) in XML format and add it to the archive. This file, in particular, records the name "merge", according to which the component is searched for using the lookup () method.
All this can be done with the depioytool utility, which is part of the Java 2 SDK Enterprise Edition. The same utility allows you to test the application and install it into the EJB container. You just need to start the EJB server first with the j2ee command.
However, all the files of an EJB application can be packaged into a single jar file.
Many application servers and development tools, such as Borland JBuilder and IBM Visual Age for Java, include utilities for installing EJB applications.
EJB application is ready. Now it is enough to call the HTML file in the browser and fill in the form that appears in the window.
Conclusion
Well that's all. The book is read. Now you can feel confident in the world of Java, freely understand new technologies and create your own applications at the most modern level. Of course, in this book we could not analyze in detail all aspects of Java technology, but, knowing the basic techniques, you can easily master all its new methods. I wish you success!

Comments
To leave a comment
Object oriented programming
Terms: Object oriented programming