Lecture
The standard Java API library includes hundreds of classes. Each programmer in the course of work adds dozens of their own. Many classes become boundless. For a long time to accept classes to unite in libraries. But class libraries, other than the standard, are not part of the language.
Java developers have included an additional construct in the language - packages. All Java classes are packaged. In addition to classes, packages can include interfaces and subpackages. A tree structure of packages and subpackages is formed.
This structure is exactly mapped to the file system structure. All files with a class extension (containing bytecodes) that make up the package are stored in the same file system directory. Subpackages are compiled into subdirectories of this directory.
Each package forms one namespace. This means that all class, interface, and subpackage names in a package must be unique. Names in different packages may coincide, but they will be different program units. Thus, no class, interface or sub-package can end up in two packages at once. If you need to use two classes with the same name from different packages, the class name is specified by the package name: package.class . Such a qualified name is called a fully qualified class name.
All these rules, again, coincide with the rules for storing files and subdirectories in directories.
Packages are also used to add to the already existing rights of access to members of the class private, protected and public another, “packet” level of access.
If a class member is not marked by any of the private, protected, public modifiers, then by default, it is provided with packet access (default access), namely, any method of any class from the same package can refer to that member. Packages restrict access to the class as a whole — if the class is not marked with the public modifier, then all of its members, even the public ones , will not be visible from other packages.
How to create a package and place classes and subpackages in it?
Package and Subpackage
To create a package, simply write the name package in the first line of the Java source file ; , eg:
package mypack;
This creates a package with the specified name mypack and all classes recorded in this file will be included in the package mypack . Repeating this line at the beginning of each source file, we include new classes in the package.
The name of the subpackage is specified by the package name. To create a subpacket with a name, for example, subpack , you should write in the first line of the source file;
package mypack.subpack;
and all classes of this file and all files with the same first line will fall into the subpacket of mypack .
You can create a subpackage by writing something like
package mypack.subpack.sub;
etc. as many times as you like.
Since the string is package name; only one and this is necessarily the first line of the file, each class falls only in one package or subpackage.
The Java compiler itself can create a directory with the same name mypack, a subpacket subpacket in it, and place class files with bytecodes in them.
The full names of classes A, in will look like this: mypack.A, mypack.subpack.c.
SUN recommends that you write the package names in lower case, then they will not match the class names, which, by convention, begin with a capital letter. In addition, SUN advises using the domain name of your website as a package name or subpackage in reverse order, for example:
com.sun.developer
Until now, we have never created a package. Where are our files with compiled classes?
The compiler always creates an unnamed package for such classes, which corresponds to the current directory (current working directory)
file system. That is why our class file always appeared in the same directory as the corresponding Java file.
An unnamed package usually serves as a repository of small test or intermediate classes. Big projects are best kept in bags. For example, the Java 2 API class library is stored in java, javax, org.omg packages. The Java package contains only the subpackages applet, awt, beans, io, lang, math, net, rmi, security, sql, text, util and not a single class. These packages have their own subpackages, for example, the GUI creation package and java.awt graphics contains the subpackages color, datatransfer, dnd, event, font, geometry, im, image, print.
Of course, the composition of packages varies from version to version.
Access rights to class members
It is time to examine in detail the various restrictions on access to the fields and methods of the class.
Consider a great example. Suppose there are five classes placed in two packages, as shown in Fig. 3.1.
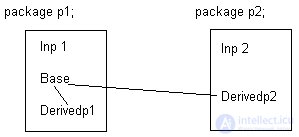
Fig. 3.1. Placing our classes by package
The Base.java file describes three classes: inpi, Base, and the Derivedpi class, which extends the vase class. These classes are located in the pi package. In the Base class, variables of all four types of access are defined, and in the f () methods of the classes inp1 and Derivedp1 an attempt is made to access all fields of the vase class. Failed attempts are marked by comments. The comments contain compiler messages. Listing 3.1 shows the contents of this file.
Listing 3.1. Base.java file with p1 package description
package p1;
class Inp1 {
public void f () {
Base b = new Base ();
// b.priv = 1; // "priv has private access in p1.Base"
b.pack = 1;
b.prot = 1;
b.publ = 1;
}
}
public class Base {
private int priv = 0;
int pack = 0;
protected int prot = 0;
public int publ = 0;
}
class Derivedpi extends Base {
public void f (Base a) {
// a.priv = 1; // "priv hds private access in pi.Base"
a.pack = 1;
a.prot = 1;
a.publ = 1;
// priv = 1; // "priv has private access in pi.Base"
pack = 1;
prot = 1;
publ = 1;
}
}
As you can see from Listing 3.1, only closed, private , fields of another class are not available in the package.
The file Inp2.java describes two classes: inp2 and the class Derivedp2 , which extends the base class. These classes are in another package p2 . In these classes, too, an attempt was made to refer to the vase class fields. Unsuccessful attempts are commented by compiler messages. Listing 3.2 shows the contents of this file.
Recall that a vase class must be marked in its description in the p1 package with the public modifier, otherwise none of its members will be visible from the p2 package.
Listing 3.2. File Inp2.java with package description p2
package p2;
import pl.Base;
class Inp2 {
public static void main (String [] args) {
Base b = new Base ();
// b.priv = 1; // "priv has private access in pl.Base"
// b.pack = 1; // "pack is not public in pl.Base;
// cannot be accessed from outside package "
// b.prot = 1; // „" prot has protected access in pi.Base "
b.publ = 1;
}
}
class Derivedp2 extends Base {
public void, f (Base a) {
// a.priv = 1; // "priv has private access in. p1.Base"
// a.pack = 1; // "pack, is not public in pi.Base; cannot
// be accessed from outside package "
// a.prot = 1; // "prot has protected access in p1.Base"
a.publ = 1;
// priv = 1; // "priv has private access in pi.Base"
// pack = 1; // "pack is not public in pi.Base; cannot
// be accessed from outside package "
prot = 1;
publ = 1;
super.prot = 1;
}
}
Here, in another package, access is more limited.
From an independent class, you can access only the open, public fields of the class of another package. From the subclass one can also apply to the protected, protected fields, but only those inherited directly, and not through an instance of the superclass.
All of the above refers not only to the fields, but also to the methods. Summarize all the above table. 3.1.
Table 3.1. Permissions for class fields and methods
|
Class |
Package |
Package and Subclasses |
All classes |
|
|
private |
+ |
|||
|
"package" |
+ |
+ |
||
|
protected |
+ |
+ |
* |
|
|
public |
+ |
+ |
+ |
+ |
The feature of access to protected fields and methods from someone else's package is marked with an asterisk.
Package Packages by File
The fact that class files containing class bytecodes must be placed in the appropriate directories imposes its own characteristics on the process of compiling and executing the program.
Let us turn to the same example. Suppose that in the directory D: \ jdkl.3 \ MyProgs \ ch3 there is an empty subdirectory of classes and two files - Base.java and Inp2.java, - the contents of which are shown in Listings 3.1 and 3.2. Fig. 3.2 shows the directory structure after compilation.
We can do all the work manually.
1. In the classes directory create subdirectories p! and p2.
2. Transfer the Base.java file to the p directory! and make p] the current directory.
3. Compile Base.java, getting in the p directory! three files: Base.class, Inpl.class, Derivedpl.class.
4. Transfer the Inp2java file to the p2 directory.
5. Again we make the classes directory current.
6. Compile the second file, indicating the path p2 \ Inp2.java.
7. Run the java p2.inp2 program .
Instead of steps 2 and 3, you can simply create three class files anywhere, and then transfer them to the pi directory. The class files do not store any information about the paths to the files.
The meaning of actions 5 and 6 is that when compiling an Inp2.java file, the compiler should already know the p1.Base class, and it will find the file with this class along the path p1.Base.class, starting from the current directory.
Notice that in the last step 7 you need to specify the full name of the class.
If you use the options (options) command line compiler, you can do all the work faster.
1. Call the compiler with the -d key path, specifying the path parameter for the starting directory for the package:
javac -d classes Base.java
The compiler will create a subdirectory p1 in the classes directory and put three class files there.
2. Call the compiler with another -classpath path, specifying the path to the classes directory, which contains a subdirectory with the pi package already compiled:
javac -classpath classes -d classes Inp2.java
The compiler, guided by the -d switch, will create the p2 subdirectory in the classes directory and put two class-files there, during the creation of which it would “look in” the pi directory, guided by the -classpath key.
3. Make the classes directory current.
4. We start java p2.inp2.
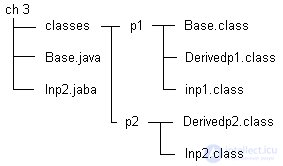
Fig. 3.2. Directory structure

Fig. 3.3. Protocol compilation and run the program
For "Unixoids" all this sounds like music, but others have to remember MS DOS.
Of course, if you use not a command line compiler, but an IDE for work, then all these actions will be taken without your participation.
In fig. 3.2 displays the directory structure after compilation.
In fig. Figure 3.3 shows the output of these actions in the Command Prompt window and the contents of the directories after compilation.
Import classes and packages
The attentive reader noticed in the second line of Listing 3.2 a new import statement. What is it for?
The fact is that the compiler will only look for classes in the one package, namely, in what is specified in the first line of the file. For classes from another package, you must specify the full names. In our example, they are short, and we could write in Listing 3.2 instead of Base the full name p1.Base.
But if the full names are long, and classes are often used, then knocking on the keys, typing the full names, becomes tedious. This is where we write the import statements, giving the compiler the full class names.
The rules for using the import statement are very simple: the word import is written and, separated by a space, the full class name, terminated by a semicolon. How many classes you need to specify, as many import statements and written.
This can also become tedious and then the second form of the import statement is used — the name of the package or subpackage is indicated, and an asterisk * is used instead of the short class name. This record instructs the compiler to view the entire package. In our example, you could write
import p1. *;
Recall that you can only import open classes that are marked with the public modifier.
Attentive reader and watchful here. We used the methods of the standard library classes, without specifying its packages? Yes, right.
The java.iang package is always visible, it is not necessary to import it. The remaining packages of the standard library must be specified in the import statements, or write the full names of classes.
We emphasize that the import statement is introduced only for the convenience of programmers and the word "import" does not mean any movement of classes.
Connoisseurs C / C ++
The import statement is not equivalent to the preprocessor directive include - it does not include any files.
Java files
Now you can describe the structure of the source file with the text of the program in Java.
Two more rules.
It follows that if there are several open classes in the project, they must be in different files.
The Code Conventions agreement recommends an open class, which, if it is in the file, should be described first.
Interfaces
You have already noticed that you can only get an extension from one class, each class in or from comes from an incomplete family, as shown in Fig. 3.4, a. All classes come only from "Adam", from the class object . But often there is a need to generate a class o from two classes of vis, as shown in fig. 3.4, b. This is called multiple inheritance. There is nothing wrong with multiple inheritance. Difficulties arise if the classes of classes are generated from one class A, as shown in Fig. 3.4 * in. This is the so-called "diamond" inheritance.
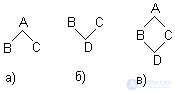
Fig. 3.4. Different inheritance options
Indeed, let the method f () be defined in class A, to which we refer from some method of class o. Can we be sure that the method f о performs what is written in class A, that is, is it the method Af o? Perhaps he is redefined in classes in and with? If so, which option do we use: Bf () or cf ()? Of course, you can define instances of classes and refer to the methods of these instances, but this is a completely different conversation.
In different programming languages, this issue is solved in different ways, mainly by clarifying the name of the method ft). But at the same time the principle of KISS is always violated. There are always many disputes around multiple inheritance, there are his ardent supporters and equally ardent opponents. We will not get involved in these disputes, our business is to make the best use of the language tools for solving our problems.
The creators of the Java language, after much controversy and reflection, acted radically - banned multiple inheritance altogether. When extending a class, after the word extends you can write only one name of the superclass. Using the super refinement, you can only refer to members of the immediate superclass.
But what to do, if you still need to use several ancestors when spawning? For example, we have a general class of automobiles Automobile , from which one can spawn a class of truck trucks and a class of passenger cars Sag. But here it is necessary to describe the pickup Pickup . This class must inherit the properties of both trucks and cars.
In such cases, another Java language construct is used — the interface. Having carefully analyzed the diamond-shaped inheritance, the PLO theorists found out that the problem is created only by the implementation of the methods, and not by their description.
Interface (interface), in contrast to the class, contains only constants and method headers, without their implementation.
Interfaces are placed in the same packages and subpackages as the classes, and also compiled into class files.
The interface description begins with the word interface , which can be preceded by a public modifier, meaning, as for the class, that the interface is accessible everywhere. If there is no public modifier, the interface will be visible only in its package.
After the word interface , the name of the interface is written. Thus, interfaces can be generated from interfaces, forming their own hierarchy, independent of classes, and it allows for multiple inheritance of interfaces. There is no root, common ancestor in this hierarchy.
Then, in curly braces, constants and method headers are written in any order. We can say that in the interface all methods are abstract, but the word abstract is not necessary. Constants are always static, but the words static and final are not required.
All constants and methods in interfaces are always open, you do not even need to specify the public modifier.
Here is the scheme that can be proposed for a car hierarchy:
interface Automobile {. . . }
interface Car extends Automobile {. . . }
interface Truck extends Automobile {. . . }
interface pick extends car {. . . }
Thus, the interface is only a sketch, a sketch. It indicates what to do, but not how to do it.
How to use the interface, if it is completely abstract, there is not a single complete method?
It is necessary to use not the interface, but its implementation (implementation). An interface implementation is a class in which the methods of one or more interfaces are written. In the class header, after its name or after the name of its superclass, if it exists, the word implements is entered and, comma-separated, the names of the interfaces are listed.
Here's how to implement a car hierarchy:
interface Automobile {. . . }
interface Car extends Automobile! . . . }
class Truck implements Automobile! . . . }
class Pickup extends Truck implements Car {. . . }
or so:
interface Automobile {. . . }
interface Car extends Automobile {. . . }
interface Truck extends Automobile {. . . }
class Pickup implements Car, Truck {. . . }
Interface implementation may be incomplete, some interface methods are described, and others are not. Such an implementation is an abstract class, it must be marked with an abstract modifier.
How to implement the f () method in the pickup class, described both in the saga interface and in the Truck interface with the same signature? The answer is simple - no way. This situation cannot be realized in the Pickup class. The program must be designed differently.
So, interfaces allow you to implement pure object-oriented design using Java tools, without being distracted by questions of project implementation.
When starting to develop a project, we can write it in the form of a hierarchy of interfaces, not thinking about implementation, and then build a hierarchy of classes on this project, taking into account the limitations of single inheritance and the visibility of class members.
Interestingly, we can create links to interfaces. Of course, such a link can only indicate any interface implementation. Thus, we get another way of organizing polymorphism.
Listing 3.3 shows how you can assemble the choir of pets in Listing 2.2 using the interface.
Listing 3.3. Using the interface to organize polymorphism
interface Voice {
void voice ();
}
class Dog implements Voice {
public void voice () {
System.out.println ("Gav-gav!");
}
}
class Cat implements Voice {
public void voice () {
System.out.println ("Miaou!");
}
}
class Cow implements Voice {
public void voice () {
System.out.println ("Mu-uu!");
}
}
public class Chorus {
public static void main (String [] args) {
Voiced singer = new Voice [3];
singer [0] = new Dog ();
singer [1] = new Cat ();
singer [2] = new Cow ();
for (int i = 0; i
singer [i] .voice ();
}
}
It uses the voice interface instead of the abstract Pet class , described in Listing 2.2.
Что же лучше использовать: абстрактный класс или интерфейс? На этот вопрос нет однозначного ответа.
Создавая абстрактный класс, вы волей-неволей погружаете его в иерархию классов, связанную условиями одиночного наследования и единым предком — классом object . Пользуясь интерфейсами, вы можете свободно проектировать систему, не задумываясь об этих ограничениях.
С другой стороны, в абстрактных классах можно сразу реализовать часть методов. Реализуя же интерфейсы, вы обречены на скучное переопределение всех методов.
Вы, наверное, заметили и еще одно ограничение: все реализации методов интерфейсов должны быть открытыми, public , поскольку при переопределении можно лишь расширять доступ, а методы интерфейсов всегда открыты.
In general, the presence of both classes and interfaces gives the developer rich design possibilities. In our example, you can include any class in the chorus simply by implementing the voice interface in it .
Finally, interfaces can be used simply to define constants, as shown in Listing 3.4.
Listing 3.4. Traffic control system
interface Lights {
int RED = 0;
int YELLOW = 1;
int GREEN = 2;
int ERROR = -1;
}
class Timer implements Lights {
private int delay;
private static int light = RED;
Timer (int sec) (delay = 1000 * sec;}
public int shift () {
int count = (light ++)% 3;
try {
switch (count) {
case RED: Thread.sleep (delay); break;
case YELLOW: Thread.sleep (delay / 3); break;
case GREEN: Thread.sleep (delay / 2); break;
}
} catch (Exception e) {return ERROR;}
return count;
}
}
class TrafficRegulator {
private static Timer t = new Timer (1);
public static void main (String [] args) {
for (int k = -0; k < 10; k++)
switch(t.shift()){
case Lights.RED: System.out.println("Stop!"); break;
case Lights.YELLOW: System.out.println("Wait!"); break;
case Lights.GREEN: System.out.println("Go!"); break;
case Lights.ERROR: System.err.println("Time Error"); break;
default: System.err.println("Unknown light."); return;
}
}
}
Здесь, в интерфейсе Lights , определены константы, общие для всего проекта.
Класс Timer реализует этот интерфейс и использует константы напрямую как свои собственные. Метод shift о этого класса подает сигналы переключения светофору с разной задержкой в зависимости от цвета. Задержку осуществляет метод sleep() класса Thread из стандартной библиотеки, которому передается время задержки в миллисекундах. Этот метод нуждается в обработке исключений try{} catch() {} , о которой мы будем говорить в главе 16.
Класс TrafficReguiator не реализует интерфейс Lights и пользуется полными именами Lights.RED и т.д. Это возможно потому, что константы RED, YELLOW и GREEN по умолчанию являются статическими.
Теперь нам известны все средства языка Java, позволяющие проектировать решение поставленной задачи. Заканчивая разговор о проектировании, нельзя не упомянуть о постоянно пополняемой коллекции образцов проектирования (design patterns).
Design patterns
В математике давно выработаны общие методы решения типовых задач. Доказательство теоремы начинается со слов: "Проведем доказательство от противного" или: "Докажем это методом математической индукции", и вы сразу представляете себе схему доказательства, его путь становится вам понятен.
Нет ли подобных общих методов в программировании? There is.
Допустим, вам поручили автоматизировать метеорологическую станцию. Информация от различных датчиков или, другими словами, контроллеров температуры, давления, влажности, скорости ветра поступает в цифровом виде в компьютер. Там она обрабатывается: вычисляются усредненные значения по регионам, на основе многодневных наблюдений делается прогноз на завтра, т. е. создается модель метеорологической картины местности. Затем прогноз выводится по разным каналам: на экран монитора, самописец, передается по сети. Он представляется в разных видах, колонках чисел, графиках, диаграммах.
Естественно спроектировать такую автоматизированную систему из трех частей.
В чем удобство такой трехзвенной схемы? Она очень гибка. Замена одного датчика приведет к замене только одного модуля в Контроллере, ни Модель, ни Вид этого даже не заметят. Надо представить прогноз в каком-то новом виде, например, для телевидения? Пожалуйста, достаточно написать один модуль и вставить его в Вид. Изменился алгоритм обработки данных? Меняем Модель.
Эта схема разработана еще в 80-х годах прошлого столетия [То есть XX века. — Ред. ] в языке Smalltalk и получила название MVG (Model-View-Controller). Оказалось, что она применима во многих областях, далеких от метеорологии, всюду, где удобно отделить обработку от ввода и вывода информации.
Сбор информации часто организуется так. На экране дисплея открывается поле ввода, в которое вы набиваете сведения, допустим, фамилии в произвольном порядке, а в соседнем поле вывода отображается обработанная информация, например, список фамилий по алфавиту. Будьте уверены, что эта программа организована по схеме МУС. Контроллером служит поле ввода, Видом — поле вывода, а Моделью — метод сортировки фамилий. В третьей части книги мы рассмотрим примеры реализации этой схемы.
By the mid-1990s, many such schemes had accumulated. They have concentrated many years of experience of thousands of programmers, expressed the best solutions typical problems.
Here, perhaps, the simplest of these schemes. You need to write a class in which you can create only one instance, but objects of other classes should use this instance. To solve this problem, the proposed scheme Singleton, presented in Listing 3.5.
Listing 3.5. Singleton circuit
final class Singleton {
private static Singleton s = new Singleton (0);
private int k;
private singleton (int i) {k = i;}
public static Singleton getReference () (return s;}
public int getValue () {Return k;}
public void setValue (int i) {k = i;}
}
public class SingletonTest {
public static void main (String [] args) {
Singleton ref = Singleton.getReference ();
System.out.println (ref.getValue ());
ref.setValue (ref.getValue () + 5);
System.out.println (ref.getValue ());
}
}
The singleton class is final - it cannot be expanded. Its constructor is closed - no method can create an instance of this class. A singleton instance of the singleton class is static; it is created inside the class. But any object can get a reference to an instance using the getReference () method, Change the state of an instance s using the s etValue () method, or view its current state using the getValue () method.
This is only a scheme - the singleton class must also be filled with useful content, but the idea is expressed clearly and completely.
Design schemes were systematized and described in the book [7]. Four authors of this book were nicknamed the "gang of four" (Gang of Four), and the book, in short, "GoF". Information processing schemes are called "Design Patterns". Russian term is not yet settled. They talk about "patterns", "development schemes", "design patterns".
The GoF book describes 23 templates, divided into three groups:
1. Object creation templates: Factory, Abstract Factory, Singleton, Builder, Prototype.
2. Object structure templates: Adapter, Bridge, Composite, Decorator, Facade, Flyweight, Proxy.
3. Patterns of object behavior: Chain of Responsibility, Command, Interpreter, Iterator, Mediator, Memento, Observer, State, Strategy, Template, Visitor.
The descriptions are given mainly in C ++. In the book [8], the same templates are presented in the Java language. The electronic publication is devoted to the same topic [9]. The book [10] discusses in detail the development of systems based on design patterns.
We, unfortunately, can not make out in detail the design patterns in this book. But every programmer of the beginning of the XXI century should know them. The description of many developments begins with the words: "The project is solved on the basis of a template," and the structure of the project immediately becomes clear to anyone familiar with design patterns.
In the course of the book, we will indicate on the basis of which template this or that development was made.
Conclusion
So we finished the first part of the book. Now you know all the basic constructs of the Java language, allowing you to design and implement a project of any complexity on the basis of OOP. The remaining language constructs, no less important, but less commonly used, are set aside until the fourth part. The second and third part of the book will be devoted to the study of classes and methods included in the Core API. It will be a good workout for you.
The Java language, like all modern programming languages, is not only syntactic constructs, but also a rich class library. Knowledge of these classes and the ability to use them just determines the programmer and practice.

Comments
To leave a comment
Object oriented programming
Terms: Object oriented programming