Lecture
In addition to widgets and effects, the jQuery UI library includes a set of so-called interactions . These are low-level building blocks that allow you to add functionality to the interface of web applications. This article describes the interaction of Draggable and Droppable, providing the ability to move elements with the mouse pointer and paste them to other places in the HTML-document.
Using screen shots to demonstrate the effects created by interactions is rather difficult. As their name implies, they have a direct impact on the behavior of the elements. Therefore, you can run some examples directly in the browser.
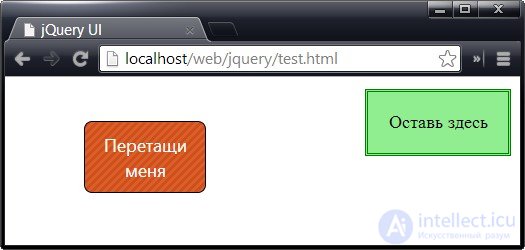
The element to which the Draggable interaction is applied becomes draggable , i.e. it can be moved with the mouse pointer within the browser window. When a document is opened, such an element appears in the layout at its usual place, but after that the user can change its location by clicking on it with the mouse and dragging it to another place. A simple example of this kind of interaction is shown below:
jQuery UI
Запустить пример
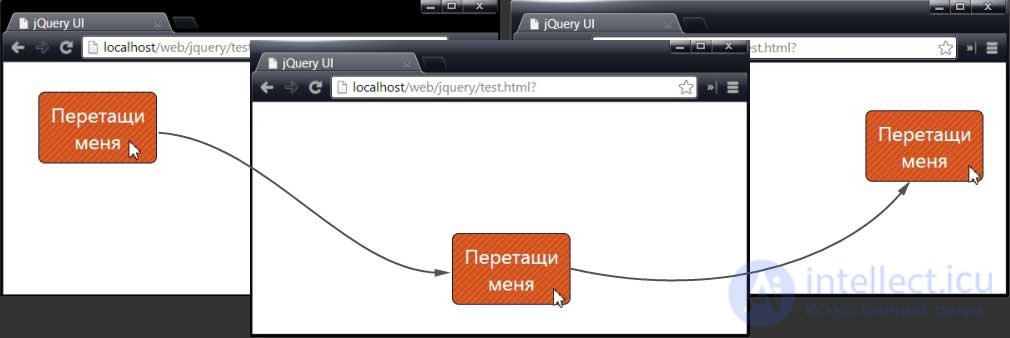
In this example, we select the div element and make it relocatable by calling the draggable () method for it. As shown in the figure below, in the opened document the element takes its usual position, but after that it can be moved with the mouse pointer to any place in the browser window:
The ability to drag and drop items is useful by itself, but it is even more useful if used in conjunction with the Droppable interaction, which is described later.
Draggable interoperability is implemented solely by using specific HTML markup and CSS styles. This means that this functionality will work in almost any browser, but the elements allocated to it will not be able to work with similar own drag-and-drop operating systems.
The HTML5 specification-defined Drag-and-drop operations are usually implemented using proprietary operating system mechanisms. If you use the jQuery UI Drag-and-drop mechanism, then to avoid conflict situations, equivalent HTML5 tools should be disabled. To do this, set the draggable attribute of the document body element to false.
There are many customization options for draggable interaction. The most important properties, which are discussed in the following sections, are shown in the table below:
| Property | Description |
|---|---|
| axis | Limits the ability to move in certain directions. The default value is false, it means there are no restrictions, but you can also specify the value "x" (move only along the X axis) or "y" (move only along the Y axis) |
| containment | Restricts the location of the item being moved to a specific screen area. The types of values supported are described in the table below, when considering the corresponding example. The default value is false, it means there are no restrictions. |
| delay | Specifies the time during which an item must be dragged before it moves. The default value is 0, it means no delay. |
| distance | Determines the distance the user must drag an element from its starting position before it actually moves. The default value is 1 pixel. |
| grid | Forces a binding of a moving element to grid cells. The default value is false, it means no binding. |
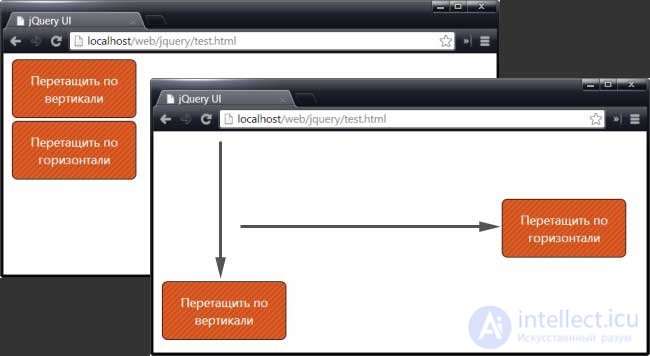
There are several ways in which you can limit the movement of an element to certain directions. The first of these is to use the axis option, which allows you to limit the direction of movement by the X or Y axis. A corresponding example is shown below:
...
Запустить пример
In this example, we define two div elements, select them with jQuery and call the draggable () method. As an argument, an object is passed to this method that initially restricts the movement of both div elements to the X direction. Then, using the jQuery filter () method, we can choose the dragV element without re-searching using jQuery for the whole document and set another permitted movement direction for it - along the Y axis. Thus, we get a document in which one element of the div can be dragged only in the vertical direction, and the other - only in the horizontal one. The result is shown in the picture:
You can also limit the area of the screen in which an element can be dragged. To do this, use the option containment. The formats of values that can be specified in this option are described in the table below:
| Value | Description |
|---|---|
| Selector | If a selector is specified, dragging the item being moved is limited to the area occupied by the first matching element. |
| Html element | Drag and drop is limited to the area occupied by the specified element |
| Line | To limit the dragging area, you can specify a string containing one of the following values: parent, document, window |
| Numeric array | Dragging area can be limited by defining it with a numeric array of format coordinates [x1, y1, x2, y2] |
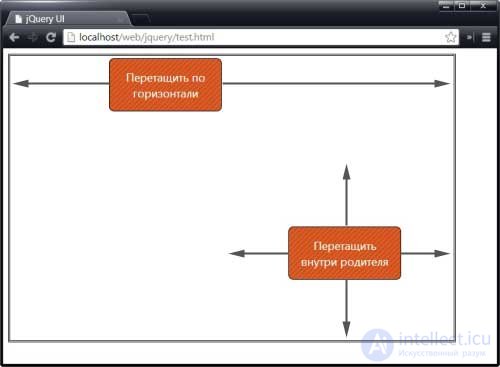
An example of using the containment option is shown below:
...
Запустить пример
In this example, the ability to move both elements is limited so that they can be dragged only inside the parent element, which is a fixed-size div element. For one of the div elements being moved using the axis option, an additional restriction has been introduced: it can be moved inside the parent element only in the horizontal direction. The result is illustrated in the figure:
The grid option allows you to set the binding of the moving element to the grid cells. This option takes as its value an array of two elements that define the width and height of the grid cells in pixels. An example of using the grid option is shown below:
...
Запустить пример
In this example, a grid with cells 100 pixels wide and 50 pixels high is specified. When you drag an item, it "jumps" from one (invisible) cell to another. The anchoring effect is a very telling example of the use of interactions functionality, but it is difficult to convey through screen shots.
You can create a snap effect for only one direction, specifying 1 for the free axis. For example, if you set the grid option to [100, 1], the element will snap to grid cells 100 pixels wide when moved horizontally, but the vertical movement will be free.
There are two options that allow you to organize a delay when dragging a moving element. Using the delay option, you can specify the time in milliseconds during which the user must drag the mouse pointer before the element is actually moved. Another type of delay is provided by the distance option, which determines the distance in pixels to which the user must drag the mouse pointer before the element follows.
An example of using both settings is shown below:
...
Запустить пример
In this example, there are two relocatable elements, one of which is delayed using the delay option, and the other using the distance option.
In the case of a delay specified by the delay option, the user must drag and drop for a specified time before it actually moves the item. In this example, the duration of this gap is 1000 ms. It is not necessary to move the mouse at this time, but throughout the entire period of the delay, the mouse button should remain pressed, after which the element can be moved by moving the mouse. When the delay time expires, the item to be moved will snap to the location of the mouse pointer, taking into account the limitations previously imposed by the grid, region, and axis options.
The distance option has a similar effect, but in this case, the user must drag the mouse pointer at least a specified number of pixels in any direction from the element's initial location. After that, the item being moved will abruptly move to the current location of the pointer.
If both settings are applied to the same element, then the moved element will not budge until both delay criteria are met, i.e. until the dragging of the element lasts for a specified time and until the mouse pointer moves by a specified number of pixels.
All the methods defined for the Draggable interaction are included in the set of basic methods that you have already met when reviewing widgets. Methods specific to the interaction of Draggable are not provided, so we will not consider them in detail. The list of available methods is given in the table below:
| Method | Description |
|---|---|
| draggable ("destroy") | Completely removes the functionality of the draggable interaction from the element |
| draggable ("disable") | Temporarily disables the draggable interaction functionality for the base item. |
| draggable ("enable") | Enables the previously disabled draggable interaction functionality for the base item. |
| draggable ("option") | Allows you to get or change the value of one or more options. |
Draggable interoperability supports a simple set of events that notify you when an item is being dragged. These events are described in the table below:
| Event | Description |
|---|---|
| create | Occurs when a drag element is applied to an element. |
| start | Occurs when the drag is started. |
| drag | Occurs each time the mouse is moved while dragging an item. |
| stop | Occurs when the mouse button is released while dragging. |
As with widget events, you can also react to these events. An example of handling start and stop events is shown below:
...
Запустить пример
In this example, the start and stop events are used to change the text content of an element during drag and drop. This opportunity is a consequence of the fact that the Draggable interaction is implemented exclusively using HTML and CSS tools: you can use jQuery to change the state of a moving element even while it is moving across the screen.
In some situations, the mere possibility of dragging an element may be quite enough, but it brings the greatest benefit when used in conjunction with Droppable interaction.
The elements to which the interaction Droppable ( receiving elements ) was applied acquire the ability to accept relocatable elements created using the Draggable interaction.
Receiving elements are created using the droppable () method , but to get useful functionality you will need to create event handlers from among those defined for this kind of interaction. Available events are shown in the table below:
| Event | Description |
|---|---|
| create | Occurs when the Droppable interaction is applied to an element. |
| activate | Occurs when the user starts dragging the item being moved. |
| deactivate | Occurs when the user stops dragging the item being moved. |
| over | Occurs when the user drags the item being moved over the receiving item (but provided that the mouse button has not yet been released) |
| out | Occurs when the user drags a roaming item outside the receiving item. |
| drop | Occurs when the user leaves the item being moved on the receiving item. |
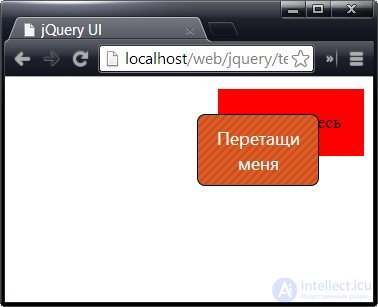
An example of creating a simple receiving element for which a single drop event handler is defined is shown below:
...
Оставь здесь Запустить пример
In this example, a div element has been added to the document, the text content of which is represented by the string "Leave here". We select this element using jQuery and call the droppable () method, passing it an object with settings that defines a handler for the drop event. The response to this event is to change the text of the item being moved using the text () method.
The drag-and-drop category interaction created in this example is the simplest, but it creates a convenient context for explaining the possibilities of collaboration between the Draggable and Droppable interactions. The various stages of the drag and drop process are illustrated in the figure:
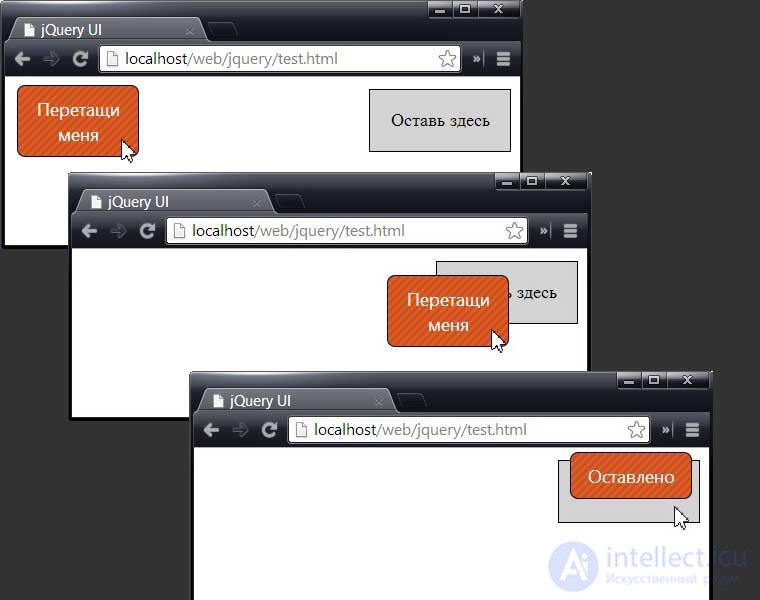
It all looks very simple. We drag the item to be moved until it is above the receiving item, and release it. The item to be moved remains where it was left, and its text content changes in response to the onset of the drop event. The following sections show how to use other Droppable interaction events to enhance user experience.
Using the activate and deactivate events, you can highlight the target receiving object when the user starts the process of dragging an item. In many situations, this idea turns out to be very fruitful, since in this case the user receives a reliable indication as to which elements are part of the drag-and-drop model. The corresponding example is shown below:
... $(function() { $('#draggable').draggable(); $('#droppable').droppable({ drop: function() { $('#draggable').text("Оставлено") }, activate: function() { $('#droppable').css({ border: "medium double green", backgroundColor: "lightGreen" }); }, deactivate: function() { $('#droppable').css("border", "").css("background-color", ""); } }); }); ... Запустить пример
As soon as the user starts dragging an element, the activate event fires - associated with our receiving element, and the handler function uses the css () method to change the CSS properties of the border and background-color of this element. As a result, the target receiving element is highlighted, indicating to the user the existence of a connection between him and the moving element.
The deactivate event is used to remove CSS property values from the receiving element and return it to its original state as soon as the user releases the mouse button. (This event occurs whenever the dragging of an item stops, regardless of whether the item being moved is left on the receiving item or not.) This process is illustrated in the figure:
Drag-and-drop technology can be improved by adding event handling over and out. The over event occurs when 50% of the element being moved is over any part of the receiving element. The out event occurs when overlapped elements cease to overlap. An example of a response to these events is given below:
$(function() { $('#draggable').draggable(); $('#droppable').droppable({ drop: function() { $('#draggable').text("Оставлено") }, activate: function() { $('#droppable').css({ border: "medium double green", backgroundColor: "lightGreen" }); }, deactivate: function() { $('#droppable').css("border", "").css("background-color", ""); }, over: function() { $('#droppable').css({ border: "medium double red", backgroundColor: "red" }); }, out: function() { $('#droppable').css("border", "").css("background-color", ""); } }); }); Запустить пример
Here, the same handler functions are used as in the previous example, but in this case they are associated with over and out events. When at least 50% of the moving element overlaps with the receiving element, it is enclosed in a frame and its background color changes, as shown in the figure:
This 50% limit is called the threshold of tolerance (tolerance) , the value of which can be set during the creation of the receiving element, as will be shown later.
For interaction Droppable provides a number of properties, by changing which you can customize its behavior. These properties are listed in the table below:
| Property | Description |
|---|---|
| disabled | If this option is true, then the interaction functionality Droppable is initially disabled. The default is false. |
| accept | Narrow the number of relocatable elements to which the receiving element will react. The default is *, it matches any item. |
| activeClass | Specifies the class that will be assigned in response to the activate event and deleted in response to the deactivate event. |
| hoverClass | Specifies the class to be assigned in response to the over event and deleted in response to the out event. |
| tolerance | Defines the minimum degree of overlap at which an over event occurs. |
You can limit the number of relocatable elements that will be accepted by an element endowed with Droppable interaction functionality using the accept option.As the value of the accept option should be assigned to the selector. As a result, Droppable interaction events will only occur if the item being moved matches the specified selector. The corresponding example is shown below:
...
Оставь здесь Запустить пример
In this example, there are two relocatable elements with the drag1 and drag2 identifiers. When creating a receiving element, the accept option is used, with which we indicate that only the drag1 element will be an acceptable moving element.
При перетаскивании элемента drag1 вы будете наблюдать тот же эффект, что и в предыдущих примерах. В соответствующие моменты для принимающего элемента будут запускаться события activate, deactivate, over и out. В то же время, если перетаскивать элемент drag2, который не соответствует указанному в параметре accept селектору, то эти события запускаться не будут. Этот элемент можно свободно перемещать, но он не будет восприниматься принимающим элементом.
Обратите внимание на изменение способа выбора приемлемого перемещаемого элемента, для которого следует вызывать метод text(). Когда в документе был всего лишь один перемещаемый элемент, для этого хватало атрибута id:
drop: function() { $('#draggable').text("Оставлено") },
В данном примере имеется два перемещаемых элемента, и выбор по атрибуту id не даст желаемого результата, поскольку текст в этом случае будет всегда изменяться в одном и том же перемещаемом элементе, независимо от того, какой из них является приемлемым для принимающего элемента.
Выход состоит в том, чтобы использовать объект ui, который jQuery UI предоставляет в качестве дополнительного аргумента каждому обработчику событий. Свойство draggable объекта ui возвращает объект jQuery, содержащий элемент, который пользователь перетаскивает или пытается оставить на целевом элементе, что позволяет выбрать требуемый элемент следующим образом:
drop: function(event, ui) { ui.draggable.text("Оставлено") },
По умолчанию событие over происходит лишь в тех случаях, когда по крайней мере 50% перемещаемого элемента перекрывается с принимающим элементом. Величину этого порогового перекрывания можно изменить с помощью опции tolerance, которая может принимать значения, указанные в таблице ниже:
| Value | Description |
|---|---|
| fit | Перетаскиваемый элемент должен полностью находиться в области принимающего элемента |
| intersect | Перетаскиваемый элемент должен перекрываться с принимающим элементом по крайней мере наполовину. Это значение используется по умолчанию |
| pointer | Указатель мыши должен находиться в области принимающего элемента, независимо от того, где именно перетаскиваемый элемент был захвачен пользователем |
| touch | Означает любую степень перекрывания перетаскиваемого и принимающего элементов |
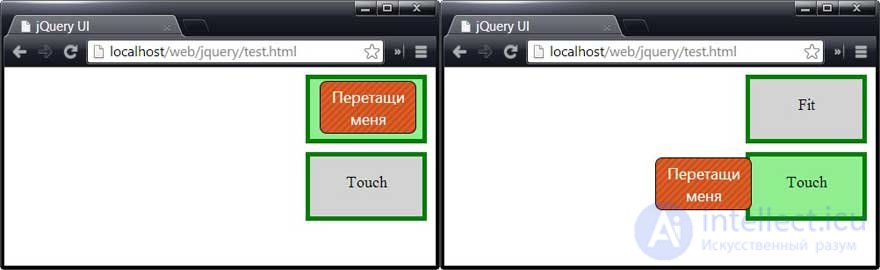
Чаще всего я использую два значения, fit и touch, поскольку их смысл наиболее понятен для пользователей. Значение fit используется мною в тех случаях, когда перетаскиваемый элемент должен остаться в той области принимающего элемента, в которую он был перемещен, а значение touch — когда перемещенный элемент должен вернуться в исходную позицию (соответствующий пример будет приведен далее). Пример использования параметров fit и touch приведен ниже:
Запустить пример
jQuery UI
Fit Touch Сначала обратите внимание на то, что в этом примере я использовал подсветку принимающего элемента с использованием классов. В этом примере определены два новых CSS-стиля. Создав классы, мы получили возможность различать элементы с одинаковыми атрибутами id (например, .droppable.active), так что новые стили более специфичны по сравнению с другими стилями (например, #droppable) и потому имеют более высокий приоритет. Определив новые стили, мы используем имена соответствующих классов в качестве значений опций activeClass и hoverClass. Всю работу по добавлению и удалению этих классов из принимающего элемента в ответ на наступление соответствующих событий выполняет взаимодействие Droppable.
В этом примере есть два принимающих элемента, один из которых сконфигурирован с использованием значения fit для параметра tolerance, а второй — с использованием значения touch. Перемещаемый элемент только один и используется для демонстрации эффектов перетаскивания с двумя различными значениями опции tolerance. Снимки делались в момент наступления события over. Заметим, что при определении момента перекрывания граница учитывается в обоих случаях:
Возможно, вас удивляет, каким образом я сумел сделать экранные снимки точно в тот момент, когда происходило событие over. Для этого я использовал в своем элементе script ключевое слово JavaScript debugger . Хотя в официальной спецификации языка это и не оговорено, в таких браузерах, как Google Chrome и Firefox (с установленным расширением FireBug), предусмотрены отладчики, которые приостанавливают выполнение сценария, как только в нем встречается ключевое слово debugger (так называемые точки останова).
Для работы с отладчиком в сценарий добавлен обработчик события over, как показано ниже:
... $('.droppable').droppable({ drop: function(event, ui) { ui.draggable.text("Оставлено") }, activeClass: "active", hoverClass: "hover", tolerance: "fit", over: function() { debugger } });
Когда происходит событие over, отладчик генерирует прерывание, и дальнейшее выполнение сценария становится возможным лишь после того, как отладчик получит соответствующее указание. Это позволило мне делать экранные снимки, которые вы видите на рисунках, именно в тот момент, когда происходило событие. Как правило, ключевое слово debugger выручает во многих ситуациях, но оно становится просто незаменимым при работе с событиями. Разумеется, прежде чем предоставлять программу пользователям, все вхождения этого ключевого слова должны быть удалены из сценария.
Имеется ряд дополнительных параметров, с помощью которых можно выполнить точную настройку функциональности Draggable и Droppable jQuery UI. В данном разделе приводятся описания этих настроек и примеры их использования.
Ранее было продемонстрировано, как использовать опцию accept для выбора перемещаемых элементов, которые могут захватываться принимающими элементами. В простых проектах селекторы работают вполне удовлетворительно, но с увеличением количества перемещаемых элементов, которыми приходится управлять, необходимые селекторы значительно усложняются, что повышает риск появления ошибок.
Альтернативный подход заключается в использовании опции scope как для перемещаемых, так и для принимающих элементов. Перемещаемый элемент будет активизировать лишь те принимающие элементы, которые имеют одинаковое с ним значение свойства scope. Пример использования этой опции приведен ниже:
Запустить пример
jQuery UI
Цветы Фрукты Орхидея Яблоко В этом примере создаются два перемещаемых и два принимающих элемента. При создании им назначается одно из двух значений свойства scope: fruit или flower. Конечный результат состоит в том, что каждый из перемещаемых элементов будет активизировать лишь те принимающие элементы и являться приемлемым лишь для тех из них, которые имеют то же значение свойства scope, как показано на рисунке:

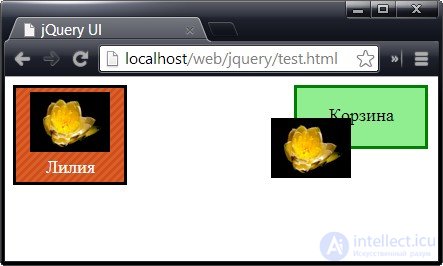
С помощью опции helper можно определить вспомогательный элемент, который будет перетаскиваться вместо исходного элемента, остающегося на месте. Это разительно отличается от предыдущих примеров, в которых перемещаемый элемент покидал свою позицию. Пример использования вспомогательного элемента приведен ниже:
...
Корзина  Лилия
Лилия Запустить пример
Значение clone указывает jQuery UI на то, что необходимо создать копию перемещаемого элемента вместе со всем его содержимым и использовать полученный результат в качестве вспомогательного элемента. Результат представлен на рисунке:
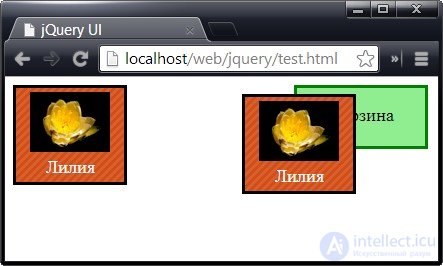
Вспомогательный элемент удаляется, когда пользователь отпускает кнопку мыши над перемещаемым элементом, оставляя перемещаемый и принимающий элементы в их исходных позициях.
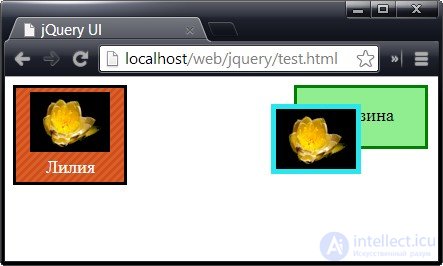
Как показано на рисунке, исходный перемещаемый элемент остается на своем месте и лишь вспомогательный элемент перемещается по экрану вслед за указателем мыши. Если размеры перемещаемого элемента велики, как в нашем примере, то он закрывает собой остальные элементы документа, так что даже отследить позицию принимающего элемента пользователю будет трудно. С этой проблемой можно справиться, предоставив функцию в качестве значения опции helper, как показано в примере ниже:
... $(function() { $('div.draggable').draggable({ helper: function() { return $('') } }); $('#basket').droppable({ activeClass: "active", hoverClass: "hover" }); }); ... Запустить пример
Когда пользователь начинает перетаскивать элемент, jQuery UI вызывает функцию, заданную параметром helper, и использует возвращаемый элемент в качестве перемещаемого объекта. В данном случае я использую jQuery для создания элемента img. Результат представлен на рисунке:
Небольшое изображение играет роль заместителя перемещаемого элемента, что значительно упрощает отслеживание других элементов документа.
Объект ui, который jQuery UI передает событиям взаимодействия Droppable, содержит свойство helper, и это свойство можно использовать для манипуляций вспомогательным элементом в процессе его перетаскивания. Пример использования этого свойства в связке с событиями over и out приведен ниже:
... $(function() { $('div.draggable').draggable({ helper: function() { return $('') } }); $('#basket').droppable({ activeClass: "active", hoverClass: "hover", over: function(event, ui) { ui.helper.css("border", "thick solid #27e6ed") }, out: function(event, ui) { ui.helper.css("border", "") } }); }); ...
Здесь события over и out, а также свойство ui.helper используются для отображения рамки вокруг вспомогательного элемента, когда он перекрывает принимающий элемент. Результат представлен на рисунке:
С помощью опции snap можно добиться того, чтобы перемещаемый элемент как бы "притягивался" к краям элементов, рядом с которыми он проходит. В качестве значения эта опция принимает селектор. Перемещаемый элемент будет привязываться к краям любого элемента, соответствующего указанному селектору. Пример использования опции snap приведен ниже:
Запустить пример
jQuery UI
Корзина Привяжись здесьПеретащи меня Когда перемещаемый элемент приближается к одному из подходящих элементов, он как бы "притягивается" к нему таким образом, что их соседние края соприкасаются. Для такой привязки можно выбрать любой элемент, а не только принимающий. В этом примере я добавил элемент div и определил для опции snap значение, которое выбирает в документе данный элемент, а также принимающий элемент.
Существует пара вспомогательных опций, позволяющих более точно настроить поведение элементов в отношении привязки. Одна из них — это опция snapMode . С ее помощью можно указать тип привязки. Допускаются следующие значения: inner (привязка к внутренним краям элементов), outer (привязка к внешним краям элементов) и both (привязка ко всем краям; используется по умолчанию).
Опция snapTolerance позволяет указать, на какое расстояние должен приблизиться перемещаемый элемент к краю элемента-мишени, прежде чем произойдет привязка. Значение по умолчанию — 20, что означает 20 пикселей. В примере используется значение 50, которому соответствует привязка на большем расстоянии. Очень важно правильно выбрать значение этой опции. Если значение опции snapTolerance слишком мало, то пользователь может не заметить эффекта привязки, а если оно слишком велико, то перемещаемый элемент начнет совершать неожиданные скачки, привязываясь к далеко расположенным элементам.

Comments
To leave a comment
Scripting client side JavaScript, jqvery, BackBone
Terms: Scripting client side JavaScript, jqvery, BackBone