Lecture
In the process of writing CSS, you should adhere to some principles that allow you to shorten the CSS code, make it more convenient, visible and readable. Readability in this case means that the developer after some time can easily understand and modify the style, or that even a third-party person will understand the code.
Placing styles in a separate file allows you to speed up the loading of web pages by reducing their code, as well as caching a file with a description of the style.
A large number of selectors creates confusion as to who is responsible for what, and simply increases the volume of the document. To avoid this, remove the selectors that are not used on the site. Unfortunately, determining exactly which selector is used and which is not is quite difficult, so add a comment to the code. This will help at least not to get confused in a large amount of text.
The advantage and convenience of grouping is to describe the same properties in one place. Thus, the value of the property is written only once, and not repeated many times.
Instead of specifying the indent values on each side of the element through the margin-left, margin-right, margin-top, and margin-bottom properties, you can specify this simultaneously via the universal margin property. Enumeration of values through a space allows you to set individual indents for each side. In addition to margin, universal properties include background, border, font, padding. The use of these properties reduces the amount of code and increases its readability.
There are many different approaches to writing CSS code. Someone arranges the selectors in blocks, the other according to the structure of the document, the third alphabetically, in general, how many people, so many opinions. You can use an online tool that formats CSS code in four different ways at once. And then decide for yourself which of the ways you prefer.
Link
http://www.cssportal.com/format-css/
The principle of operation is very simple, enter your code in the text field, click on the "Format Code" button and get four different types of the original code. For example, take the following small fragment.
body { font: 0.9em Arial, Verdana, Helvetica, sans-serif; color: #000; background: #fff; margin: 0; } .top { margin-bottom: 10px; padding-left: 3%; border-bottom: 1px solid #acacac; } As a result of its formatting, such options will be obtained.
Formatted CSS (Formatted CSS)
body { font: 0.9em Arial, Verdana, Helvetica, sans-serif; color: #000; background: #fff; margin: 0; } .top { margin-bottom: 10px; padding-left: 3%; border-bottom: 1px solid #acacac; } The order of the properties does not change, the lines with the properties are shifted to the right by four spaces, the selectors are separated by an empty line.
Properties in alphabetical order (Properties in Alphabetical Order)
body { background: #fff; color: #000; font: 0.9em Arial, Verdana, Helvetica, sans-serif; margin: 0; } .top { border-bottom: 1px solid #acacac; margin-bottom: 10px; padding-left: 3%; } The lines with the properties are shifted to the right by four spaces, the selectors are separated by an empty string, the style properties are ordered alphabetically.
Ladder (Longest Property to Shortest)
body { font: 0.9em Arial, Verdana, Helvetica, sans-serif; background: #fff; color: #000; margin: 0; } .top { border-bottom: 1px solid #acacac; margin-bottom: 10px; padding-left: 3%; } The lines with the properties are shifted to the right by four spaces, the selectors are separated by an empty line, the lines with the properties are ordered by length. At the beginning there are the longest lines, at the end the shortest.
Compact (Compact)
body {font: 0.9em Arial, Verdana, Helvetica, sans-serif;color: #000;background: #fff;margin: 0;} .top {margin-bottom: 10px;padding-left: 3%;border-bottom: 1px solid #acacac;} Selectors and properties are written in one line, empty lines are deleted.
The above tool, of course, does not pretend to be complete, it is impossible to set the amount of indentation between selectors, the number of spaces before the property. Also, the extra spaces before the property values are not reduced. Nevertheless, the main thing is that the code formatting process is simple and convenient.
When editing a CSS file, a controversial task arises. On the one hand, the code should be convenient for perception and editing, quickly finding the desired selector, for which jigsaws, comments, spaces and tabs are actively used. On the other hand, the amount of code should be compact and not contain anything extra. Compactness allows you to speed up the loading of the site and improve its performance.
This contradiction is solved by the presence of two versions of the CSS file: one file for editing, and the second for uploading to the server. The very process of code reduction is called minimization and is completely automated using network services, which we will consider further.
http://tools.w3clubs.com/cssmin/
Simple, I can even say, a primitive service built on JavaScript and the YUI Compressor library. Enter the CSS code in the “Source” field, click the “Crunch” button and get the finished result in the adjacent field. It also gives an estimate of the input and output volumes and the percentage ratio between them (Fig. 22.1).

Fig. 22.1. The result of code minimization
http://www.csscompressor.com
This service is convenient because it comments on all its actions, so that you will be aware of changes in your style. It works as follows. In the CSS Input field, insert the CSS code, select the desired settings, and click the “Compress” button (Fig. 22.2).
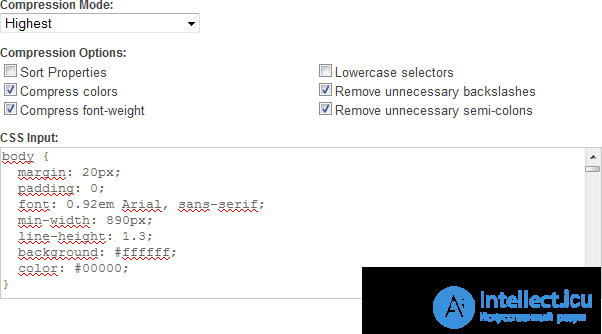
Fig. 22.2. Interface
The settings are as follows.
After compression, two fields are displayed: a list of the changes made in the properties and compressed CSS (Fig. 22.3).
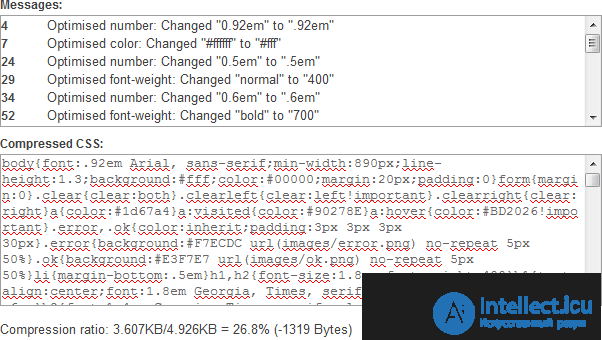
Fig. 22.3. Result of use
http://www.generateit.net/css-optimize
The service is built on the same engine as the previous one, therefore it has a number of similar settings. Among the nice advantages, you can note the syntax highlighting of the code, saving to the file, as well as entering the network address of the CSS file.
In fig. 22.4 shows the settings window.
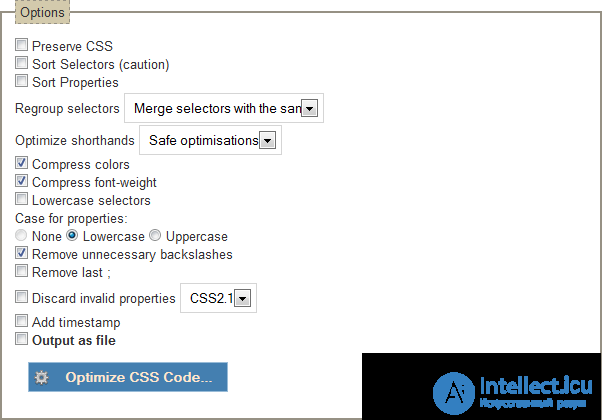
Fig. 22.4. Settings
If you often have to make changes to the CSS file, the minimization process becomes inconvenient. Judge for yourself, you first need to edit the file, then minimize it and save the resulting code to the file you want to upload to the server. Too many actions have to be done for the sake of one change. It would be more logical to assign the minimization task to the site. Upload the file to the server, and now it is already in a compact form given to visitors. One of these universal solutions is called minify, this is a PHP5 library. It minimizes, merges, and caches CSS files, as well as JavaScript.
Link to the minify project
http://code.google.com/p/minify/
The minify library exists both separately and as a WordPress plugin.
The process of using the library is as follows. Download the archive, inside it is the min directory, which must be copied to the server. Compressing a CSS file is fairly straightforward; instead of the usual path to the style file, we now specify:
http://example.ru/min/?f=themes/default/style.css
The f parameter specifies the path to the CSS file relative to the site root. Two or more files are separated by commas:
http://example.ru/min/?f=themes/default/style.css,themes/default/cms.css
You can also automate the process of obtaining an address by going to http://example.ru/min, a page will open where you are invited to specify the path to the files that you want to minimize (Fig. 22.5).
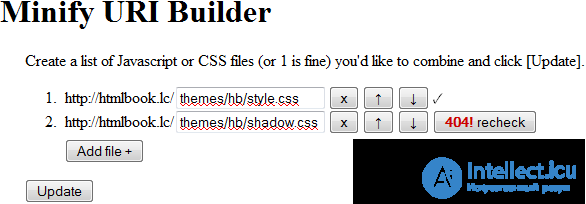
Fig. 22.5. File Management Page
The up and down arrow buttons are needed to change the order of the files, and the x button to remove the file from the list. Verification of the correctness of the path is carried out automatically, in case of an error, a button with the inscription “404!” Will appear, as shown in the figure above. To add another file to the list, use the “Add file” button. After all the files are specified, the paths to them are set correctly, which is confirmed by the presence of a check mark in front of each file, you can click the Update button. Below on the page there will be a link to the new combined file (text with URI) and a <link> tag (text with HTML) that you want to paste onto the page instead of the old one (Fig. 22.6).

Fig. 22.6. Minimization result
According to tests over WordPress, using the library reduces the number of HTTP requests and reduces the amount of CSS and JavaScript files by up to 70%.
In addition to the above methods for minimizing CSS files, there are also solutions that allow the gzip utility to archive files directly on the server and give the browser a packaged version. Modern browsers perfectly understand gzip and unpack it in place. The whole process occurs automatically and leads to a significant reduction in the amount of files transmitted over the network. The gzip configuration issues go beyond the tutorial, so I will not dwell on them. I recommend everyone interested in articles on these links.

Comments
To leave a comment
Cascading CSS / CSS3 Style Sheets
Terms: Cascading CSS / CSS3 Style Sheets