Lecture
A child is an element that is directly located inside the parent element. To better understand the relationship between the elements of the document, let's analyze a small code (example 12.1).
Example 12.1. Nesting of elements in the document
HTML5CSS 2.1IECrOpSaFx
<!DOCTYPE HTML> <html> <head> <meta charset="utf-8"> <title>Lorem ipsum</title> </head> <body> <div class="main"> <p><em>Lorem ipsum dolor sit amet</em>, consectetuer adipiscing elit, sed diem nonummy nibh euismod tincidunt ut lacreet dolore magna aliguam erat volutpat.</p> <p><strong><em>Ut wisis enim ad minim veniam</em></strong>, quis nostrud exerci tution ullamcorper suscipit lobortis nisl ut aliquip ex ea commodo consequat.</p> </div> </body> </html> In this example, several containers are used, which are located in code in one another. This is more clearly seen in the element tree; this is the name of the structure of the relationship between the document tags (fig. 12.1).
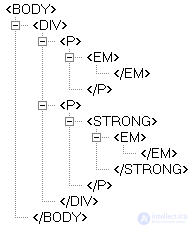
Fig. 12.1. Element tree for example
In fig. 12.1 in a convenient form presents the nesting of elements and their hierarchy. Here the child element in relation to the <div> tag is the <p> tag. However, the <strong> tag is not a child of the <div> tag, since it is located in the <p> container.
We now return to the selectors. A child selector is considered to be one that is in the element tree right inside the parent element. The syntax for using such selectors is as follows.
Selector 1> Selector 2 {Description of style rules}
The style is applied to Selector 2, but only if it is a child of Selector 1.
If we again refer to example 12.1, the style of the type P> EM {color: red} will be set for the first paragraph of the document, since the <em> tag is inside the container <p> and will not give any result for the second paragraph. And all because the <em> tag in the second paragraph is located in the <strong> container, so the nesting condition is violated.
By their logic, child selectors are similar to context selectors. The difference between them is as follows. The style for a child selector is applied only when it is a direct descendant, in other words, it is directly located inside the parent element. For the context selector, any nesting level is allowed. To make it clear what we are talking about, let us analyze the following code (Example 12.2).
Example 12.2. Context and child selectors
HTML5CSS 2.1IECrOpSaFx
<!DOCTYPE HTML> <html> <head> <meta charset="utf-8"> <title>Дочерние селекторы</title> <style> DIV I { /* Контекстный селектор */ color: green; /* Зеленый цвет текста */ } P > I { /* Дочерний селектор */ color: red; /* Красный цвет текста */ } </style> </head> <body> <div> <p><i>Lorem ipsum dolor sit amet</i>, consectetuer adipiscing elit, sed diem nonummy nibh euismod tincidunt ut lacreet <i>dolore magna</i> aliguam erat volutpat.</p> </div> </body> </html> The result of this example is shown in Fig. 12.2.
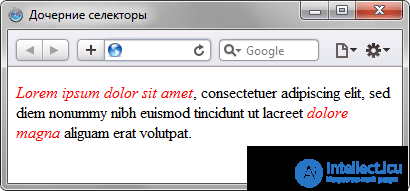
Fig. 12.2. Text color set using child selector
In the example, the <i> tag is subject to two rules simultaneously: the context selector (the <i> tag is located inside <div>) and the child selector (the <i> tag is a child of <p>). In this case, the rules are equivalent, since all the conditions for them are met and do not contradict each other. In such cases, the style is applied, which is located in the code below, so italic text is displayed in red. It is necessary to change the rules in places and put the DIV I below, as the text color changes from red to green.
Note that in most cases you can refuse to add child selectors by replacing them with context selectors. However, the use of child selectors extends the ability to manage styles of elements, which ultimately allows you to get the desired result, as well as simple and clear code.
It is most convenient to use the specified selectors for elements that have a hierarchical structure — for example, tables and various lists. Example 12.3 shows changing the list view using styles. By nesting one list into another, we get a variety of menus. The headings are arranged horizontally, and the set of links is vertically below the headings (fig. 12.3).
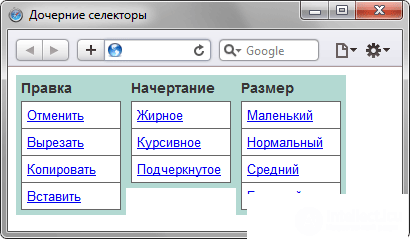
Fig. 12.3. Menu list
To place text horizontally, the float style property is added to the LI selector. In order to divide the style of the horizontal and vertical list between them and the child selectors are used (Example 12.3).
Example 12.3. Using child selectors
HTML5CSS 2.1IECrOpSaFx
<!DOCTYPE HTML> <html> <head> <meta charset="utf-8"> <title>Дочерние селекторы</title> <style> UL#menu { margin: 0; padding: 0; /* Убираем отступы */ } UL#menu > LI { list-style: none; /* Убираем маркеры списка */ width: 100px; /* Ширина элемента в пикселах */ background: #b3d9d2; /* Цвет фона */ color: #333; /* Цвет текста */ padding: 5px; /* Поля вокруг текста */ font-family: Arial, sans-serif; /* Рубленый шрифт */ font-size: 90%; /* Размер шрифта */ font-weight: bold; /* Жирное начертание */ float: left; /* Располагаем элементы по горизонтали */ } LI > UL { list-style: none; /* Убираем маркеры списка */ margin: 0; padding: 0; /* Убираем отступы вокруг элементов списка */ border-bottom: 1px solid #666; /* Граница внизу */ padding-top: 5px; /* Добавляем отступ сверху */ } LI > A { display: block; /* Ссылки отображаются в виде блока */ font-weight: normal; /* Нормальное начертание текста */ font-size: 90%; /* Размер шрифта */ background: #fff; /* Цвет фона */ border: 1px solid #666; /* Параметры рамки */ border-bottom: none; /* Убираем границу снизу */ padding: 5px; /* Поля вокруг текста */ } </style> </head> <body> <ul id="menu"> <li>Правка <ul> <li><a href="#">Отменить</a></li> <li><a href="#">Вырезать</a></li> <li><a href="#">Копировать</a></li> <li><a href="#">Вставить</a></li> </ul> </li> <li>Начертание <ul> <li><a href="#">Жирное</a></li> <li><a href="#">Курсивное</a></li> <li><a href="#">Подчеркнутое</a></li> </ul> </li> <li>Размер <ul> <li><a href="#">Маленький</a></li> <li><a href="#">Нормальный</a></li> <li><a href="#">Средний</a></li> <li><a href="#">Большой</a></li> </ul> </li> </ul> </body> </html> In this example, child selectors are required to separate the style of top-level list items and nested lists that perform different tasks, so the style for them should not overlap.
1. What color will be in bold italic text in the code
<p> Illumination norms are based on a <b> <i> classification of visual works </ i> </ b> according to certain quantitative characteristics. </ p>
When using the following style?
P {color: green; }
B {color: blue; }
I {color: orange; }
B> I {color: olive; }
P> I {color: yellow; }
2. What is the parent element for the <TITLE> tag?
3. For which tag does the <! DOCTYPE> element act as a parent?
1. Olive.
2. <HEAD>
3. Not for one tag.

Comments
To leave a comment
Cascading CSS / CSS3 Style Sheets
Terms: Cascading CSS / CSS3 Style Sheets