Lecture
In this lecture, we'll talk a little about text editors, the mc file manager, and look at the inittab file . I hope you looked at the basic shell commands that I asked you to review on your own. Just in case, let's look at those that we may need today. The com *** and ls -l displays the contents of the current directory in an extended format. You can pass any directory as a parameter to a command, and then its contents will be displayed. For example, ls -l / etc / X11 / - displays the contents of the / etc / X11 directory.
Com *** and cd directory name - allows you to go to the specified directory. cd / etc / - running this com *** u will go to the / etc directory.
We have already reviewed the com *** u less , which allows us to view the contents of text files. But less does not allow to change the contents of the files. For this purpose, there are text editors. One of the oldest is the text editor vi . Now he is practically superseded by his more advanced heir to vim . The vim editor is very flexible, versatile (able to work on virtually any type of console) and resource-undemanding. Its only drawback is that it is a bit complicated at the initial stage of development, which discourages novices. The thing is that it is not as intuitive as other text editors. Very many novice users opening any file in this editor can not even get out of it, which causes a lot of negativity to the paste. Therefore, remember the following: vim editor has several modes of operation: insert mode (edit mode), main mode , command entry mode . Between modes of operation, you can switch by pressing certain keys. By default, vim runs in native mode . To start editing the text, go to insert mode . To do this, press the i key. In order to exit the vim editor, he needs to inform about it by executing the *** command at the exit. As you may have guessed, this can be done in the command entry mode . To enter the command mode, you must press the colon - :. To switch to the main mode, you must press the Esc key (sometimes twice).
Another important point. Remember it. The transition to the main mode is possible from any mode (by pressing the Esc key ). The transition to other modes is possible only from the main mode . That is, to switch from insert mode to command mode , you must first switch to main mode , and then from main mode to command mode .
In the lower left corner of the editor, the word hints indicate which mode you are in. For example, in insert mode it will say - INSERT - (or - INSERT -), in command mode there will be a colon. Now consider a few basic commands. After typing each command you need to press the Enter key.
Com *** and exit from the editor. While in the main mode, dial : q! - exit the editor without saving the changes. If you type a comma *** at : q , then vim will check if there were any changes in the file, and if so, it will warn you about this and you will remain in the editor.
To save the changes you need to type : w . If a new file is saved which does not have a name, then after : w you need to specify the file name after the space - - w text .
Teams can be combined. For example, instead of saving the text of an existing file and leaving the editor, you can type : wq .
To get help on vim , you need to enter the following *** at : help . To exit the help you need to press the com *** at the exit : q .
The rules and commands described above are already enough to open files, edit them, save the changes made. For further study, I recommend contacting vim help. Also a lot of textbooks and good articles can be found on the Internet.
If you still decide that vim is not your editor, or there is no time to study it, then you can use simpler text editors. I recommend in this case to pay attention to the editor nano . This editor is well suited to those who are just starting to learn Linux . Typing in the console com *** u nano you get into the editor, in which in the lower part are shortcuts for performing basic actions (see. Fig. 1).
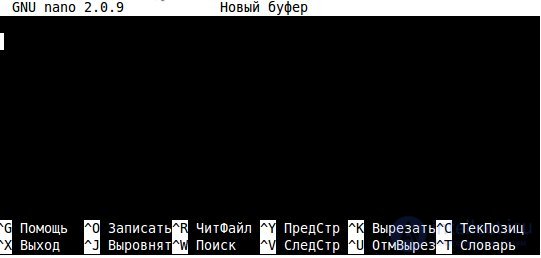
Picture 1
To exit the editor, click on the ctrl + x combination, to get the ctrl + g help, to save the changes ctrl + o , etc. nano is a simple and clear editor and its development should not cause you any difficulties.
Another editor that you will probably use is the built-in editor of the Midnight Commander program or better known by its abbreviated name - mc . mc is the usual two-pane file manager like Norton Commander on DOS or Far on Windows . To run mc, just type the command *** at mc in the command line. If you have worked with Far or Norton Commander , then mastering mc will not take you much time, especially since many of the keyboard shortcuts for these managers are the same. We are currently interested in the built-in editor. To go to it you need to press the F4 key. You can exit by pressing the Esc key twice. I also want to note that the system can be configured so that when you click on F4, it will launch the default system editor (for example, nano ).
Now let's go back to loading Linux and look at the contents of the inittab file in detail. Type the following command at the command line *** vim / etc / inittab to open the file in the vim editor. Lines beginning with # are comments. The init process does not pay attention to such lines. The remaining lines are divided into fields using the colon character. The first field is the so-called label, the second field indicates the runlevel (system level), the third field indicates the action of the init process, and the fourth executes the *** command and its parameters. Consider for example the string l5: 5: wait: /etc/init.d/rc 5 .
l5 is a label
5 is runlevel
wait is action
/etc/init.d/rc is a comma *** a, and 5 is a parameter
What is runlevel ? The fact is, the work of the system was conventionally divided into so-called levels. That is, the system at each moment of time is on one of the levels. Standardly defined 7 levels - from level 0 to level 6. Level 0 - means that the system is turned off. At level 1, the system is at boot time or in single user mode. Levels 2-5 are levels for multi-user work. Moreover, level 5 is usually used to run the graphics subsystem, and level 3 is a multi-user alphanumeric mode (command line mode). Level 6 is system reboot. When a system transitions to a certain level, a set of scripts corresponding to this level is executed. The scripts are located in the /etc/init.d/ folder. The line from the example says that when going to the 5th level of the system, you need to run the /etc/init.d/rc script with parameter 5. Now let's look at the inittab from the very beginning.
id: 5: initdefault: - this line indicates at what level the system should remain after booting (rebooting). In this case, the system should go to the fifth level at which the graphics subsystem runs. If digit 5 is replaced in this line, for example, with digit 2, then the system boots to the second level (usually this is a multi-user mode without a graphics subsystem).
si :: sysinit: /etc/init.d/rcS is the first system initialization script if it does not load in emergency mode. The concept of level S is introduced here. Level S is closely related to level 1. These are single-user levels. In different distributions, the definition of these levels may be slightly different. Therefore, in general, it is difficult to give an accurate assessment and differences of level 1 from level S. It is necessary to study differences and peculiarities already for a specific distribution. For different distributions, this line may differ in the inittab file .
~~: S: respawn: / sbin / sulogin is a program for registering in the system in single user mode. Two tildes indicate that the process must be authenticated. The respawn action means that the init process must maintain this process ( sulogin ) in working condition at the specified level (in this case, at level S ). If the process is terminated for some reason, it will be started again.
Below are the lines that run the download script at the appropriate level.
l0: 0: wait: /etc/init.d/rc 0
l1: 1: wait: /etc/init.d/rc 1
l2: 2: wait: /etc/init.d/rc 2
l3: 3: wait: /etc/init.d/rc 3
l4: 4: wait: /etc/init.d/rc 4
l5: 5: wait: /etc/init.d/rc 5
l6: 6: wait: /etc/init.d/rc 6
The wait action means that the script must be run and wait for it to end. That is, init will not take action until the script has finished loading. You can switch between levels using the init command and passing the launch level number as a parameter to it. For example, at the command init 3 , the graphics subsystem will be completed and you will enter the command line mode. Then, after logging into the system at level 3, you can type init 5 and the graphics subsystem will be started again.
ca: 12345: ctrlaltdel: / sbin / shutdown -t1 -a -r now - this line indicates how the init process responds to pressing ctrl + alt + del . As you can see, this entry is relevant for levels 1, 2, 3, 4, 5. That is, if you want programs or scripts to run at several levels, you just need to list them without spaces, commas and other characters.
The following three lines describe how the system should react if power is generated or disappears.
pf :: powerwait: /etc/init.d/powerfail start
pn :: powerfailnow: /etc/init.d/powerfail now
po :: powerokwait: /etc/init.d/powerfail stop
And the last lines:
1: 2345: respawn: / sbin / getty 38400 tty1
2: 23: respawn: / sbin / getty 38400 tty2
3:23: respawn: / sbin / getty 38400 tty3
4:23: respawn: / sbin / getty 38400 tty4
5: 23: respawn: / sbin / getty 38400 tty5
6:23: respawn: / sbin / getty 38400 tty6
responsible for running at the appropriate levels of the getty program.
Now, in some modern distributions, instead of the init process, the upstart subsystem is used in which its own init is implemented. If you do not find the / etc / inittab file, then you have the upstart subsystem installed. Instead of the inittab file, upstart uses configuration files located in /etc/event.d/ . The upstart subsystem is event-oriented, that is, event-oriented. For example, as well as the udev subsystem (can be compared with the Windows Plug & Play service), which is also event-oriented. The hardware is constantly being improved, their number and variety is growing. For the convenience of users, the Plug & Play technology was invented, and after that, the udev subsystem was developed for Linux . Connecting the same flash drive is an event, and the udev subsystem reacts to this event and performs actions to initialize the device, mount the file system of the flash drive, etc. and the flash drive is ready for use. Upstart works on the same principle. The project is quite young and actively developing, so I recommend to monitor its development.
In conclusion, I recommend to perform several exercises:
Edit the inittab file so that only two consoles are launched — the second and third. Reboot the system and check the result.
Edit the inittab file so that the system starts only in text mode. Reboot the system and check the result.

Comments
To leave a comment
LINUX operating system
Terms: LINUX operating system