Lecture
Content
|
Software RAID management in Linux is performed using the mdadm program.
The mdadm program has several modes of operation.
Call format
mdadm [mode] [array] [options]
Modes:
Consider how to configure a RAID array level 5 on three disk partitions. We will use sections:
  / dev / hde1
    / dev / hdf2
    / dev / hdg1
In the event that the sections are different, do not forget to use the appropriate file names.
It is necessary to determine on which physical partitions a RAID array will be created. If there are already partitions, you need to find free ( fdisk -l ). If there are no sections yet, but there is an unallocated space, you can create them using fdisk or cfdisk .
View what sections there are:
% # fdisk -l
  Disk / dev / hda: 12.0 GB, 12072517632 bytes
    255 heads, 63 sectors / track, 1467 cylinders
    Units = cylinders of 16065 * 512 = 8225280 bytes
  Device Boot Start End Blocks Id System
    / dev / hda1 * 1 13 104391 83 Linux
    / dev / hda2 14 144 1052257+ 83 Linux
    / dev / hda3 145 209 522112+ 82 Linux swap
    / dev / hda4 210 1467 10104885 5 Extended
    / dev / hda5 210 655 3582463+ 83 Linux
    ...
    ...
    / dev / hda15 1455 1467 104391 83 Linux
See which partitions are mounted where and how much free space is on them (sizes in kilobytes):
  % # df -k
    Filesystem 1K-blocks Used Available Use% Mounted on
    / dev / hda2 1035692 163916 819164 17% /
    / dev / hda1 101086 8357 87510 9% / boot
    / dev / hda15 101086 4127 91740 5% / data1
    ...
    ...
    ...
    / dev / hda7 5336664 464228 4601344 10% / var
If you use partitions created earlier, be sure to unmount them. RAID cannot be created over partitions on which mounted file systems are located.
  % # umount / dev / hde1
   % # umount / dev / hdf2
   % # umount / dev / hdg1
It is desirable (but not necessary) to change the type of partitions that will be included in the RAID and set it to FD (Linux RAID autodetect). You can change the partition type using fdisk.
Consider how to do this using the example of the / dev / hde1 partition .
  % # fdisk / dev / hde
     Set to 8355.
     But this is larger than 1024,
     setups cause problems with:
     1) software that runs at boot time (eg, old versions of LILO)
     2) booting and partitioning software from other OSs
     (eg, DOS FDISK, OS / 2 FDISK)

     Command (m for help):

     Use FDISK Help

     Now use the fdisk command to get some help:

     Command (m for help): m
     ...
     ...
     p print the partition table
     q quit without saving changes
     s create a new empty Sun disklabel
     t change a partition's system id
     ...
     ...
     Command (m for help):

     Set The ID Type To FD

     Partition / dev / hde1 is the first partition on disk / dev / hde.
     Modify its type
     and type code.
     You also shouldn't have
     of ID types in case you forget.

     Command (m for help): t
     Partition number (1-5): 1
     Hex code (type L to list codes): L

     ...
     ...
     ...
     16 Hidden FAT16 61 SpeedStor f2 DOS secondary
     17 Hidden HPFS / NTF 63 GNU HURD or Sys fd Linux raid auto
     18 AST SmartSleep 64 Novell Netware fe LANstep
     1b Hidden Win95 FA 65 Novell Netware ff BBT
     Hex code (type L to list codes): fd
     Changed system type of partition 1 to fd (Linux raid autodetect)

     Command (m for help):


     Make Sure The Change Occurred

     Use the p command to get the new proposed partition table:

     Command (m for help): p

     Disk / dev / hde: 4311 MB, 4311982080 bytes
     16 heads, 63 sectors / track, 8355 cylinders
     Units = cylinders of 1008 * 512 = 516096 bytes

     Device Boot Start End Blocks Id System
     / dev / hde1 1 4088 2060320+ fd Linux raid autodetect
     / dev / hde2 4089 5713 819000 83 Linux
     / dev / hde4 6608 8355 880992 5 Extended
     / dev / hde5 6608 7500 450040+ 83 Linux
     / dev / hde6 7501 8355 430888+ 83 Linux

     Command (m for help):


     Save The Changes

     Use the w command to save permanently to disk / dev / hde:

     Command (m for help): w
     The partition table has been altered!

     Calling ioctl () to re-read partition table.

     WARNING: Re-reading the partition table failed with error 16: Device or resource busy.
     The kernel still uses the old table.
     The new table will be used at the next reboot.
     Syncing disks.
Similarly, you need to change the partition type for all other partitions included in the RAID.
Creation of a RAID array is performed using the mdadm program ( --create key). We will use the --level option to create a level 5 RAID. Using the --raid-devices key, we specify the devices on which the RAID array will be built.
  % # mdadm --create --verbose / dev / md0 --level = 5 --raid-devices = 3 / dev / hde1 / dev / hdf2 / dev / hdg1

     mdadm: layout defaults to left-symmetric
     mdadm: chunk size defaults to 64K
     mdadm: / dev / hde1 appears to contain an ext2fs file system
         size = 48160K mtime = Sat Jan 27 23:11:39 2007
     mdadm: / dev / hdf2 appears to contain an ext2fs file system
         size = 48160K mtime = Sat Jan 27 23:11:39 2007
     mdadm: / dev / hdg1 appears to contain an ext2fs file system
         size = 48160K mtime = Sat Jan 27 23:11:39 2007
     mdadm: size set to 48064K
     Continue creating array?  y
     mdadm: array / dev / md0 started.
If you want to immediately create an array where the disk is not enough (degraded) just type the word missing instead of the device name. For RAID5, this can be only one disk; for RAID6 - no more than two; for RAID1 - as many as you want, but there must be at least one worker.
You can make sure that the RAID array is initialized correctly by viewing the / proc / mdstat file. This file reflects the current state of the RAID array.
  % # cat / proc / mdstat
     Personalities: [raid5]
     read_ahead 1024 sectors
     md0: active raid5 hdg1 [2] hde1 [1] hdf2 [0]
         4120448 blocks level 5, 32k chunk, algorithm 3 [3/3] [UUU]

     unused devices: <none>
Notice how the new RAID is called. In our case, it is called / dev / md0 . We will refer to the array by this name.
A new RAID partition needs to be formatted, i.e. create a file system on it. This can be done with the help of the program from the mkfs family. If we will create an ext3 file system, we will use the mkfs.ext3 program. :
  % # mkfs.ext3 / dev / md0
     mke2fs 1.39 (29-May-2006)
     Filesystem label =
     OS type: Linux
     Block size = 1024 (log = 0)
     Fragment size = 1024 (log = 0)
     36144 inodes, 144192 blocks
     7209 blocks (5.00%) reserved for the super user
     First data block = 1
     Maximum filesystem blocks = 67371008
     18 block groups
     8192 blocks per group, 8192 fragments per group
     2008 inodes per group
     Superblock backups stored on blocks:
             8193, 24577, 40961, 57345, 73729

     Writing inode tables: done
     Creating journal (4096 blocks): done
     Writing superblocks and filesystem accounting information: done

     This filesystem will be automatically checked every 33 mounts or
     180 days, whichever comes first.  Use tune2fs -c or -i to override.
It makes sense for the best file system performance to specify when creating the number of disks in the raid and the number of file system blocks that can fit in one stripe (chunk), this is especially important when creating arrays of RAID0, RAID5, RAID6, RAID10 levels. For RAID1 (mirror) it doesn’t matter since the recording is always on one device, and in other raid types the date is recorded sequentially on different disks in portions corresponding to the size of the stripe. For example, if we use RAID5 of 3 disks, with default stripe size of 64K we use the ext3 file system with a block size of 4K, then we can call the mkfs.ext command like this:
% # mkfs.ext3 -b 4096 -E stride = 16, stripe-width = 32 / dev / md0
stripe-width is usually calculated as stride * N (N is the date drives in the array — for example, in RAID5 — two data drives and one parity) stripe himself
% # mkfs.xfs -d su = 64k, sw = 3 / dev / md0
The system itself does not remember which RAID arrays it needs to create and which components it contains. This information is in the mdadm.conf file.
The lines that should be added to this file can be obtained with the command
mdadm --detail --scan --verbose
Here is an example of its use:
  % # mdadm --detail --scan --verbose
     ARRAY / dev / md0 level = raid5 num-devices = 4
     UUID = 77b695c4: 32e5dd46: 63dd7d16: 17696e09
     devices = / dev / hde1, / dev / hdf2, / dev / hdg1
If the mdadm.conf file does not yet exist, you can create it:
  % # echo "DEVICE partitions"> /etc/mdadm/mdadm.conf
    % # mdadm --detail --scan --verbose |  awk '/ ARRAY / {print}' >> /etc/mdadm/mdadm.conf
Since we created a new file system, we will probably need a new mount point. Call it / raid .
% # mkdir / raid
In order for the file system created on the new RAID array to be automatically mounted at boot time, we will add the appropriate entry to the / etc / fstab file storing the list of file systems automatically mounted at boot time.
/ dev / md0 / raid ext3 defaults 1 2
If we have combined sections that were used before into a RAID array, we need to disable their mounting: delete or comment out the corresponding lines in the / etc / fstab file . You can comment out the line with # .
  # / dev / hde1 / data1 ext3 defaults 1 2
     # / dev / hdf2 / data2 ext3 defaults 1 2
     # / dev / hdg1 / data3 ext3 defaults 1 2
In order to gain access to the file system located on the new RAID array, it needs to be mounted. Mount using mount command.
If a new file system is added to the / etc / fstab file , you can mount it with the mount -a command (all file systems that should be mounted at boot time but not mounted now are mounted).
% # mount -a
You can mount only the section we need (provided that it is specified in / etc / fstab ).
% # mount / raid
If the partition in / etc / fstab is not specified, then during the mounting we must set at least two parameters - the mount point and the device to be mounted:
% # mount / dev / md0 / raid
Information about the status of the RAID array is in the / proc / mdstat file.
  % # raidstart / dev / md0
    % # cat / proc / mdstat
     Personalities: [raid5]
     read_ahead 1024 sectors
     md0: active raid5 hdg1 [2] hde1 [1] hdf2 [0]
         4120448 blocks level 5, 32k chunk, algorithm 3 [3/3] [UUU]

     unused devices: <none>
If the information in the file is constantly changing, for example, array rebuilding is in progress, it is convenient to view the constantly changing file using the watch program:
% $ watch cat / proc / mdstat
How to perform the integrity check of the md0 software RAID array:
echo 'check'> / sys / block / md0 / md / sync_action
How to see if there were any errors in the process of checking a software RAID array using the check or repair command:
cat / sys / block / md0 / md / mismatch_cnt
In some mdadm manuals, after the initial assembly of arrays, it is recommended to add the output of the "mdadm --detail --scan --verbose" command to the /etc/mdadm/mdadm.conf file:
  ARRAY / dev / md / 1 level = raid1 num-devices = 2 metadata = 1.2 name = linuxWork: 1 UUID = 147c5847: dabfe069: 79d27a05: 96ea160b
   devices = / dev / sda1
 ARRAY / dev / md / 2 level = raid1 num-devices = 2 metadata = 1.2 name = linuxWork: 2 UUID = 68a95a22: de7f7cab: ee2f13a9: 19db7dad
   devices = / dev / sda2
in which the partition names are hard coded ( / dev / sda1, / dev / sda2 in the given example).
If you then update the boot image (on Debian, call update-initramfs -u or dpkg-reconfigure mdadm), the partition names will be written to the boot image of the boot image and you will not be able to boot from the array if the hard disk configuration will change (the necessary sections will receive other names). To do this, it is not necessary to add or remove hard drives: in multidisk systems, their names can vary from boot to boot.
Solution: write to /etc/mdadm/mdadm.conf the output of the command "mdadm --detail --scan" (without --verbose).
At the same time in the mdadm.conf file there will be the UUIDs of the partitions that make up each RAID array. When the system boots, mdadm finds the necessary partitions regardless of their symbolic names by UUID.
The mdadm.conf extracted from the Debian bootstrap image:
  DEVICE partitions
 HOMEHOST <system>
 ARRAY / dev / md / 1 metadata = 1.2 UUID = 147c5847: dabfe069: 79d27a05: 96ea160b name = linuxWork: 1
 ARRAY / dev / md / 2 metadata = 1.2 UUID = 68a95a22: de7f7cab: ee2f13a9: 19db7dad name = linuxWork: 2
The result of the study section with the command 'mdadm --examine' "
  / dev / sda1:
          Magic: a92b4efc
        Version: 1.2
    Feature Map: 0x0
     Array UUID: 147c5847: dabfe069: 79d27a05: 96ea160b
           Name: linuxWork: 1
  Creation Time: Thu May 23 09:17:01 2013
     Raid Level: raid1
   Raid Devices: 2
The partition with UUID 147c5847: dabfe069: 79d27a05: 96ea160b will be included into the array, even if it becomes / dev / sdb1 during the next system boot.
In general, there are 2 mdadm.conf files that affect the automatic assembly of arrays:
Accordingly, you may have information:
1) in the boot image (DHO) and in /etc/mdadm/mdadm.conf;
2) ONZ only (gets there when it is updated);
3) only in /etc/mdadm/mdadm.conf;
4) nowhere.
In that place where there is mdadm.conf, assembly happens by rules; where not, unpredictable.
Note: if you didn’t update the DPS after creating the RAID-arrays, their configuration will still get into it - when you update the image with another program / when updating the system (but you will not know about it with all the consequences).
The disk in the array can be conditionally failed, the key --fail ( -f ):
  % # mdadm / dev / md0 --fail / dev / hde1
    % # mdadm / dev / md0 -f / dev / hde1
The failed disk can be removed with the --remove ( -r ) switch:
  % # mdadm / dev / md0 --remove / dev / hde1
    % # mdadm / dev / md0 -r / dev / hde1
You can add a new disk to the array using the --add ( -a ) and --re-add options :
  % # mdadm / dev / md0 --add / dev / hde1
    % # mdadm / dev / md0 -a / dev / hde1
You can assemble an existing array using mdadm --assemble . As an additional argument, it is indicated whether the device should be scanned, and if not, which devices should be collected.
  % # mdadm --assemble / dev / md0 / dev / hde1 / dev / hdf2 / dev / hdg1
    % # mdadm --assemble --scan
You can expand the array with the --grow ( -G ) switch. First a disk is added, and then the array is expanded:
% # mdadm / dev / md0 --add / dev / hdh2
Check that the disk (partition) was added:
  % # mdadm --detail / dev / md0
    % # cat / proc / mdstat
If the section is actually added, we can expand the array:
% # mdadm -G / dev / md0 - rained devices = 4
The --raid-devices option specifies the new number of disks used in the array. For example, there were 3 disks, and now we are expanding to 4 - we specify 4.
It is recommended to set the backup file in case the array rebuilding is interrupted, for example, add:
--backup-file = / var / backup
If necessary, you can adjust the speed of the array expansion process by specifying the desired value in the files
  / proc / sys / dev / raid / speed_limit_min
     / proc / sys / dev / raid / speed_limit_max
Ensure that the array has expanded:
% # cat / proc / mdstat
It is necessary to update the configuration file with the changes made:
  % # mdadm --detail --scan >> /etc/mdadm/mdadm.conf
    % # vi /etc/mdadm/mdadm.conf
Delayed sync:
  Personalities: [linear] [multipath] [raid0] [raid1] [raid6] [raid5] [raid4] [raid10]
 md0: active (auto-read-only) raid1 sda1 [0] sdb1 [1]
       78148096 blocks [2/2] [UU]
         resync = PENDING
Resume:
echo idle> / sys / block / md0 / md / sync_action
PS : If you saw “ active (auto-read-only) ” in the /proc/mdstat file, then maybe you just did not write anything to this array. For example, after the partition is mounted and any changes in the mounted directory, the status automatically changes:
md0: active raid1 sdc [0] sdd [1]
First, unmount and stop the array:
  % # umount / dev / md0
    % # mdadm --stop / dev / md0
Then you need to rebuild as md5 each of the sections sd [abcdefghijk] 1
% # mdadm --assemble / dev / md5 / dev / sd [abcdefghijk] 1 --update = name
or so
% # mdadm --assemble / dev / md5 / dev / sd [abcdefghijk] 1 --update = super-minor
First, unmount and stop the array:
  % # umount / dev / md0
    % # mdadm -S / dev / md0
Then you need to wipe the superblock of each of the components of the array:
  % # mdadm --zero-superblock / dev / hde1
    % # mdadm --zero-superblock / dev / hdf2
If the action above did not help, then wipe it like this:
  % # dd if = / dev / zero of = / dev / hde1 bs = 512 count = 1
    % # dd if = / dev / zero of = / dev / hdf2 bs = 512 count = 1
After creating a RAID5 array of three two-TB drives, I was unpleasantly surprised by the low write speed of the array: only 55 MB / s. I had to learn, with the help of what parameters you can achieve from the array of normal performance.
The thing turned out to be that
stripe_cache_size value set for the array is too small; –bitmap=internal ) and a small bitmap chunk. After increasing the stripe_cache_size and bitmap chunk size, the write speed rose to 130-150 MB / s. Read more about these and other options below.
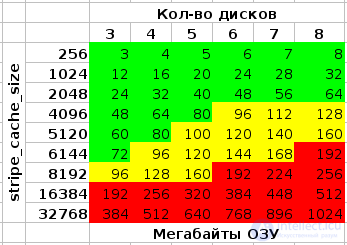
The default value is 256, the range is from 32 to 32768, while an increase of at least up to 8192 greatly helps write speed:
echo 8192> / sys / block / md? / md / stripe_cache_size
Attention : measured in the кол-ве страниц * на кол-во устройств , and can be very voracious in terms of consumption of RAM. With the above value of 8192 , a memory page size of 4096 bytes (used in the Linux kernel on x86 and x86-64) and four disks in a RAID , the memory consumption will be:
8192 * 4096 * 4 = 134217728 bytes (128 megabytes)
After incorrectly rebooting the system, it allows you to not double-check the entire RAID ', but only those areas that were recorded at the time of the reboot or power failure. In the variant –bitmap=internal , it has an extremely negative effect on the write speed:
The effect can be reduced by using the larger value of the mdadm –bitmap-chunk parameter (see man mdadm ), for example, I now use 131072 . You can also eliminate it almost completely by using a bitmap in an external file - on a disk that is not in the array. For the section where the bitmap file will be stored, the author of the mdadm file system is ext2 or ext3, however, there were no problems when placing it on XFS.
mdadm --grow --bitmap = internal --bitmap-chunk = 131072 / dev / md0
It is important to set these parameters correctly when creating the filesystem; if you forget, that's okay, you can change them later using tune2fs .
XFS tries to determine the appropriate values automatically if it fails - see man mkfs.xfs for sunit= and swidth= .
Set when creating an array, –chunk-size mdadm –chunk-size parameter. The change in an already running array is an extremely long, and probably not quite safe operation, requiring, in addition, the most recent version of mdadm (3.1) and a fairly new kernel (2.6.31+) 1) .
The default value in the old mdadm was 64K, in the new one it became 512K 2) . According to the author mdadm , “512K new drives fit better,” in my opinion - not so simple. For now, I prefer to continue using 64K.
Another author of the test results recommended size of 128K:
  # View current:
 blockdev --getra / dev / md?

 # Change:
 blockdev --setra <new value in sectors (512 bytes)> / dev / md?
I have not yet conducted experiments with this, the read speed from the array (on a three-disk RAID5, reaching the sum of the linear speed of two disks) is fine with that.

Comments
To leave a comment
LINUX operating system
Terms: LINUX operating system