Lecture
The graphical user interface includes not only the location of the necessary controls in the window, but also the purpose of reacting to user events. Most honored actions in window programs are performed in response to the user selecting menu commands, pressing buttons, and sometimes even simply in response to entering a new character in the text field.
Thus, when developing a program, it is necessary:
The first point depends on the logic of the application and is entirely at the discretion of the programmer. An event handler is, as a rule, an ordinary method and there is nothing special about its writing.
Different programming languages and visual libraries use a variety of ways to bind a procedure (method), which should be called in response to an event, to the event itself. In particular, in Delphi, the procedure simply must have a special name consisting of the name of the component and the type of event being processed.
In the Swing library, the observer design pattern is used to bind an event handler to its caller component.
Design patterns are standard object-oriented programming techniques that allow you to optimally cope with non-trivial, but often arising in programming situations. The design pattern describes the classes that must be entered to resolve this situation and the interaction between the classes. In particular, we previously considered the iterator design pattern, which allows you to bypass all the elements of the collection using two simplest methods in the order hidden in the iterator itself.
The “observer” design pattern is used when one object must notify others about changes or external influences that have occurred to it. Such an object is called an observable, and objects that should be notified are observers.
In order for such an interaction to be possible, an observer object must have a method (or several methods) with a predetermined signature (name and parameters). When an expected event occurs with the observed object, it will call the corresponding method of its observer. In this method, the reaction to the event will be programmed.
In order for an observable object to call the observer's method, it must be aware that such an observer exists. Therefore, a special method must be called in the observed beforehand, registering it with an observer.
Note that in this scheme one observer can be registered with several objects (i.e., react equally to changes in each of them), and one object can have several observers (that is, when an event occurs, several independent methods are used). handlers). This greatly increases the flexibility of programming.
In the context of the graphical user interface, the observed objects are controls: buttons, checkboxes, menus, etc. They can inform their observers about certain events, both elementary (mouse hovering, keystroke on the keyboard) and high-level events (changing the text in the text field, selecting a new item in the drop-down list, etc.).
Objects of classes that support special interfaces should be observers (remember that there should be certain methods in the observer class that the observant “knows” about and calls them when an event occurs). Such classes are called listeners in Swing terminology.
We consider the technology of writing listeners on the example of mouse event listeners.
Mouse events are one of the most popular types of events. Virtually any control is able to report that a mouse has been hoisted on it, clicked on it, etc. All registered mouse event listeners will be notified.
For example, the login button from the example at the end of the previous chapter should respond to clicking on it, checking the username and password entered by the user.
The mouse event listener must implement the MouseListener interface. This interface lists the following methods:
public void mouseClicked(MouseEvent event) - mouse clicked on the observed object
public void mouseEntered(MouseEvent event) - the mouse cursor entered the area of the observed object
public void mouseExited(MouseEvent event) - the mouse cursor has left the area of the observed object
public void mousePressed(MouseEvent event) - the mouse button is pressed while the cursor is over the observed object
public void mouseReleased(MouseEvent event) - the mouse button is released while the cursor is over the observed object
Each of these methods receives a parameter of type MouseEvent , through which additional information is transmitted about the event that occurred. For example, you can get the object that triggered this event with the event.getSource() command event.getSource() remember that the same listener can be registered in several objects and sometimes it may be necessary to know which of them caused this method). The getPoint() method will return the coordinates of the point where the mouse cursor was located when the event was triggered. The getClickCount() method returns the number of consecutive clicks (it makes sense only for mouseClicked() and allows you to double-click, triple, etc. click in a special way).
To handle a button click, you need to describe a class that implements the MouseListener interface, and the mouseClicked() method must contain an event handler. Next, you need to create an object of this class and register it as a listener of the button you are interested in. To register a listener, the addMouseListener(MouseListener listener) method is used.
We describe the class of the listener within the class of the window SimpleWindow , after the constructor. The event handler will check whether the user has entered the login “Ivan” (we will not check the password) and display a message about the success or failure of the login (the work of the standard dialog boxes is discussed further in this chapter):
class MouseL implements MouseListener { public void mouseClicked(MouseEvent event) { if (loginField.getText().equals("Иван")) JOptionPane.showMessageDialog(null, "Вход выполнен"); else JOptionPane.showMessageDialog(null, "Вход НЕ выполнен"); } public void mouseEntered(MouseEvent event) {} public void mouseExited(MouseEvent event) {} public void mousePressed(MouseEvent event) {} public void mouseReleased(MouseEvent event) {} } We have made the listener a nested class of the SimpleWindow class so that it can easily access its internal loginField and passwordField fields. In addition, although in reality we process only one of the five possible mouse events, we had to describe all five methods (four have an empty implementation). The fact is that otherwise the class would have to be declared abstract (after all, it inherited empty method headers from the interface) and we could not create an object of this class. And we have to create a listener object and attach it to the button. To do this, you need to add the following command to the SimpleWindow() constructor code:
ok.addMouseListener(new MouseL()); This can be done immediately after the command:
JButton ok = new JButton("OK"); In order for the ok button to find a listener that will handle clicking on it, we need to describe the new (nested) class. Sometimes, instead of a nested class, you can get away with anonymous. As you remember, the anonymous class does not have a name and only one object of this class can be created in the program (the creation of which is combined with the definition of the class). But very often, as in our example, the listener is written in order to handle the events of a single object — in our case, the ok button, which means it is used in the program only once: during binding to this object. Thus, we can replace the nested class with anonymous. To do this, the MouseL class MouseL can be simply deleted, and the command
ok.addMouseListener(new MouseL()); replaced by:
ok.addMouseListener(new MouseListener() { public void mouseClicked(MouseEvent event) { if (loginField.getText().equals("Иван")) JOptionPane.showMessageDialog(null, "Вход выполнен"); else JOptionPane.showMessageDialog(null, "Вход НЕ выполнен"); } public void mouseEntered(MouseEvent event) {} public void mouseExited(MouseEvent event) {} public void mousePressed(MouseEvent event) {} public void mouseReleased(MouseEvent event) {} }); The new version looks more cumbersome than the first. Abuse of anonymous classes can make the program difficult to read. However, as a result, all actions with the button (creating, adjusting its appearance and processing commands for clicking on it) are not separated, as in the case of nested classes, but are side by side, which makes it easier to maintain (make changes) the program. In the case of simple (in a few lines) handlers, it is reasonable to make a choice in favor of anonymous classes.
In general, you can implement the listener interface in any class by adding the directive implements MouseListener to its description and defining the necessary methods in it. In particular, it can be the SimpleWindow window class itself. But most often they use anonymous and nested classes (not least because of the presence of adapters (see below).
The program began to look cluttered mainly because in addition to the mouseClicked() method, which is useful for us, we had to define empty implementations of all other, unnecessary methods. In principle, this can be avoided.
The MouseAdapter class implements the MouseListener interface, defining empty implementations for each of its methods. You can inherit your listener from this class and override the methods that we need.
As a result, the previous description of the listener will look more compact:
ok.addMouseListener(new MouseAdapter() { public void mouseClicked(MouseEvent event) { if (loginField.getText().equals("Иван")) JOptionPane.showMessageDialog(null, "Вход выполнен"); else JOptionPane.showMessageDialog(null, "Вход НЕ выполнен"); } }); In addition to MouseListener listeners, MouseListener visual components support a number of other listeners (note that the set of possible listeners may differ in different components).
Each listener must implement the ***Listener interface, where *** is the listener type. Virtually each of these interfaces (with the exception of those in which only one method) corresponds to an empty stub class ***Adapter . Each method of the listener interface accepts one parameter of type ***Event , in which all information relating to the event is collected. We will not consider in detail the methods for obtaining this information. As a rule, there are few of them and their purpose is easy to understand, and the list of methods will be provided by the contextual help of Eclipse.
To bind a listener to an object (which supports the corresponding listener type), the add***Listener(***Listener listener) method is used.
For example, a MouseListener listener must implement an interface with the same name as the stub MouseAdapter . The methods of this interface handle a parameter of type MouseEvent , and the listener is registered with the method addMouseListener(MouseListener listener) . We will not repeat this information for other types of listeners, they work similarly.
The FocusListener listens to moments when an object receives focus (that is, becomes active) or loses it. The concept of focus is very important for window applications. At any time in the window there can be only one active (in focus) object that receives information about the keys pressed on the keyboard (i.e., responds to keyboard events), scrolling the mouse wheel, etc. The user activates one of the controls by clicking the mouse or using the Tab key (switching between them).
The FocusListener interface has two methods:
public void focusGained(FocusEvent event) - called when the observed object receives focus
public void focusLost(FocusEvent event) - called when the observed object loses focus.
The MouseWheelListener listener MouseWheelListener notified when the mouse wheel is MouseWheelListener while the component is in focus. This interface contains only one method:
public void mouseWheelMoved(MouseWheelEvent event) .
The KeyListener listener KeyListener notified when the user is working with the keyboard while the component is in focus. The interface defines methods:
public void mouseKeyTyped(KeyEvent event) - called when a character is entered from the keyboard
public void mouseKeyPressed(KeyEvent event) - called when the keyboard key is pressed
public void mouseKeyReleased(KeyEvent event) - called when the keyboard key is released.
The event argument of these methods can provide very valuable information. In particular, the event.getKeyChar() command returns a char character associated with the key pressed. If no key is associated with the key pressed, the CHAR_UNDEFINED constant is CHAR_UNDEFINED . The event.getKeyCode() command event.getKeyCode() return the key code as an integer of type int . It can be compared to one of the many constants defined in the KeyEvent class: VK_F1 , VK_SHIFT , VK_D , VK_MINUS , etc. The isAltDown() , isControlDown() , isShiftDown() let you know if one of the modifier keys Alt, Ctrl or Shift was pressed simultaneously.
In the login window, add the ability so that when you press the Esc key in the login window, its contents are cleared.
The ChangeListener listener responds to an object's state change. Each control defines its own concept of “state change”. For example, for a tabbed JTabbedPane this is a transition to another tab, for a JSlider slider, a change in its position, the JButton button considers a state change to be a click on it. Thus, although the event is quite general, it is necessary to clarify its specificity for each specific component. The interface defines only one method:
public void stateChanged(ChangeEvent event) .
A WindowListener listener can only be WindowListener with a window and is notified of various events that have occurred with the window:
public void windowOpened(WindowEvent event) - the window has opened.
public void windowClosing(WindowEvent event) - an attempt to close a window (for example, a user clicked on the cross). The word “attempt” means that this method will be called before the window is closed and can prevent this (for example, display a dialog like “Are you sure?” And cancel closing the window if the user selects “No”).
public void windowClosed(WindowEvent event) - the window has closed.
public void windowIconified(WindowEvent event) - the window is minimized.
public void windowDeiconified(WindowEvent event) - the window is maximized.
public void windowActivated(WindowEvent event) - the window has become active.
public void windowDeactivated(WindowEvent event) - the window has become inactive.
The listener ComponentListener notified when the observed visual component changes its position, size or visibility. The interface has four methods:
public void componentMoved(ComponentEvent event) - called when the monitored component is moved (as a result of a call to the setLocation() command, the location manager, or for some other reason).
public void componentResized(ComponentEvent event) - called when the size of the observed component changes.
public void componentHidden(ComponentEvent event) - called when the component becomes invisible.
public void componentShown(ComponentEvent event) - called when the component becomes visible.
The listener ItemListener responds to changes in the state of one of the elements that make up the monitored component. For example, a JComboBox drop-down list consists of many elements and the listener responds when the selected element changes. This listener is also notified when you select or deselect the JCheckBox checkbox or the JRadioButton switch, change the state of the JToggleButton button, etc. The listener has one method:
public void itemStateChanged(ItemEvent event) .
Among the numerous events to which each control reacts (and about which it notifies the appropriate listeners if they are attached to it), there is one main component that flows from the essence of the component and is processed much more often than the others. For example, for a button it is a click on it, and for a drop-down list it is a choice of a new item.
To track and handle such an event, a special ActionListener listener can be used, having one method:
public void actionPerformed(ActionEvent event) .
Using ActionListener has a slight advantage in efficiency (so, when handling pressing a button, you do not have to react to four extra events - after all, even if the handler methods are empty, resources are still used to call these methods). And besides, it is very convenient to memorize and constantly use one class with one method and address the rest only in those relatively rare cases when such a need arises.
The processing of clicking the ok button in our example is easily rewritten for the ActionListener:
ok.addMouseListener(new ActionListener() { public void actionPerformed(ActionEvent event) { if (loginField.getText().equals("Иван")) JOptionPane.showMessageDialog(null, "Вход выполнен"); else JOptionPane.showMessageDialog(null, "Вход НЕ выполнен"); } }); An integral part of modern window programs is the menu, which is a conveniently grouped set of commands. The menu is of two types: main and context. The main menu is located along the upper border of the window and contains commands related to the entire application (more precisely, all the commands that can be executed by working with this window). The context menu is invoked by clicking the right mouse button on a specific object and contains commands that can be applied to this particular object.
The main window menu is represented in Swing by the JMenuBar class. In essence, this class is a box with the layout manager BoxLayout (horizontally), in which you can add not only menu items, but anything: drop-down lists, even tabbed panels. However, for ease of use of the program it is preferable to use the "traditional" menu options.
The main menu should be attached to the window using the setJMenuBar(JMenuBar menuBar) method setJMenuBar(JMenuBar menuBar) .
The main menu items are the usual menus — drop-down rectangular blocks of commands — objects of the JMenu class. The JMenu(String title) constructor takes one parameter: the name of the menu that will be displayed on the main menu bar. *
The menu, in turn, consists of menu items represented by the JMenuItem class. According to the logic of the menu items are similar to the JButton button, that is, when you click on it, the user performs some action.
You can create a menu item with a blank JMenuItem constructor JMenuItem or (more in demand) by one of the constructors, to which text and / or menu item icon is JMenuItem(String text) : JMenuItem(String text) , JMenuItem(Icon icon) , JMenuItem(String text, Icon icon) . Of course, at any time, the text and icon can be changed by the methods setText(String text) and setIcon(Icon icon) respectively.
An item is added to the menu by the add(JMenuItem item) method add(JMenuItem item) of the JMenu class. To separate groups of interrelated menu items, you can add a separator between them using the addSeparator() method of the JMenu class.
 In addition, you can add another menu to the menu. In this case, a sequence of submenus nested in each other is formed, which is quite common in modern programs. But do not get carried away: the depth of nesting more than three levels is likely to lead to inconveniences in using the program.
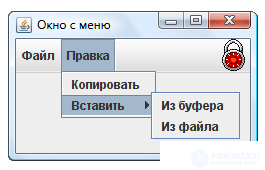
Let's create the main menu of the window, consisting of two submenus: “File” and “Edit”, and in the “Edit” menu we place a drop-down submenu. In addition, we will use the knowledge of the main menu layout manager to add an icon from the right edge (similar to how it was done in Internet Explorer).
SimpleWindow(){ super("Окно с меню"); setDefaultCloseOperation(EXIT_ON_CLOSE); JMenuBar menuBar = new JMenuBar(); JMenu fileMenu = new JMenu("Файл"); fileMenu.add(new JMenuItem("Новый")); fileMenu.add(new JMenuItem("Открыть", new ImageIcon("1.png"))); fileMenu.add(new JMenuItem("Сохранить")); fileMenu.addSeparator(); fileMenu.add(new JMenuItem("Выйти")); JMenu editMenu = new JMenu("Правка"); editMenu.add(new JMenuItem("Копировать")); JMenu pasteMenu = new JMenu("Вставить"); pasteMenu.add(new JMenuItem("Из буфера")); pasteMenu.add(new JMenuItem("Из файла")); editMenu.add(pasteMenu); menuBar.add(fileMenu); menuBar.add(editMenu); menuBar.add(Box.createHorizontalGlue()); menuBar.add(new JLabel(new ImageIcon("2.png"))); setJMenuBar(menuBar); setSize(250,150); } As mentioned, each menu item is essentially a button, so it reacts to the same events and allows you to join the same listeners as the button. * Therefore, we can assign a response to the menu commands in the same way as we did before. For example, to stop the program when selecting the Exit item in the menu, you should replace the command in the example
fileMenu.add(new JMenuItem("Выйти")); on a sequence of commands:
JMenuItem exit = new JMenuItem("Выйти"); exit.addActionListener(new ActionListener() { public void actionPerformed(ActionEvent event) { System.exit(0); } }); fileMenu.add(exit); The System.exit(0) command terminates the current application.
The contextual (or popup) menu is implemented in the JPopupMenu class, which is very similar to the JMenu class. The distinctive method of this class is the show(Component comp, int x, int y) method show(Component comp, int x, int y) , which displays a menu at a point with given coordinates relative to the boundaries of a given component.
As already noted, the context menu is usually displayed when you right-click on a component. Thus, to display a menu, you need to add a mouse listener to this component.
Consider an example in which a label with an inscription and a context menu of two elements associated with this label are added to a window that we have already created. It is necessary to add the following code to the constructor before the last command ( setSize ):
label = new JLabel("КНИЖКА", new ImageIcon("1.png"), JLabel.RIGHT); JPanel panel = new JPanel(); panel.add(label); popup = new JPopupMenu(); popup.add(new JMenuItem("Прочитать")); popup.add(new JMenuItem("Сжечь")); label.addMouseListener(new MouseAdapter(){ public void mouseClicked(MouseEvent event) { if (SwingUtilities.isRightMouseButton(event)) popup.show(label, event.getX(), event.getY()); }); setContentPane(panel);  At the same time in the class definition window should enter two fields:
JPopupMenu popup; JLabel label; This is necessary so that an anonymous class listener can refer to the label and context menu.
The example also illustrates the use of the useful method isRightMouseButton(MouseEvent event) , defined in the class of helper utilities SwingUtilities .The method receives information about the mouse event and answers the question whether the right mouse button was pressed. Methods getX()and getY()return the coordinates of the mouse cursor relative to the observed component.
Very often the same command is duplicated in a graphical interface in several places. For example, the “Copy” command may be present in the main menu of the window, in the context menu of some object, and also as a button on the toolbar. This is necessary for the convenience of using the program. However, binding to all these objects (buttons and menu commands) identical listeners is quite tiresome. Moreover, all these commands should equally respond to changes in the program state: if copying becomes impossible for any reason, then all controls representing this command should become inactive.
For simplification of work in such situations the interface is provided Action. It collects in one place everything that relates to a certain action: a handler, an activity indicator, a tooltip, an icon, etc.
The interface is Actioninherited from the interface ActionListener, so its main method is actionPerformed(ActionEvent event). This is where the action itself is programmed. But besides this, using the method, putValue(String key, Object value)you can set one of the additional properties of the action. The first parameter is the string identifier of the property. It can take one of the values described in interface constants Action. The second parameter is an object representing the value of the property.
The main properties of the Action interface (more precisely, the corresponding constants):
NAME - the name of the action
SMALL_ICON - icon corresponding to the action,
SHORT_DESCRIPTION — краткое описание действия (для всплывающей подсказки).
Метод setEnabled(boolean enabled) позволяет сделать действие активным или неактивным.
На основе созданного действия можно создавать некоторые элементы управления, передавая это действие в качестве единственного параметра конструктора. К таким элементам управления, в частности, относятся элементы меню и кнопки.
Недостаток интерфейса Action — в нем слишком много вспомогательных абстрактных методов (их семь, в том числе setEnabled() и putValue() ) и программировать их достаточно утомительно. Поэтому обычно используется реализующий данный интерфейс класс AbstractAction , в котором «не заполнен» единственный метод — actionPerformed() , а его все равно необходимо определить для программирования сути действия.
Consider an example.
public class SimpleWindow extends JFrame { private ExitAction exitAction; SimpleWindow(){ super("Окно с меню"); setDefaultCloseOperation(EXIT_ON_CLOSE); exitAction = new ExitAction(); DeactivateAction deactivateAction = new DeactivateAction(); JMenuBar menuBar = new JMenuBar(); JMenu fileMenu = new JMenu("Файл"); fileMenu.add(new JMenuItem("Новый")); fileMenu.addSeparator(); fileMenu.add(deactivateAction); fileMenu.add(exitAction); menuBar.add(fileMenu); setJMenuBar(menuBar); JToolBar toolBar = new JToolBar("Панель инструментов"); toolBar.add(exitAction); toolBar.add(deactivateAction); getContentPane().add(toolBar, BorderLayout.NORTH); JPanel panel = new JPanel(); panel.add(new JButton(exitAction)); panel.add(new JButton(deactivateAction)); getContentPane().add(panel); setSize(250,250); } class ExitAction extends AbstractAction { ExitAction(){ putValue(Action.NAME, "Выйти"); putValue(Action.SHORT_DESCRIPTION, "Программа перестанет работать, а окно исчезнет с экрана."); putValue(Action.SMALL_ICON, new ImageIcon("2.png")); } public void actionPerformed(ActionEvent event) { System.exit(0); } } class DeactivateAction extends AbstractAction { DeactivateAction(){ putValue(Action.NAME, "Запретить выход"); putValue(Action.SMALL_ICON, new ImageIcon("1.png")); } public void actionPerformed(ActionEvent event) { if (exitAction.isEnabled()) { exitAction.setEnabled(false); putValue(Action.NAME, "Разрешить выход"); } else { exitAction.setEnabled(true); putValue(Action.NAME, "Запретить выход"); } } } } Здесь в окне описаны два внутренних класса-действия, одно из которых — это выход из программы. Объект этого класса, exitAction, является внутренним полем класса-окна и на его основе создается пункт меню и две кнопки. Второй класс-действие активирует и деактивирует объект exitAction (при этом изменяется соответствующий действию текст). Запустите пример и пронаблюдайте за тем, как выглядят и ведут себя объекты на основе Action , а затем внимательно проанализируйте его.
Неотъемлемой частью большинства программ являются небольшие диалоговые окна: для вывода пользователю сообщения (например, сообщения об ошибке), для вопроса, ответ на который важен для выполнения текущего действия (например, просьба подтвердить или отменить запрашиваемую операцию). Эти диалоги могут быть запрограммированы вручную на основе класса JFrame . Однако ввиду того, что они являются типичными для многих программ, Swing предоставляет в распоряжение программиста несколько готовых классов для работы с ними.
Чаще всего используется класс JOptionPane , содержащий несколько статических методов, отображающих стандартные диалоги.
Метод showMessageDialog() выводит на экран диалоговое окно, информирующее пользователя. Оно содержит надпись, значок и кнопку ОК. Существует несколько разновидностей этого метода с разными наборами параметров. Самый простой из них showMessageDialog(Component component, Object content) требует указания компонента, над которым должно появиться диалоговое окно и содержимого окна. Чаще всего содержимым окна является некоторая строка, а вместо первого параметра передается null — тогда окно появляется по центру экрана. Более «продвинутый» вариант showMessageDialog(Component component, Object content, String title, int type) позволяет задать также свой заголовок окна и выбрать его тип (влияет на иконку в окне): сообщение об ошибке ( ERROR_MESSAGE ), предупреждение ( WARNING_MESSAGE ), информация ( INFORMATION_MESSAGE ).
Диалоговое окно является модальным. Это значит, что пока пользователь не нажмет в этом окне кнопку OK, программа окажется заблокирована — пользователь не сможет работать с другими окнами.
Пронаблюдаем действие метода на простом примере:

public class SimpleWindow extends JFrame { private JButton button; SimpleWindow(){ super("Предупреждающий диалог"); setDefaultCloseOperation(EXIT_ON_CLOSE); button = new JButton("Информация"); button.addActionListener(new ActionListener() { public void actionPerformed(ActionEvent event) { JOptionPane.showMessageDialog(button, "Не надо было нажимать на эту кнопку", "Информация", JOptionPane.WARNING_MESSAGE); } }); getContentPane().setLayout(new FlowLayout()); getContentPane().add(button); setSize(200,150); } } Кнопка button сделана полем класса окна, чтобы можно было получить к ней доступ из анонимного класса-слушателя.
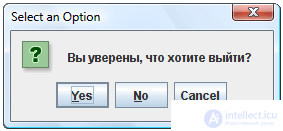 Другое часто используемое диалоговое окно — окно вопроса. В этом окне несколько кнопок, одну из которых пользователь должен нажать. В программу, вызывающую это диалоговое окно, возвращается информация о выборе пользователя, на основе которой и строится дальнейший ход работы программы.
Данное окно отображается методом showConfirmDialog(Component component, Object content) . Параметры этого метода идентичны по смыслу параметрам showMessageDialog() , но в диалоговом окне появится не одна кнопка, а три: «Yes», «No» и «Cancel». Более того, метод возвращает значение, которое можно сравнить с константами YES_OPTION , NO_OPTION и CANCEL_OPTION . Логику работы с этим методом проиллюстрирует пример:
public class SimpleWindow extends JFrame { JButton button; SimpleWindow(){ super("Предупреждающий диалог"); setDefaultCloseOperation(EXIT_ON_CLOSE); button = new JButton("Выход"); button.addActionListener(new ActionListener() { public void actionPerformed(ActionEvent event) { if (JOptionPane.showConfirmDialog(button, "Вы уверены, что хотите выйти?") == JOptionPane.YES_OPTION) System.exit(0); } }); getContentPane().setLayout(new FlowLayout()); getContentPane().add(button); setSize(200,150); } } Метод имеет еще четыре разновидности с разным набором параметров, позволяющих изменять заголовок и значок окна, а также набор кнопок.
Swing содержит готовое окно для выбора файла (полезное, например, для программирования пункта меню Файл --> Открыть). Объект класса JFileChooser создается простым конструктором без параметров, после чего может выводиться на экран методом showOpenDialog() . Этот метод возвращает результат действий пользователя по выбору файла, который сравнивается с одной из следующих констант:
APPROVE_OPTION — выбор файла прошел успешно. Теперь можно методом getFile() получить выбранный файл.
CANCEL_OPTION — пользователь отменил выбор файла, щелкнув на кнопке Cancel.
ERROR_OPTION — при выборе файла произошла ошибка, либо пользователь закрыл диалоговое окно крестиком.
Метод showSaveDialog() отображает то же самое окно, но теперь оно работает в режиме сохранения. Пользователь выбирает директорию для сохранения файла и может ввести его имя. Метод возвращает результат того же типа, что и showOpenDialog() . Если выбор пути для сохранения прошел успешно, вызов метода getFile() вернут путь, куда пользователь желает сохранить файл.
Следует иметь в виду, что сам класс JFileChooser ничего не открывает и не сохраняет. Он только возвращает путь к выбранному пользователем файлу. А открыть его или сохранить файл в заданном месте должна уже сама программа.
Метод setDialogTitle(String title) позволяет задать окну заголовок.

Comments
To leave a comment
OOP and Practical JAVA
Terms: OOP and Practical JAVA