Lecture
SSL is an industry standard and is used by millions of web sites to secure user transactions. SSL technology is supported by all major Internet browsers and operating systems, compatibility over 99%.
To create a secure SSL connection between the web server and the browser, you need a digital SSL certificate that uniquely identifies individual users and servers.
TLS (English Transport Layer Security - transport layer security), like its predecessor SSL (English Secure Sockets Layer - secure socket layer) - cryptographic protocols that provide secure data transfer between nodes on the Internet [1] . TLS and SSL use asymmetric cryptography for authentication, symmetric encryption for confidentiality , and message authentication codes to preserve message integrity.
This protocol is widely used in applications that work with the Internet, such as web browsers, e-mail, instant messaging, and IP telephony (VoIP).
The TLS protocol is based on the SSL version 3.0 specification developed by Netscape Communications [2] . Now the development of the TLS standard is the IETF. The latest protocol update was at RFC 5246 (August 2008) and RFC 6176 (March 2011).
SSL is an earlier system, TLS appeared later and it is based on the SSL 3.0 specification developed by Netscape Communications. However, the task of these protocols is the same - to provide secure data transfer between two computers on the Internet. This transmission is used for various sites, for e-mail, for messaging and a lot more for what. In principle, you can transmit any information in this way, about this below.
Secure transmission is provided through authentication and encryption of the transmitted information. In fact, these protocols, TLS and SSL, work in the same way, there are no fundamental differences. TLS can be said to be the successor to SSL, although they can be used simultaneously, even on the same server. Such support is necessary in order to provide work both with new clients (devices and browsers) and with obsolete ones that TLS do not support. The sequence of occurrence of these protocols looks like this:
SSL 1.0 - never published
SSL 2.0 - February 1995
SSL 3.0 - 1996
TLS 1.0 - January 1999
TLS 1.1 - April 2006
TLS 1.2 - August 2008
The operation principle of SSL and TLS is the same. Over the TCP / IP protocol, an encrypted channel is established, within which data is transmitted via the application protocol - HTTP, FTP, and so on. Here's how to present it graphically:
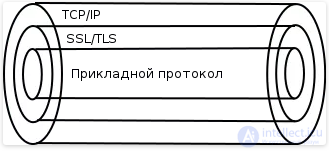
The application protocol is wrapped in TLS / SSL, and that in turn is in TCP / IP. In fact, the data on the application protocol is transmitted via TCP / IP, but it is encrypted. And only the machine that established the connections can decipher the transmitted data. For all others who receive transmitted packets, this information will be meaningless if they can not decipher it.
Connection establishment is provided in several stages:
1) The client establishes a connection to the server and requests a secure connection. This can be provided either by establishing a connection to the port that was originally designed to work with SSL / TLS, for example, 443, or by an additional request by the client to establish a secure connection after the normal connection.
2) When establishing a connection, the client provides a list of encryption algorithms that it “knows”. The server checks the list with the list of algorithms that the server itself “knows” and selects the most reliable algorithm, and then tells the client which algorithm to use.
3) The server sends its digital certificate signed by the certifying authority and the public key of the server to the client.
4) The client can contact the server of the trusted certificate authority that signed the server certificate and verify that the server certificate is valid. But can not communicate. The operating system usually already has root certificate authority certificates installed that verify the signatures of server certificates, for example, browsers.
5) A session key for a secure connection is generated. This is done as follows:
- The client generates a random digital sequence.
- The client encrypts it with the server's public key and sends the result to the server
- The server decrypts the resulting sequence using the private key
Given that the encryption algorithm is asymmetric, only the server can decipher the sequence. When using asymmetric encryption, two keys are used - private and public. The message sent by the public is encrypted, and the private one is decrypted. It is impossible to decrypt a message with a public key.
6) This establishes an encrypted connection. The data transmitted over it is encrypted and decrypted until the connection is disconnected.

The following algorithms are available in the current protocol version:
Algorithms can be supplemented depending on the version of the protocol. Prior to the latest version of the TLS 1.2 protocol, the following symmetric encryption algorithms were also available, but they were removed as unsafe: RC2, IDEA, DES.
This is the certificate of the authorization center, the signature of which confirms that the certificate that is signed is the one that belongs to the corresponding service. The certificate itself usually contains a number of information fields that contain information about the name of the server to which the certificate was issued and the validity of this certificate. If the certificate has expired, it is considered invalid.
To obtain a signed server certificate, you need to generate a signature request (CSR, Certificate Sign Request) and send this request to the authorization center, which will return the signed certificate that is installed directly on the server, just look at how to do this in practice. First, a key for encryption is generated, then a signature request, a CSR file, is generated based on this key.
The client certificate can be generated both for use in devices and for use by users. Typically, such certificates are used in two-way verification, when the client verifies that the server is really the one it claims to be, and the server does the same in response. This interaction is called two-way authentication or mutual authentication. Two-way authentication allows you to increase the level of security compared to one-way authentication, and can also serve as a substitute for authentication using a login and password.
generated by the client along with the request for a public key. The private key MUST be stored in a safe place, having it can be signed on your behalf any certificate. This certificate is not disclosed to anyone.
SSL certificates with domain verification do not contain information about the name of the company - they indicate only the domain name for which the certificate was issued. A certificate of this type can be purchased by both a legal entity and an individual.
For such a certificate is both a paid version of its receipt and free.
Among paid services is the most famous comodo
Among the free services -
|
Let's Encrypt is a non-profit certificate authority (certificate authority, CA) that issues SSL certificates for free and is designed so that most of the sites can get to work using the encrypted protocol (HTTPS).
|
Free SSL certificates - for 3 years from WoSign https://buy.wosign.com/free/
StartSSL https://www.startssl.com/
other
The certificate does not require the provision of any documents. Registration takes place within one to two business days.
Certificates with verification of the company in addition to information about the domain name also contain information about the organization. Such certificates are highly trusted by users.
Issuance of a certificate is usually carried out within 4-7 days. The certificate can be issued only to a legal entity.
Wildcard SSL certificates are designed to protect an unlimited number of subdomains with one certificate. The certificate is issued for the domain name * .domain.com and at the same time protects domain names like www.domain.com, mail.domain.com, something.domain.com, etc.
Wildcard SSL certificates exist with domain verification and organization verification. A certificate with a validated domain can also be obtained by an individual.
Extended validation certificates have the highest customer confidence. When a user is on the site with an Extended Validation SSL certificate, the browser highlights the address bar in green.
These certificates are especially recommended for use by banks and other financial organizations.
Certificates of the developer (Code Signing) are intended for signing the program code by digital signature. Widely used for signing software that is distributed via the Internet.
A self-signed certificate is a special type of certificate signed by its own subject. Technically, this type is no different from a certificate certified by the signature of the certification authority (CA), but instead of sending it to the CA, the user creates his own signature. Simply put, the creator of the certificate itself is in this case the CA. All root certificates of trusted CAs are self-signed.
Since the self-signed certificate is not certified by the certifying authority, in accordance with clause 3.3 of RFC 2459, such a certificate cannot be revoked.
Theoretically, this allows for a Man-in-The-Middle-Attack, in which an attacker can intercept the certificate of the initiator node of an encrypted connection and instead send the destination node his fake, with which the transmitted data can be decrypted
At the same time, a compromised certificate cannot be revoked in this way, since it is not certified by the CA.
To protect the server with an SSL certificate, you need to go through several steps:
1) Place an order in the system and make a payment.
2) Create a CSR request.
3) Install your SSL certificate.
There is no such extension. It is simply ordered to issue a new certificate with a new term of action. and replaces the existing settings and certificates on the server with new ones.
The certificate must be revoked if:
You can withdraw a certificate at any time. Such a requirement can be sent both by the person who submitted the application for its release and by the entity who paid for it. It is necessary to understand that a certificate revocation is not equivalent to a return of expenses.
Certificate revocation - early termination of its validity. Revoked certificates are not subject to renewal.
Certificate revocation methods:
A certificate is blocked from being temporarily terminated for the duration of this certificate, during which the certificate can be renewed. If the applicant does not renew the certificate upon expiration, it will be revoked.
Certificate locking methods:
To renew a locked certificate, you must submit a standard application to a key certification center.
To purchase an SSL certificate you will need to generate a CSR (Certificate Signing Request) on your server. CSR is a piece of cipher text containing information about the company and the domain name.
In most cases, the CSR contains the following fields: country (Country), region (State / Province), city (Locality / City), organization (Organization), department (Organizational Unit) and domain name (Common Name). Note:
1. The field "country" must contain a code of two characters corresponding to the country. For Ukraine, the code is "UA", for Russia, "RU", for other countries, see the full list of codes.
2. The fields "region" and "city" must contain full names, for example "Kievskaya Oblast", "Kiev".
3. The field "organization" is the full legal name of the company or the name of the entrepreneur, if the certificate is issued to him.
4. The field "department" is the department of the organization that deals with the purchase of a certificate, for example "IT".
5. "Domain name" - the fully qualified domain name for which the certificate is purchased, for example, "www.ssl.com".
If you generate a CSR for Wildcard SSL certificate, the domain name must be specified with "*." (for example * .ssl.com). An asterisk (*) will mean any sequence of characters that do not contain a period.
After creating a CSR, you can transfer it to us in the process of issuing a certificate.
So, in order to get an SSL certificate, the very first thing to do is to create a special request for issuing a certificate, the so-called (Certificate Signing Request). When forming this query, you will be asked a series of questions to clarify the details about your domain and your company. Upon completion, your web server will create 2 types of cryptographic keys - a private key and a public key.
The public key is not secret and is placed in the CSR request.
Here is an example of such a request:
----- BEGIN CERTIFICATE REQUEST -----
MIIC3 ...........................................
... ....
Px9x4fm + / xfgjfgjfgjLxJ + EHzQ ==
----- END CERTIFICATE REQUEST -----
The data contained in this key can be easily verified using the services of CSR Decoder.
As an example:
CSR Decoder 1 https://www.sslshopper.com/csr-decoder.html or
CSR Decoder 2. https://certlogik.com/decoder/
The second service provides more information about the CSR and checks it for validity, the Signature field in the test results.
If we insert such a request into the form to decrypt it, we will see what data is contained in the public key.
CSR Information:
Common Name: site.com - the domain name that we protect with this certificate
Organization: MyOrg - the name of the organization that owns the domain
Organization Unit: Hosting department - organizational unit
Locality: Kiev - the city where the office is located
State: Kiev - region or state
Country: UA - two-letter code, country office.
Email: support@site.com - contact email technical administrator or support service
An important point - pay attention to the Country field - the format of this field implies only a two-letter ISO 3166-1 standard, if you are not sure of the code of your country, you can check it for example here: Table ISO-3166-1. I pay attention to this field, because the most common mistake of our clients when generating a CSR request is the wrong country code. And as a result, it is impossible to issue a certificate with such a CSR.
After the CSR has been generated, you can proceed to applying for a certificate issue. During this process, the Certification Authority (CA) will validate the data you entered, and after successfully verifying, issue an SSL certificate with your data and enable you to use HTTPS. Your server will automatically associate the issued certificate with the generated private key. This means that you are ready to provide an encrypted and secure connection between your website and the client browser.
The certificate stores the following information:
Это организация, которая обладает правом выдачи цифровых сертификатов. Она производит проверку данных, содержащихся в CSR, перед выдачей сертификата. В самых простых сертификатах проверяется только соотвествие доменного имени, в самых дорогих производится целый ряд проверок самой организации, которая запрашивает сертификат. Об этом мы поговорим ниже.
Так вот, разница между самоподписными бесплатным и платными сертификатами, выданными центром сертификации как раз и заключается в том, что данные в сертификате проверены центром сертификации и при использовании такого сертификата на сайте ваш посетитель никогда не увидит огромную ошибку на весь экран.
Говоря в общем, SSL сертификаты содержат и отображают (как минимум одно из) ваше доменное имя, ваше название организации, ваш адрес, город и страницу. Также сертификат всегда имеет дату окончания и данные о центре сертификации, ответственного за выпуск сертификата. Браузер подключается к защищенному сайту, получает от него SSL сертификат и делает ряд проверок: он не просрочен ли сертификат, потом он проверяет, выпущен ли сертификат известным ему центром сертификации (CA) используется ли сертификат на сайте, для которого он был выпущен.
Если один из этих параметров не проходит проверку, браузер отображает предупреждение посетителю, чтобы уведомить, что этот сайт не использует безопастное соединение SSL. Он предлагает покинуть сайт или продолжить просмотр, но с большой осторожностью. Это последнее, что вы должны увидеть ваши потенциальные клиенты.
Центров сертификации существует достаточно много, вот перечень самых популярных:
Comodo — работает с 1998 штабквартира в Jersey City, New Jersey, США.
Geotrust — основан в 2001, в 2006 продан Verisign, штабквартира Mountain View, California, США
Symantec — бывший Verisign в состав которого входит и Geotrust. Купил всех в 2010 году.
Thawte — основан в 1995, продан Verisign в 1999.
Trustwave has been operating since 1995, headquarters in Chicago, Illinois, USA.
As you can see, the largest player in the SSL certificate market is Symantec, which owns the three largest certificate authorities - Thawte, Verisgin and Geotrust.
The main difference between different certification authorities is in the price of certificates and in how many browsers their root certificate is installed. After all, if the browser does not have a root certificate of this certificate authority, then a visitor with such a browser will still receive an error when entering the site with a certificate from such a center.
As for the above-mentioned certificate authorities, their root certificates are installed in, perhaps, 99.99% of all existing browsers.
To check which certificate certificates are installed in your browser, it is enough to find such an option in your browser settings. (In Chrome, Settings -> show advanced settings -> certificate management -> Trusted root certification authorities). Chrome has more than 50 such root certificates.
Важный момент — частенько у клиентов возникала ситуация, когда SSL сертификат на серверe установлен, но при заходе на сайт браузер все равно выдает ошибку. Такая ситуация может возникнуть или из-за отсутствия в файле ca-bundle.crt корневого сертификата центра выдавшего сертификат или из-за того, что корневой сертификат устарел. Корневые сертификаты также имеют свой срок действия (в браузерах они обновляются при обновлении браузера).
С июля 2010 года сертификационные центры перешли на использование ключей 2048bit RSA Keys, поэтому для корректной работы всех новых сертификатов необходимо устанавливать новые корневые сертификаты.
Если новые корневые сертификаты не установлены — это может вызвать проблемы с корректной установкой сертификата и распознаванием его некоторыми из браузеров.
At the end of the purchase process, you will be available SSL certificate. By itself, an SSL certificate is a text file containing encrypted information that your server can decrypt during installation.
Before you start the installation, save your certificate in a separate file and keep it in a safe place - this will give you the opportunity to easily reinstall the certificate in case of failure.
Some will also provide you with a root certificate that you will need to install.
The installation process is not complicated, but depends on the software of the server on which the certificate is installed. On the right, the menu provides installation instructions for popular web servers.
1. Copy the certificate files to your server.
2. Locate the Apache configuration file to edit.
Usually such configuration files are stored in / etc / httpd. The main configuration file is in most cases called httpd.conf. In some cases, blocks may be located at the bottom of the httpd.conf file. Sometimes you can find blocks separately under a directory, for example /etc/httpd/vhosts.d/ or / etc / httpd / sites / or in a file called ssl.conf.
If you open a file in a text editor, you must make sure that you have blocks that contain Apache settings.
3. Install the SSL blocks for configuration.
If you want the site to work with both secure and non-secure connections, you need a virtual host for each connection. Make a copy of the existing unsecured virtual host and create it for the SSL connection as described in clause 4.
4. Create blocks for connecting the SSL connection.
Below is a very simple example of a virtual host for an SSL connection. Part in bold to be added in the SSL configuration:
<192.168.0.1:443 the VirtualHost>
the DocumentRoot / var / www / HTML2
the ServerName www.yourdomain.com
SSLEngine on
SSLCertificateFile /path/to/your_domain_name.crt
SSLCertificateKeyFile / path / to / your_private .key
SSLCertificateChainFile /path/to/root.crt
Correct file names to match certificate files:
1. Copy the certificate files to the server.
Copy your certificate (your_domain_name.crt) and root certificate (root.crt), together with the .key file that you generated when creating the CSR request to the directory on your server where you are going to install the certificate. For security, save files marked read-only.
2. Connect the certificate with the root certificate.
You need to connect the certificate file with the root certificate file into a single .pem file by running the following command:
cat root.crt >> your_domain_name.crt
3. Edit the Nginx virtual host file.
Open your Nginx virtual host file for the site you are protecting. If you need a website to work with both a secure connection (https) and an unsecured (http), you need a server module for each type of connection. Make a copy of the existing server module for an unsecured connection and paste below the original. After that, add the lines shown in bold below:
server {
listen 443;
ssl on;
ssl_certificate /etc/ssl/your_domain_name.crt; (or .pem)
ssl_certificate_key /etc/ssl/your_domain_name.key;
server_name your.domain.com;
access_log /var/log/nginx/nginx.vhost.access.log;
error_log /var/log/nginx/nginx.vhost.error.log;
location / {
root /home/www/public_html/your.domain.com/public/;
index index.html;
}
}
Setting file names:
  Creating a client private key and certificate request (CSR).

    To create a signed client certificate in advance
    It is necessary to create a certificate request for its subsequent signature.
    The command arguments are completely analogous to those used in
    creating a self-signed trusted certificate (see $ 1), but
    missing the -x509 option.

          # openssl req -new -newkey rsa: 1024 -nodes -keyout client01.key \
          -subj /C=RU/ST=Msk/L=Msk/O=Inc/OU=Web/CN=usr/emailAddress=usr@dm.ru \
          -out client01.csr


    As a result of the command, two client01.key files will appear and
    client01.csr.  View the private key and request information
    Certificate (CSR) you can use the commands:

          # openssl rsa -noout -text -in client01.key (for the key)
          # openssl req -noout -text -in client01.csr (for query)


 Signed a certificate request (CSR) using a trusted certificate (CA).

    When signing a request, the parameters specified in the ca.config file are used.

          # openssl ca -config ca.config -in client01.csr -out client01.crt -batch


    Argument Description:

    ca
           Sign the request using the CA.

    -config ca.config
           Use the ca.config configuration file.

    -in client01.csr
           The CSR is in the client01.csr file

    -out client01.crt
           Save certificate to client01.crt file

    -batch
           Do not ask for confirmation of the signature.

    As a result of the command, the client certificate file will appear.
    client01.crt.  You can view the certificate data using
    commands:

          # openssl x509 -noout -text -in client01.crt


 Preparation of data for transfer to the client.

    To transfer received files as a result of previous operations
    client, usually using a file in the format PKCS # 12.  In this file
    All information necessary for the client is packed and protected with a password.
    to install the certificate in the browser.

          # openssl pkcs12 -export -in client01.crt -inkey client01.key \
          -certfile ca.crt -out client01.p12 -passout pass: q1w2e3


    Argument Description:

    pkcs12
           Work with files of format PKCS # 12.

    -export
           Export data to file.

    -in client01.crt
           Client certificate file.

    -inkey client01.key
           Private key file

    -certfile ca.crt
           Trusted certificate file.

    -out client01.p12
           Save data to client01.p12 file.

    -passout pass: q1w2e3
           Set a password q1w2e3 on the file (the password can be any, in
           including empty)

    This completes the process of creating a client certificate.  Now to you
    It is necessary to transfer the client01.p12 file and the password to it to any client.
    convenient safe way and instruct him about
    the procedure for installing the certificate in the browser.
Create files cert.key and cert.crt, which will store the secret key and the public certificate based on it. The certificate will be valid for X days; (the key with the -nodes option will be unencrypted).
openssl req -x509 -nodes -days X -newkey rsa: 2048 -keyout cert.key -out cert.crt
X should be replaced with the required number of days. After calling the team will need to answer questions about the owner, etc. The question “Common Name” must be answered with the domain name for which you plan to use this certificate. As a result of the command, you will have 2 files: cert.key (with the server's secret key) and cert.crt (with the public key), which can already be used in the server configs.
For example (certificate files are pre-installed in the / etc / ssl / directory):
Nginx
  server {
        listen 443;
        server_name site.ru;

        ssl on;
        ssl_certificate /etc/ssl/cert.crt;
        ssl_certificate_key /etc/ssl/cert.key;

        location / {
            root /var/www/site.ru;
        }
 }
Apache
  NameVirtualHost *: 443

         ServerName site.ru
         ServerAdmin admin@site.ru

         SSLEngine on
         SSLCertificateKeyFile /etc/ssl/cert.key
         SSLCertificateFile /etc/ssl/cert.crt
         DocumentRoot /var/www/site.ru/

                 Options -Indexes FollowSymLinks -MultiViews
                 AllowOverride All


                 Options -Indexes FollowSymLinks -MultiViews
                 AllowOverride All
                 Order deny, allow
                 allow from all

     DirectoryIndex index.htm index.php
You can automate the input of answers using the -subj option:
  openssl req \
   -x509 -nodes -days 365 \
   '' '-subj' /C=RU/..../CN= domain_name '\' ''
   -newkey rsa: 2048 -keyout cert.key -out cert.crt
  When creating a connection, for example, with the Push message service
  an error occurs
  OpenSSL Error messages: error: 14094416: SSL routines: SSL3_READ_BYTES: sslv3 alert certificate unknown

  Reason- or certificate voosche wrong or expired

Comments
To leave a comment
Running server side scripts using PHP as an example (LAMP)
Terms: Running server side scripts using PHP as an example (LAMP)